How to set up IIS to send emails using Office 365
Sometimes organizations need to set up a multifunction device or application to send email through Office 365 and they discover that the device or application can’t connect directly to Office 365. In these cases, they can to set up Internet Information Services (IIS) to work as an intermediary.
Office 365 customers might want to do this in the following scenarios:
- The on-premises messaging system no longer exists
- The on-premise hardware devices (e.g. scanner, printer, multi-functional printer, etc.) do not support TLS 1.2. (https://support.microsoft.com/en-us/help/4057306/preparing-for-tls-1-2-in-office-365)
- The on-premise Line-Of-Business applications (LOB) (e.g. Your resource management, Ticket/order processing, in-house developed applications, other 3rd party applications, etc.) must send email messages to remote domains and to Exchange Online mailboxes
- To secure and restrict applications and devices that can relay emails through Office 365
- The LOB application or the hardware device does not store any SMTP log needed in compliance or troubleshooting scenarios
When implementing this solution, customers must keep in mind that under no circumstances does Office 365 allows any form of unsolicited marketing/BULK/SPAM emails to be sent from the service. Therefore, we discourage the delivery of unsolicited bulk messages though Office 365 and advise our Customers who need to send legitimate bulk commercial email (for example, customer newsletters) to use third-party providers that specialize in these services.
In this article my colleague Alexandru Liviu Nita and I will try to provide guidance on how to choose, deploy and troubleshoot different Relay solutions that can be used with Office 365.
Which solution should you choose
Office 365 currently supports several methods of SMTP Relay and this article will try to help you choose and implement the appropriate one:
- Client SMTP Submission: You configure a user, device, or internal line-of-business (LOB) application to send mails as a single SMTP address for a domain you own to Office 365 & Internet recipients
- Direct Send: You configure a user, device, or line-of-business (LOB) application to directly send emails to Office 365 recipients
- SMTP Relay: You configure a user, device, or line-of-business (LOB) application to send email as multiple senders who may not have Office 365 mailboxes to Office 365 & Internet recipients
| SMTP Client Submission | Direct Send | SMTP Relay | |
| Features | |||
| Send to recipients in your domain(s) | Yes | Yes | Yes |
| Relay to Internet via Office 365 | Yes | No. Direct delivery only. | Yes |
| Bypasses antispam | Yes, if the mail is destined for an Office 365 mailbox. | No. Suspicious emails might be filtered. We recommend a custom Sender Policy Framework (SPF) record. | No. Suspicious emails might be filtered. We recommend a custom SPF record. |
| Supports mail sent from applications hosted by a third party | Yes | No | No |
| Requirements | |||
| Open network port | Port 587 or port 25 | Port 25 | Port 25 |
| Office 365 connector required | No | No | Yes |
| TLS Support | Required | Recommended | Recommended |
| Requires authentication | Office 365 user name and password required | None | Requires unshared static public IP addresses (unless a certificate is used). |
| Limitations | |||
| Throttling limits | 10,000 recipients per day. 30 messages per minute. | Standard throttling is in place to protect Office 365. | Reasonable limits are imposed. The service can't be used to send spam or bulk mail. For more information about reasonable limits, see High-risk delivery pool for outbound messages. |
Which changes you need to implement
SMTP Client Submission
This is the recommended method for sending emails through Office 365.
In this implementation, the device or application uses an Exchange Online account to send email to (Office 365 and Internet) recipients just like an email client.
The sending address must also be either an Exchange Online-licensed user in Office 365 or an alternative email address of an Exchange Online-licensed user. For example, if the address that is used for sending from is printer@tailspintoys.com and the account that is used to relay through is myapps@yourdomain.com (an Office 365 user), then printer@tailspintoys.com must be an alternate email address to myapps@yourdomain.com.
Starting June 1st 2018, the following changes will begin rolling out for SMTP Authenticated Submission protocol:
1. Sent email will now be stored in the Sent Items folder of the mailbox.
2. Only three concurrent connections to our service per mailbox will be allowed. Additional connections will be rejected with the error: 4.3.2 STOREDRV.ClientSubmit; sender thread limit exceeded.
If the sending email address doesn't match the login credentials, then 'Send As' permissions are required. Using a single mailbox with Send As permissions for all your users is not supported because of complexity and potential issues.
Configuration Changes Required
On-premise
1. Install IIS SMTP server
2. Configure the outbound connection
3. Configure IIS authentication
4. Configure IIS relay restrictions
5. Configure Delivery Settings
Cloud
No configuration needed (if an existing cloud user is used for authentication)
DNS
No configuration needed
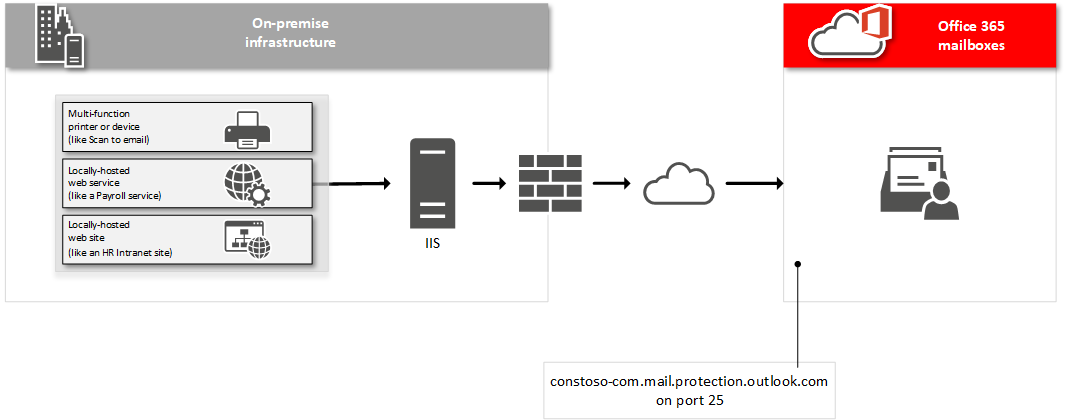
Direct Send
This is the simplest method to set up as there is no Office 365 configuration needed.
Use this implementation if the device or application is only sending emails to your own Office 365 users and SMTP Client Submission is not an option.
Direct Send allows each user in the organization to send emails using their own address. So if you want your device or application to send messages from each user’s email address and do not want multiple user credentials to be configured, Direct Sent should be used.
Use Direct Send if your device or application does not meet the requirements of SMTP Client Submission, such as TLS support.
Office 365 does not allow you to send bulk email or newsletters via SMTP Client Submission. Direct Send allows you to send a higher volume of messages. However, there is a risk of your email being marked as spam by Office 365. You might want to enlist the help of a bulk email provider to assist you. There are best practices for bulk email, and bulk email providers can help ensure that your domains and IP addresses are not blocked by others on the Internet.
Make sure the Outbound Public IP is not listed on SpamHaus or Microsoft Internal lists. In case the IP is listed, delist the IP first or use SMTP Client Submission.
Configuration Changes Required
On-premise
1. Install IIS SMTP server
2. Define a remote domain in IIS
3. Configure the domain to allow relay
4. Configure the outbound connection
5. Configure IIS authentication
6. Configure IIS relay restrictions
Cloud
No configuration needed
DNS
The on-premise IP should to be added to the SPF (ex. v=spf1 ip4:10.5.3.2 include:spf.protection.outlook.com –all)
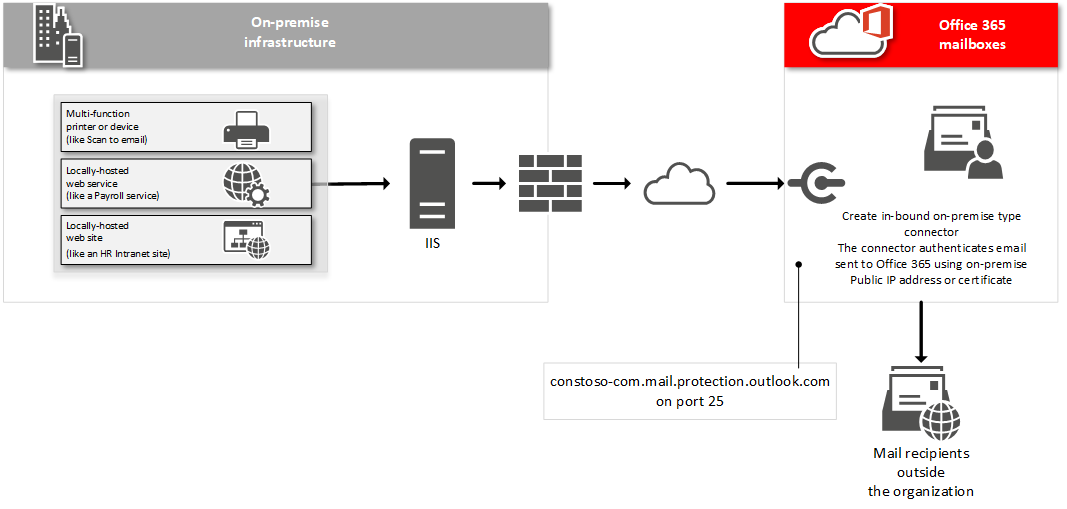
SMTP Relay
SMTP Relay is very similar to Direct Send except that it can be used to send emails also to external recipients
SMTP Relay can’t be used to send email directly to Office 365 from a third-party hosted service, such as Microsoft Azure.
Use this implementation if the device or application will send emails both to internal users and external recipients and SMTP Client Submission is not an option.
You want your device or application to send from each user’s email address and do not want multiple user credentials to be configured. SMTP Relay allow each user in the organization to send email using their own address.
Use SMTP Relay if your device or application does not meet the requirements of SMTP Client Submission, such as TLS support.
Office 365 does not allow you to send bulk email or newsletters via SMTP client submission. SMTP Relay allows you to send a higher volume of messages. However, there is a risk of your email being marked as spam by Office 365. You might want to enlist the help of a bulk email provider to assist you. There are best practices for bulk email, and bulk email providers can help ensure that your domains and IP addresses are not blocked by others on the Internet.
Make sure the Outbound Public IP is not listed on SpamHaus or Microsoft Internal lists. In case the IP is listed, delist the IP first or use SMTP Client Submission.
In case SMTP Relay is configured to use a certificate to send emails through Office 365, the Common-Name (CN) or Subject Alternate Name (SAN) in the certificate should contain a domain name that was registered in Office 365.
Configuration Changes Required
On-premise
1. Install IIS SMTP server
2. Configure IIS to allow relay
3. Configure the outbound connection
4. Configure IIS authentication
5. Configure IIS relay restrictions
Cloud
Create an Inbound On-Premise Type Connector in Exchange Admin Center to authenticate the mail sent from the device or application(https://technet.microsoft.com/en-us/library/dn751020(v=exchg.150).aspx\#Anchor\_5)
DNS
The on-premise IP should to be added to the SPF record (ex. v=spf1 ip4:10.5.3.2 include:spf.protection.outlook.com –all)
Which IIS settings you need to configure
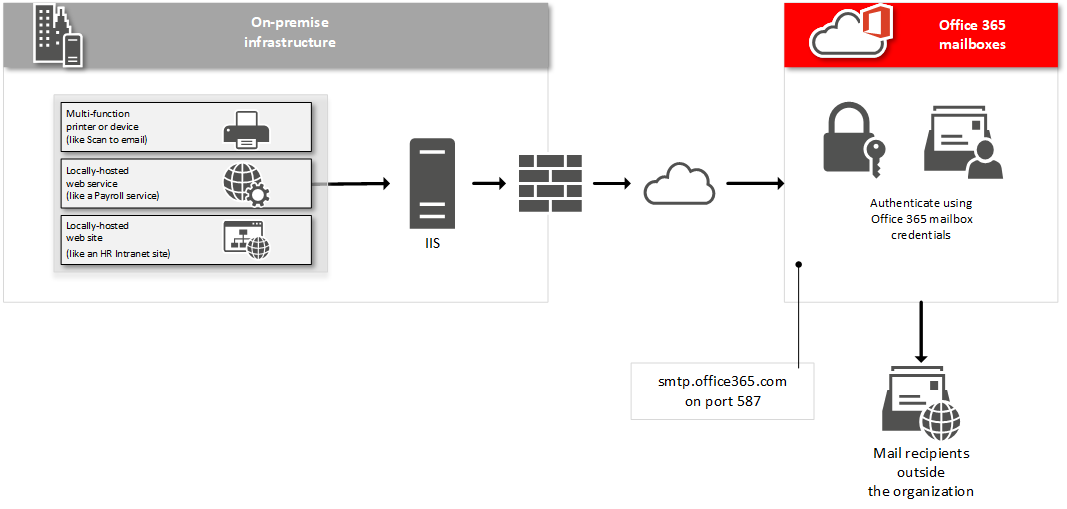
SMTP Client Submission
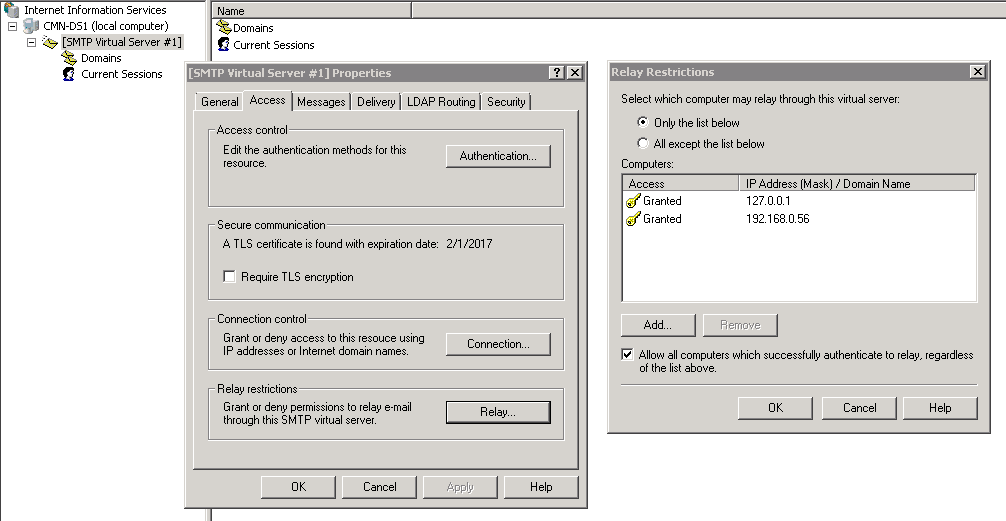
Relay Restrictions
- Open IIS 6.0 Manager, right click Default SMTP Virtual Server, and then click Properties.
- Click the Access tab, and then click Relay.
- In the Select which computers may relay through this virtual server area, click Only the list below, and then enter the IP addresses of the on-premises LOB devices and application servers that will relay through the SMTP server
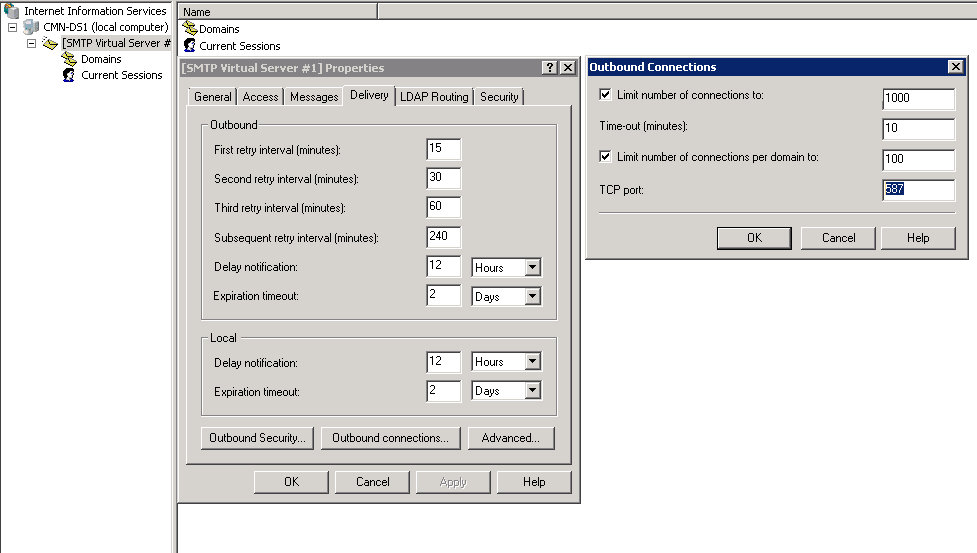
Change Outbound Port
- Click Properties of the SMTP Virtual Server
- On the Access tab, click Delivery tab, and Outbound Connections
- Change TCP port from 25 to 587
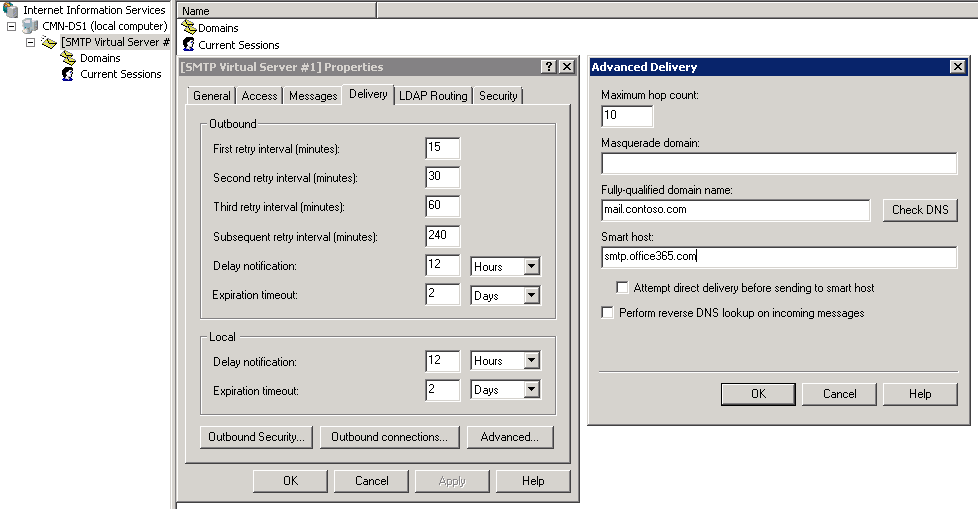
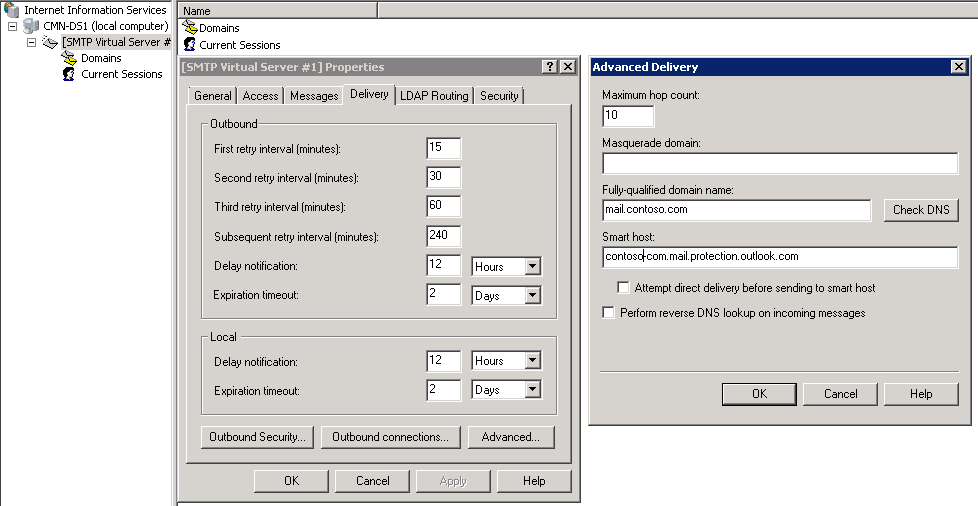
Configure Smart Host
- Click the Delivery tab, click Advanced
- Under Smart host, enter the fully qualified domain name (FQDN) of the SMTP server of the on-line Exchange mailbox (smtp.office365.com).
Configure Recipient Domain Options
1. Configure IIS with SCS (for all domains)
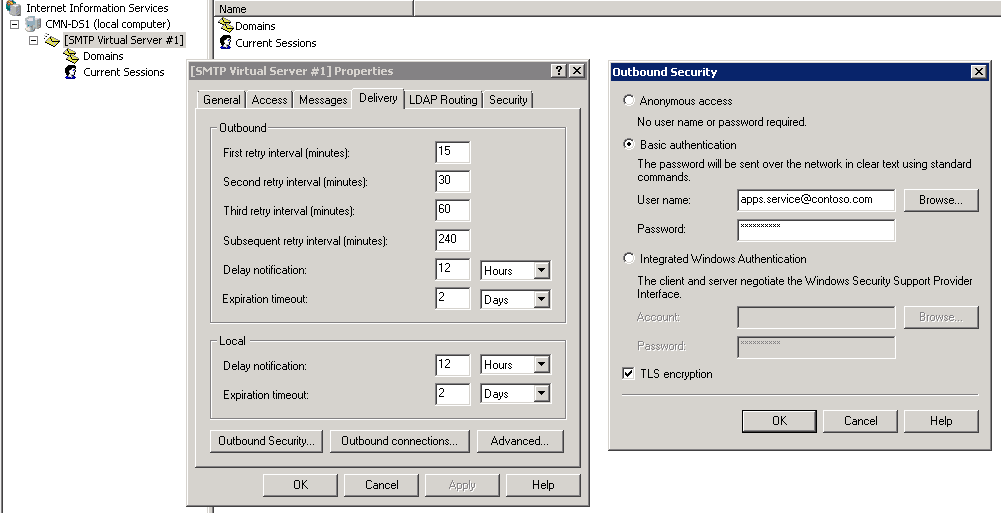
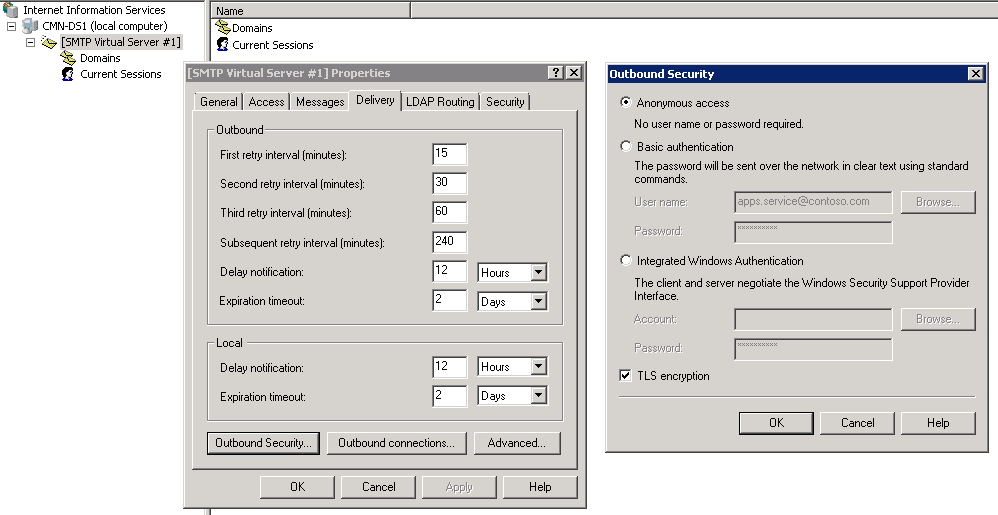
- On the Delivery tab, click Outbound Security
- Select Basic Authentication.
- In the User name and password boxes enter an Office 365 account (and it’s password)
- Select the TLS encryption check box, and then click OK.
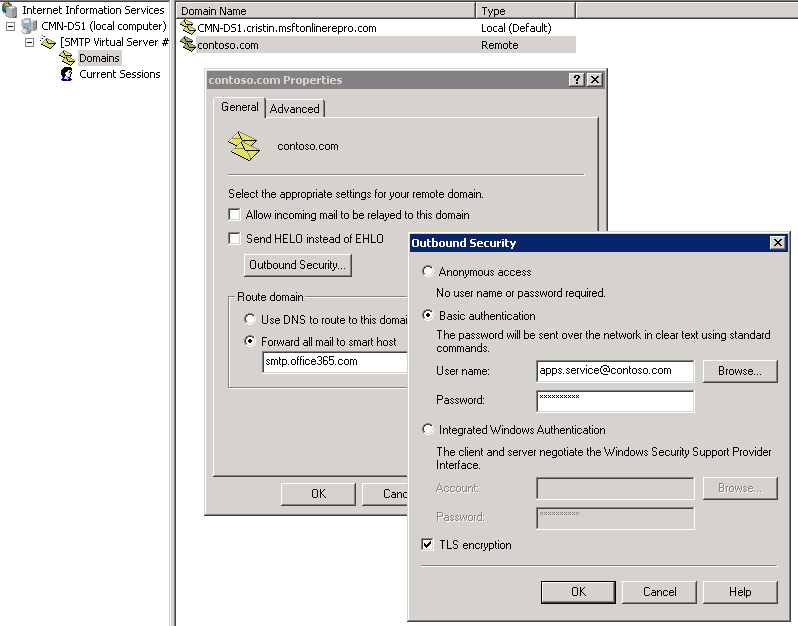
2. Configure IIS with SCS (for one domain)
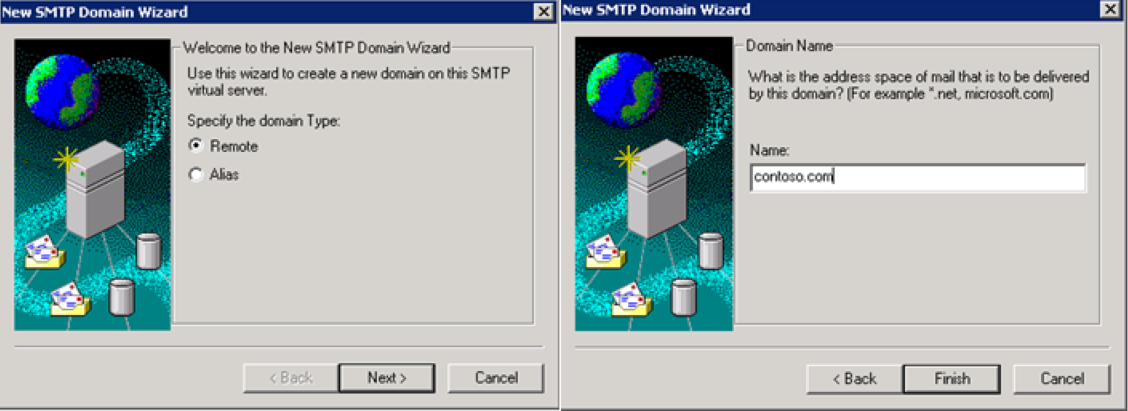
- Define a remote domain in IIS:
- In IIS Manager, expand Default SMTP Virtual Server, Domains.
- Right-click Domains, click New, click Domain, and then click Remote.
- In the Name box, type the name of your domain. For example, type yourdomain.com. Then, click Finish
- Set the routing settings for yourdomain.com
- Set the routing settings for yourdomain.com
- In IIS Manager, expand Default SMTP Virtual Server, Domains.
- Click Domains, right-click yourdomain.com, and then click Properties.
- Check Allow incoming mail to be relayed to this domain.
- Set smtp.office365.com as the smart host.
- Open Outbound Security and enter an Exchange Online account credentials.
- Check TLS encryption.
SMTP Relay/Direct Send
Configure IIS for relaying
- Click the Delivery tab, click Advanced
- Under Smart host, enter the SMTP end-point for the tenant domain. This will be the MX endpoint for the Office 365 tenant. (i.e Yourdomain-com.mail.protection.outlook.com)
Configure Relay Restrictions
- Open IIS 6.0 Manager, right click Default SMTP Virtual Server, and then click Properties.
- Click the Access tab, and then click Relay.
- In the Select which computers may relay through this virtual server area, click Only the list below, and then enter the IP addresses of the on-premises LOB devices and application servers that will relay through the SMTP server

Configure Outbound Security
- On the Delivery tab, click Outbound Security
- Select Anonymous.
- Select the TLS encryption check box, and then click OK.
Troubleshoot SMTP Client Submission
- Test the user name and password by logging on to Outlook Web App (OWA), and try to send a test email to make sure the account is not blocked
In case “550 5.1.8 Bad outbound sender” error is received, delist the user form the Action Center (https://technet.microsoft.com/en-gb/library/dn458545(v=exchg.150).aspx)
- Check TCP Configuration (IP, DNS Server and Gateway) on the IIS Server.
- Test Office 365 connectivity from the IIS Server:
- Enable the Telnet Client tool on the IIS Server. (https://social.technet.microsoft.com/wiki/contents/articles/22715.how-to-enable-telnet-in-windows-server-2012.aspx)
- Run the tool from the command line by typing telnet
- Type open smtp.office365.com 587 (or substitute 25 for 587 if that port is instead used).
- If you connected successfully to an Office 365 server, expect to receive a response line similar to this: 220 DB3PR08CA0008.outlook.office365.com Microsoft ESMTP MAIL Service ready at Mon, 18 Apr 2016 06:22:08 +0000
- If the connection is not successful, then the network firewall or Internet Service Provider (ISP) may block port 587 or 25. Correct this to be able send email from IIS
- If the response does not contain ‘outlook.office365.com Microsoft ESMTP MAIL Service’ check firewall configuration
- Type ehlo yourdomain.com and then starttls and check for the following response 220 2.0.0 SMTP server ready
- Use PowerShell to send an email:
- Open PowerShell and run $PSVersionTable
- Make sure PSVersion is at least 3.0
- Run the following command and enter the User and the Password used by the IIS: $O365Sender = Get-Credential
- Run the following command to add a recipient: $O365Recipient = Read-Host 'Please type the Email address of the recipient‘
- Depending of the port use run the right command to send an email:
$d=date; Send-mailmessage -to $O365Recipient -from $O365Sender.UserName -smtpserver smtp.office365.com -subject "SMTP - Client submission - 25" -body "This is the body of test message. The message was sent on: $d " -Credential $O365Sender -UseSsl -BodyAsHtml -port 25; write-host "Sending Message...
$d=date; Send-mailmessage -to $O365Recipient -from $O365Sender.UserName -smtpserver smtp.office365.com -subject "SMTP - Client submission - 587" -body "This is the body of test message. The message was sent on: $d " -Credential $O365Sender -UseSsl -BodyAsHtml -port 587; write-host "Sending Message..."
If you want to test with your own content you can use the following commands:
$Path=[Environment]::GetFolderPath("Desktop")
$BodyFile = "$Path\content.htm"
$File = Get-Content $BodyFile -Encoding UTF8
$Body = $File | Out-String
$d=date; Send-mailmessage -to $O365Recipient -from $O365Sender.UserName -smtpserver smtp.office365.com -subject "SMTP - Client submission - 587" -body $([string] $body) -Credential $O365Sender -UseSsl -BodyAsHtml -port 587; write-host "Sending Message..."
Troubleshoot Direct Send
- Emails send from the device are marked as junk by Office 365
- Make sure the IP is added to the SPF record
- Check if empty messages are also marked as spam
- Emails are not sent to recipients who are not in the same organization
- By design. Use SMTP Relay instead
- Test Office 365 connectivity from the network:
- Determine the MX endpoint for the Office 365 tenant, which ends with "mail.protection.outlook.com." (https://support.office.com/en-us/article/Gather-the-information-you-need-to-create-Office-365-DNS-records-77F90D4A-DC7F-4F09-8972-C1B03EA85A67\#ID0EAADAAA=Step\_2)
- Enable the Telnet Client tool on the IIS Server. (https://social.technet.microsoft.com/wiki/contents/articles/22715.how-to-enable-telnet-in-windows-server-2012.aspx)
- Run the tool from the command line by typing telnet
- Type open yourdomain-com.mail.protection.outlook.com 25 (where yourdomain-com.mail.protection.outlook.com is the MX endpoint determined at the first step)
- If you connected successfully to an Office 365 server, expect to receive a response line similar to this: 220 BN1BFFO11FD038.mail.protection.outlook.com Microsoft ESMTP MAIL Service ready at Mon, 18 Apr 2016 07:36:51 +0000
- If the connection is not successful, then the network firewall or Internet Service Provider (ISP) may block port 25. Correct this to be able send email from IIS Server
- If the response does not contain ‘mail.protection.outlook.com Microsoft ESMTP MAIL Service’ check firewall configuration
- Type the following command: EHLO yourdomain.com, and then press Enter. You should receive the following response:
250-DB3FFO11FD036.mail.protection.outlook.com Hello [IP address]
250-SIZE 157286400
250-PIPELINING
250-DSN
250-ENHANCEDSTATUSCODES
250-STARTTLS
250-8BITMIME
250-BINARYMIME
250 CHUNKING
-
- Type the following command using the correct sender address: mail from: sender@yourdomain.com, and then press Enter. You should receive the following response: 250 2.1.0 Sender OK
- Type the following command using the correct recipient address: rcpt to: recipient@yourdomain.com, and then press Enter. You should receive the following response: 250 2.1.5 Recipient OK
- In case the following error is generated " 5.7.1 Service unavailable, Client host [IP address] blocked using Spamhaus. To request removal from this list see https://www.spamhaus.org/lookup.lasso (AS16012612) ", you need to delist the IP address.
- In case either of the following errors are generated:
-
- 550 5.7.1 Service unavailable; Client host [IP address] blocked using FBLW15; To request removal from this list please forward this message to delist@messaging.microsoft.com
- 550 5.7.606-649 Access denied, banned sending IP [IP address]; To request removal from this list please visit https://sender.office.com/ and follow the directions. For more information please go to https://go.microsoft.com/fwlink/?LinkID=526653.
- You will need to delist the IP address from : https://sender.office.com
-
- In case the following error is generated “550 5.7.64 TenantAttribution; Relay Access Denied” make sure that the recipient is the same organization.
- Type the following command: DATA, and then press Enter. You should receive the following response: 354 Start mail input; end with <CRLF>.<CRLF>
- Type the following command: Subject: Telnet test message and Press Enter two times
- Type a period ( . ) at the next blank line, and then press Enter. You should receive the following response: 250 OK.
- Confirm with the recipient that the email was received.
If you want to test with your own content you can use the following PowerShell commands:
$Path=[Environment]::GetFolderPath("Desktop")
$BodyFile = "$Path\content.htm"
$File = Get-Content $BodyFile -Encoding UTF8
$Body = $File | Out-String
$O365Sender = Read-Host 'Please type the Email address of the sender‘
$O365Recipient = Read-Host 'Please type the Email address of the recipient‘
$d=date; Send-mailmessage -to $O365Recipient -from $O365Sender -smtpserver yourdomain-com.mail.protection.outlook.com -subject "SMTP - Direct Send - 25" -body $([string] $body) -BodyAsHtml -port 25;write-host "Current date is $d; Sending Message..."
Troubleshoot SMTP Relay
- Emails send from the device are marked as junk by Office 365
- Make sure the IP is added to the SPF record
- Test Office 365 connectivity from the network:
- Determine the MX endpoint for the Office 365 tenant, which ends with "mail.protection.outlook.com." (https://support.office.com/en-us/article/Gather-the-information-you-need-to-create-Office-365-DNS-records-77F90D4A-DC7F-4F09-8972-C1B03EA85A67\#ID0EAADAAA=Step\_2)
- Enable the Telnet Client tool on the IIS Server. (https://social.technet.microsoft.com/wiki/contents/articles/22715.how-to-enable-telnet-in-windows-server-2012.aspx)
- Run the tool from the command line by typing telnet
- Type open yourdomain-com.mail.protection.outlook.com 25 (where yourdomain-com.mail.protection.outlook.com is the MX endpoint determined at the first step)
- If you connected successfully to an Office 365 server, expect to receive a response line similar to this: 220 BN1BFFO11FD038.mail.protection.outlook.com Microsoft ESMTP MAIL Service ready at Mon, 18 Apr 2016 07:36:51 +0000
- If the connection is not successful, then the network firewall or Internet Service Provider (ISP) might have blocked port 25. Correct this to be able send email from your organization
- If the response does not contain ‘mail.protection.outlook.com Microsoft ESMTP MAIL Service’ check firewall configuration
- Type the following command: EHLO yourdomain.com, and then press Enter. You should receive the following response:
250-DB3FFO11FD036.mail.protection.outlook.com Hello [IP address]
250-SIZE 157286400
250-PIPELINING
250-DSN
250-ENHANCEDSTATUSCODES
250-STARTTLS
250-8BITMIME
250-BINARYMIME
250 CHUNKING
-
- Type the following command using the correct sender address: mail from: sender@yourdomain.com, and then press Enter. You should receive the following response: 250 2.1.0 Sender OK
- Type the following command using the correct recipient address: rcpt to: recipient@yourdomain.com, and then press Enter. You should receive the following response: 250 2.1.5 Recipient OK
- In case the following error is generated " 5.7.1 Service unavailable, Client host [IP address] blocked using Spamhaus. To request removal from this list see https://www.spamhaus.org/lookup.lasso (AS16012612) ", you need to delist the IP address.
- In case either of the following errors are generated:
- 550 5.7.1 Service unavailable; Client host [IP address] blocked using FBLW15; To request removal from this list please forward this message to delist@messaging.microsoft.com
- 550 5.7.606-649 Access denied, banned sending IP [IP address]; To request removal from this list please visit https://sender.office.com/ and follow the directions. For more information please go to https://go.microsoft.com/fwlink/?LinkID=526653.
- You will need to delist the IP address from : https://sender.office.com
- In case the following error is generated “550 5.7.64 TenantAttribution; Relay Access Denied” make sure that the cloud connector has the correct IP(If an IP scoped connector is used). The IP can be seen in the output: “250-DB3FFO11FD036.mail.protection.outlook.com Hello [IP address]
- Type the following command: DATA, and then press Enter. You should receive the following response: 354 Start mail input; end with <CRLF>.<CRLF>
- Type the following command: Subject: Telnet test message and Press Enter two times.
- Type a period ( . ) at the next blank line, and then press Enter. You should receive the following response: 250 OK.
- Check with the recipient if the email was received.
If you want to test with your own content you can use the following PowerShell commands:
$Path=[Environment]::GetFolderPath("Desktop")
$BodyFile = "$Path\content.htm"
$File = Get-Content $BodyFile -Encoding UTF8
$Body = $File | Out-String
$O365Sender = Read-Host 'Please type the Email address of the sender‘
$O365Recipient = Read-Host 'Please type the Email address of the recipient‘
$d=date; Send-mailmessage -to $O365Recipient -from $O365Sender -smtpserver yourdomain-com.mail.protection.outlook.com -subject "SMTP - SMTP Relay- 25" -body $([string] $body) -BodyAsHtml -port 25;write-host "Current date is $d; Sending Message..."
IIS Specific Troubleshooting
- Make sure that IIS uses the correct certificate (in case the inbound connector uses certificate)
- Confirm that only the certificate to be used by the SMTP server is in the Local_Machine\Personal certificates repository. Additional certificates can be added later.
- Confirm that the fully qualified domain name (FQDN) that’s configured under the SMTP Virtual Server properties matches the certificate's subject name.
- Configure the FQDN of the SMTP Virtual Server. Confirm that the certificate is found by the SMTP service. To do this, follow these steps:
- Locate SMTP Virtual Server Properties.
- On the Delivery tab, click Advanced, and then type the FQDN in the Fully-qualified domain name box.
- Restart the SMTP service
- Confirm that the certificate is found by the SMTP service. To do this, follow these steps:
- Locate SMTP Virtual Server Properties.
- On the Access tab, the Secure communications section should display the following: A TLS certificate is found with expiration date: day/month/year.
- Compare the shown date with the actual certificate expiration date.
- Enable SMTP Logs:
- Internet Information Service (IIS) Manager. Right click "Default SMTP Virtual Server" and choose "Properties". Check "Enable logging“
- Click "Properties ... " to check all options.
- On the IIS server run a telnet test (telnet localhost 25)
- Test outbound mail flow with a file in the Pickup folder
- Create the file using a text editor such as Microsoft Notepad, and then type the message information into the file. Example:
from:testuser@internaldomain.com
to:tbill@externaldomainname.com
subject:This is a test.
this is a test. - Save the file without an extension to c:\Inetpub\mailroot\Pickup\ do so in Notepad, insert quotation marks (" ") around the file name, and then save the file. When the file name includes quotation marks, Notepad saves the document as a .txt file by default. The name of the file is irrelevant, you can name the file to suit your needs.
- If the configuration of the SMTP service is correct, the message is delivered to the e-mail address in the "to" line in the .txt file. If the file is stuck in the Queue folder or present in the Badmail folder, there is a problem with the SMTP service configuration.
- Check c:\Inetpub\mailroot\Badmail
- Emails that could not be delivered to the intended recipient are left in the Badmail folder
- Common causes of messages ending up in the Badmail folder are incorrect or invalid email addresses and DNS issues
- Open the .bad file for more details
- Check SMTP Logs
- Check the SMTP log files at C:\WINDOWS\system32\LogFiles\SMTPSVC1
- Check for any error on email submission.
- Create the file using a text editor such as Microsoft Notepad, and then type the message information into the file. Example:
- This is a simple set of PowerShell commands that may help you, as it will export the IIS logs to a csv file:
$ts = Get-Date -Format yyyyMMdd_hhmmss;
$Path=[Environment]::GetFolderPath("Desktop")
$StartDate = [DateTime]::Today.AddDays(-1)
$EndDate = [DateTime]::now
$IISLogsFolder = "C:\Windows\System32\LogFiles\SMTPSVC1"
$IISFiles = Get-ChildItem $IISLogsFolder\*.log |Where-Object {($_.CreationTime -gt $StartDate) -and ($_.CreationTime -lt $EndDate)}
$IISLogsT1 = Get-Content $IISFiles
$IISLogsT2 =$IISLogsT1 | where {$_ -notLike "#[D,S-V]*" }
$IISLogsT2[0] = $IISLogsT2[0] -Replace '#Fields: ', ''
$IISLogs = $IISLogsT2 | where {$_ -notLike "#[F]*" }
$IISLogsOut = $IISLogs | Where {($_ -like "*OutboundConnection*") -or ($_ -like "*computer*")}
$IISLogs | ConvertFrom-Csv -Delimiter ' ' |Export-Csv $Path\$ts.IISLogs.csv -NoTypeInformation
$IISLogsOut | ConvertFrom-Csv -Delimiter ' ' |Export-Csv $Path\$ts.IISLogs_OutboundConnections.csv -NoTypeInformation