Basic troubleshooting of Outlook connectivity in Office 365, from the network perspective
When dealing with Outlook and Exchange Online troubleshooting it is a must that we do not exclude the internal network as a root cause.
Of course, this in case all the other troubleshooting steps were excluded.
To have a clean and valid network troubleshooting first we need to know all the network components along the way, like NIC, Router, Load Balancer, Proxy, Firewall, etc.
Basically the network path from the Outlook client to Office 365 and back.
The most common issues when dealing with Outlook are:
1. Unable to create a profile
2. Connectivity issues
3. Password prompts
4. Low performance
Before continuing I would like to point that if you are in a Windows Terminal Server scenario, all the below steps must be done on the affected Windows Terminal Server.
The affected user will need to initiate a basic RDP session to the affected Terminal Server
I will present this investigation the troubleshooting using Command Prompt (CMD) first and then with Network Monitor (Netmon)
Using CMD
From an elevated command prompt window, on the affected machine, please run the following commands to verify that the connectivity to Office 365 is unrestricted:
ping outlook.office365.com
- If the output shows failures, then there are network connectivity issues between the affected machine and Office 365.
- Only replies from Office 365 IPs should be seen, in any environment Hybrid or Cloud.
- It is important that the nearest Office 365 endpoint to respond to ping. Please review this article for more details.
ping autodiscover.contoso.com
- Verify from the output which IP address / host name / server is responding.
- If there are any DNS redirects, verify to which IP.
- If Autodiscover is pointing to on premise Exchange, should be seen replies from your local IP / Public IP
- If Autodiscover is pointing to Office 365, you should see replies from the nearest Office 365 endpoint.
Example:
Pinging autodiscover-emeaeast.outlook.com [132.245.229.136] with 32 bytes of data:
Reply from 132.245.229.136: bytes=32 time=63ms TTL=238
Reply from 132.245.229.136: bytes=32 time=60ms TTL=238
ping autodiscover
- If the output shows success, then there is a reminiscence from an old Exchange environment inside the AD. They need to be cleared out before continuing.
tracert outlook.office365.com
A traceroute displays the path that a packet took as it traveled around the Internet from the router the client is connected to the router where the endpoint is connected. If there is a connection problem or latency connecting to a site, it will show up in these times. You will be able to identify which of the stops (also called 'hops') along the route is the culprit.
The purpose is to see if the network path to the Office 365 endpoint is the best and has the accepted latency.
Example of Tracert analysis 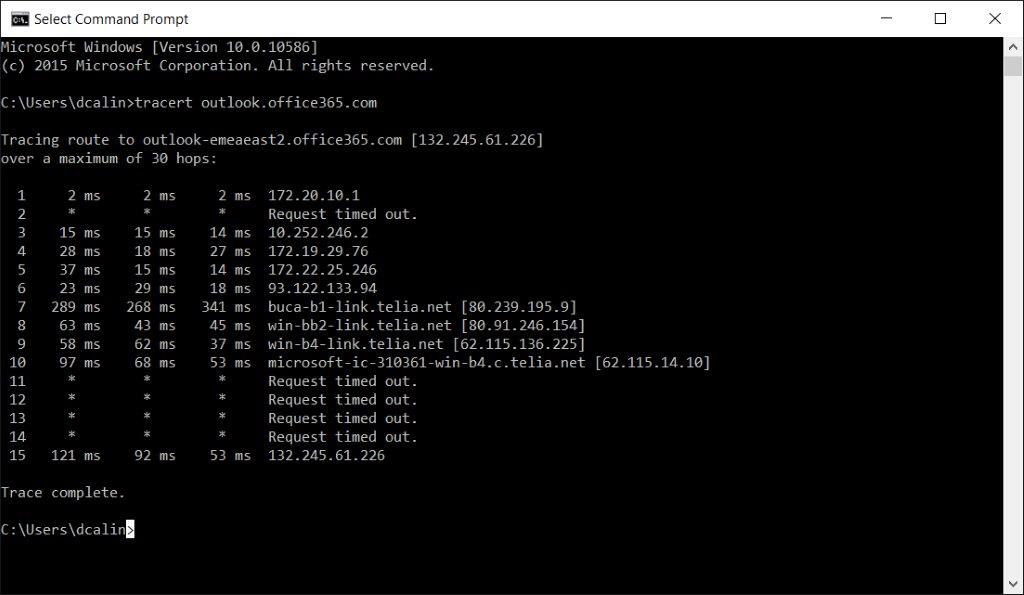
- At the HOP 10 we reach the Microsoft router that the ISP provider Telia.net has dedicated. Most likely Microsoft has set up a peering with Telia.netWhat is peering?
- Latency from my IP 172.20.10.1 to microsoft-ic-31361-win…. is as per below.
- Probe 1 is 97 ms
- Probe 2 is 68 ms
- Probe 3 is 53 ms
- As we can see there are big differences between the probes, so it seems that we are dealing here with an inconsistent network path.
- If this happens we need to repeat the test several times and confirm that this is in fact the default behavior.
- At HOP 15 we are reaching outlook.office365.com
- Latency from my IP 172.20.10.1 to 132.245.61.226 is as per below.
- Probe 1 is 121 ms
- Probe 2 is 92 ms
- Probe 3 is 53 ms
- Again notice the differences between the probes.
- Compare this values with what you see for other external sites on the same geographic location. For example, you can perform a trace route for a website.
If you are investigating latencies between continents or regions you can use as reference Verizon network
psping –n 20 outlook.office365.com:80 and psping –n 20 outlook.office365.com:443
PSPing can be downloaded from here.
PSPing is mostly used in a Outlook low performance scenario to check the latency.
Example of PSPing analysis 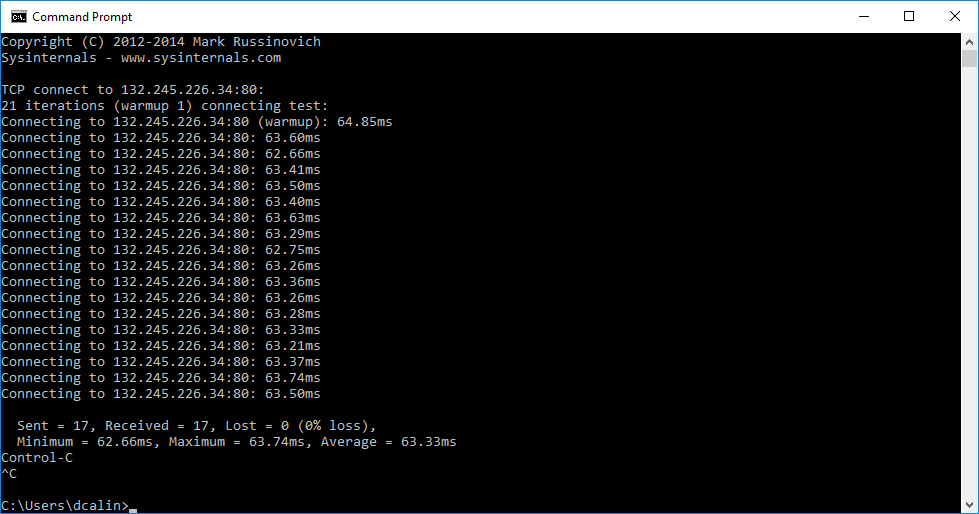
- We can see that all the 17 probes have a latency around of 63 ms
- Compare this values with what you see for other external sites on the same geographic location
- The test was done from Bucharest, so I would look for differences from Bucharest to where my endpoint is located (Amsterdam, Dublin, etc.)
- What is the latency between the probes? Do you see any big differences, like 5-10 ms ?
- Do you see any spikes between the probes? One probe is 63 ms and another is 80 ms or 100 ms?
- If yes, this means that you could have an inconsistent network.
- If you see spikes, repeat the test at least 10 times, to make sure if this was an isolated spike or not.
Using NETMON
Before starting I would like to say that the tests were done, from an Outlook 2013 client connected to a single mailbox in Office 365.
Get the Netmon capture while reproducing the issue on the affected machine.
- Install Nemon from here
- Open Netmon and create a New Capture
- Start the capture and reproduce the issue.
- Stop after the issue is reproduced.
- Save the capture.
Note : In a Terminal Server scenario it is very important to know the PID number, the IP of the client machine and the IP of the Terminal Server.
For the PID number, go to Task Manager and retain the PID of the process outlook.exe for the affected user.
If the issue is intermittent it will be difficult to leave Netmon running on the affected machine. This is because the capture could have then hundreds of MB. In this case please apply the below.
- Go to Task Manager and note the PID of the process outlook.exe for the affected user
- Identify the IP address of the affected machine
- Open Netmon and create a New Capture
- In the Display Filter add the line ProcessID==xxxx and Ipv4.address==x.x.x.x
- Click Apply
- Start the capture and monitor the situation.
- Stop after the issue is reproduced.
NETMON capture analysis
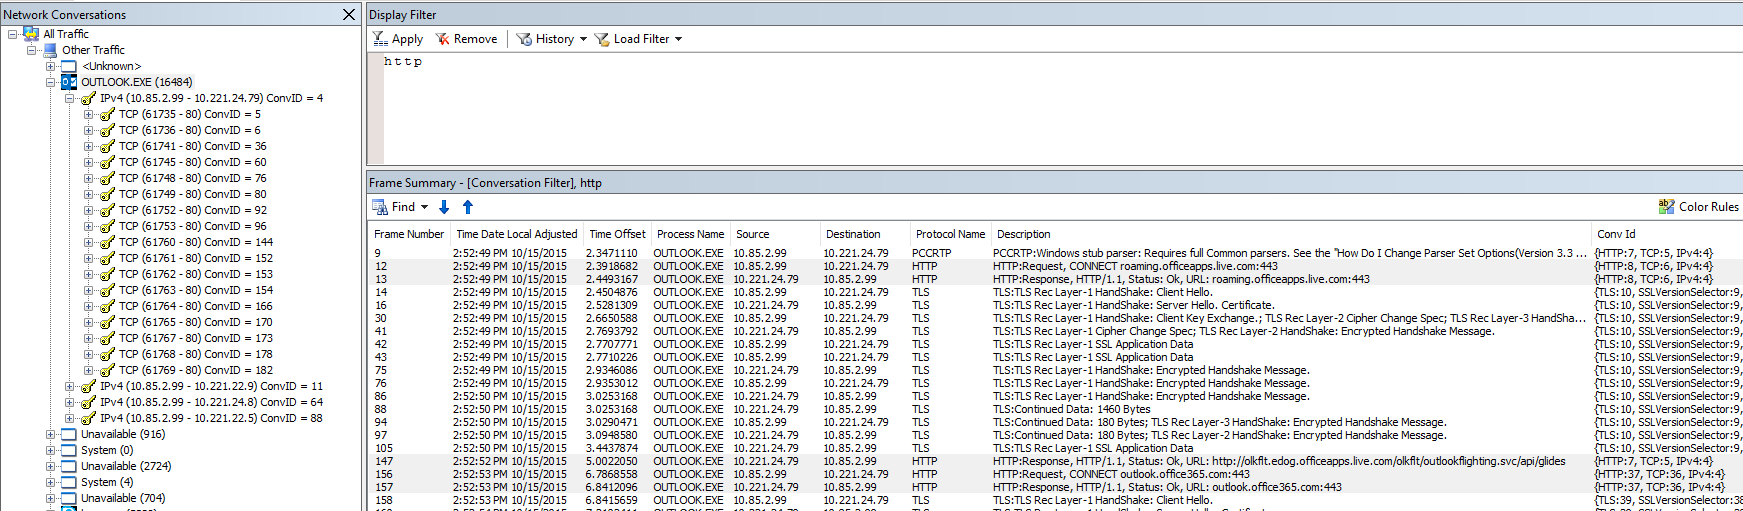
Example of analysis with a Proxy
Note : Having a proxy in the middle, means that the connection with Office 365 will be handled by the proxy server.
- In order to filter the traffic from a capture you have to perform the below steps:
- Identify the '''PID number''' of the affected user's Outlook Session '' (For example: Outlook.exe (16484) ) ''
- Manually locate the line with Http: Request, CONNECT outlook.office365.com:443
- Right Click on the line and choose Find Conversation | TCP

- At Line 153 we send the Syn packet to the Proxy server. My IP is 10.85.2.99 and the Proxy IP is 10.221.24.79
- The Syn is done on port 80 so we know now for sure that there is a proxy. Any other ports except 443, means that there is a device in the middle.
- Line 154 we receive the Syn/Ack packet from the Proxy server
- Line 155 we send the Ack that the connection is established and we are ready to go.
- Line 156 we send the HTTP request to outlook.office365.com
- Line 157 we receive the HTTP response from outlook.office365.com
- Line 158 we send the Client Hello TLS Handshake
- Line 160 we receive the Server Hello Handshake
- Line 168 we send the Handshake Client Key Exchange to Office 365
- Line 169 we receive the Cipher Change Spec from Office 365
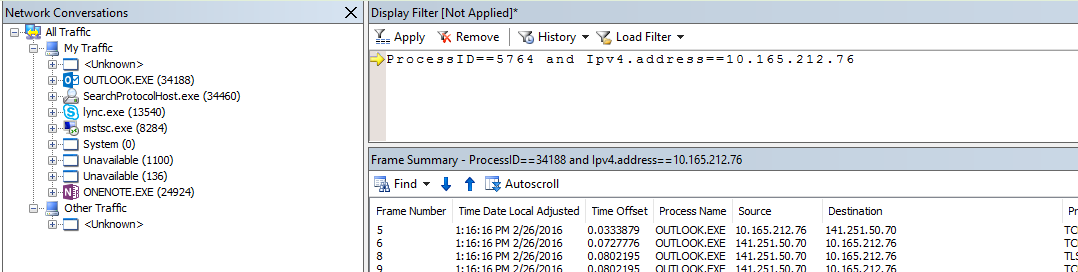
Example of analysis without a Proxy
Note: Without a proxy in the middle, the connection with Office 365 will be made directly. You should see only the IP of the machine and Office 365 IP in the capture. In this scenario you will not find the HTTP request to outlook.office365.com. You will need to identify the IP addresses from Outlook.exe based on nslookup performed against outlook.office365.com.
In order to filter the traffic from a capture you have to perform the below steps:
- Identify the PID number of the affected user's Outlook Session '' (For example: Outlook.exe (16484) ) ''
- Open CMD from the affected machine
- Type nslookup outlook.office365.com
- Check the IPs from CMD and the IPs from the Netmon capture

- At Line 511 we send the Syn packet to outlook.office365.com.My IP is 10.165.212.76 and outlook.office365.com IP is 132.245.27.34.
- The Syn is done on port 443 so we know now for sure that there is no proxy.
- Line 523 we receive the Syn/Ack packet from the Office 365 servers
- Line 524 we send the Ack that the connection is established and we are ready to go.
- Line 525 we send the Client Hello TLS Handshake
- Line 533 we receive the Server Hello Handshake
- Line 539 we send the Handshake Client Key Exchange to Office 365
- Line 543 we receive the Cipher Change Spec from Office 365
Having this said let’s see how we can use Netmon for the main Outlook scenarios.
SCENARIO: Unable to configure Outlook profile
Example of Nemon analysis having a Proxy in the middle
First Check if Outlook.exe is making other HTTP connections beside from the ones to outlook.office365.com
- In the Netmon trace click on Outlook.EXE
- In Display Filter type HTTP and click Apply
- Check for other unknown HTTP sites you see it in the trace
Second Check if the Autodiscover request was made and was successful.
- In the Netmon trace click on Outlook.EXE
- In Display Filter type http and Property.description.contains("autodiscover") and click Apply
- Do you see the Http: Request, CONNECT autodiscover-s.outlook.com:443 ?
- If yes, means that the Outlook client sent the request.
- Do you see the Http: Response, HTTP/1.1, Status: Ok, URL: autodiscover-s.outlook.com:443 ?
- If yes, means that the proxy sent the request back to the client.

Example of analysis without a Proxy in the middle
Note: In this scenario you will not find the HTTP request for autodiscover-s.outlook.com:443. Having this in mind, check if Outlook.exe is making other HTTP Autodiscover requests to IPs or URLs not belonging to Office 365
Check if the Autodiscover request was made and was successfully.
- In the Netmon trace click on Outlook.EXE
- In Display Filter type http and Property.description.contains("autodiscover") and click Apply
- Do you see the Http: Response, HTTP/1.1, Status: Moved temporarily, URL: /autodiscover/autodiscover.xml from the Office 365 IP?
- If yes, Click on it and check the Frame Details
- On the same section check if it was for Location: https://autodiscover-s.outlook.com/autodiscover/autodiscover.xml

SCENARIO: Outlook connectivity issues
Connectivity issues can be intermittent, where Outlook suddenly lose the connection for a short period, or permanent, where Outlook lose the connection and you will need to restart it.
The purpose of investigating with Netmon is to see when and what gave the disconnect and at what time.
Example of analysis with and without a Proxy in the middle
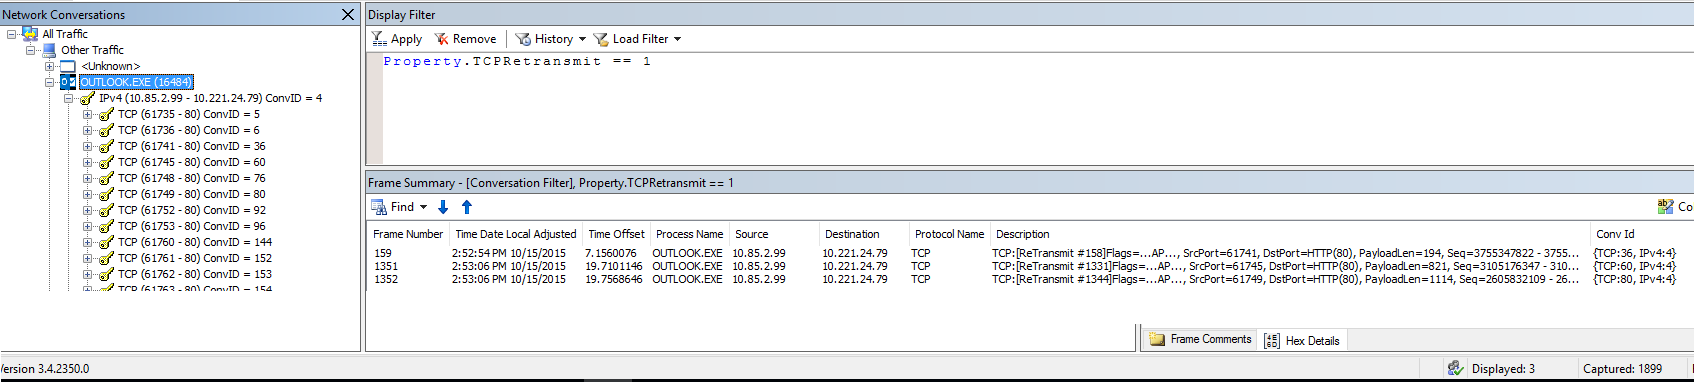
First Check for Retransmit packages
- In the Netmon trace click on Outlook.EXE
- In Display Filter type Property.TCPRetransmit == 1 and click Apply
- Check if the Displayed packets are greater than 1% of the Captured packets.
- In this example there are 3 out of 1899. So not even close to 1%
- Retransmits are often an indication of a network infrastructure problem and network congestion.
Second Check for connection Resets
- In Display Filter type TCP.Flags.Reset == 1 and click Apply
- Check for TCP:Flags=..A.R
- Reset flag is an indicator that the connection was abruptly closed either by the Source or Destination.

SCENARIO: Outlook performance issues
Example of analysis with and without a Proxy in the middle
First Check the latency to outlook.office365.com
Note : When you have a proxy you cannot see the latency between the Proxy and Office 365. In Netmon you see only the latency from the affected machine to the proxy.
However, there is a way to guess this latency. Note please that the TLS cannot be done by the Proxy or Firewall unless there is a device that intermediates the SSL connection.
- Compare the Time Delta from the Syn/Ack with Server Hello Handshake and Cipher Change Spec
- Line 154 we can see that we have 52 ms latency between Syn and Syn/Ack
- Line 160 we have 54 ms latency between Client Hello TLS Handshake and Server Hello Handshake
- Line 169 we have 59 ms latency between Handshake Client Key Exchange and Cipher Change Spec
- So the total latency is (52 + 54 + 59)/3 = 55 ms
- Compare this values with what you see for other external sites on the same geographic location. For example, you can perform a PSPing to a website.
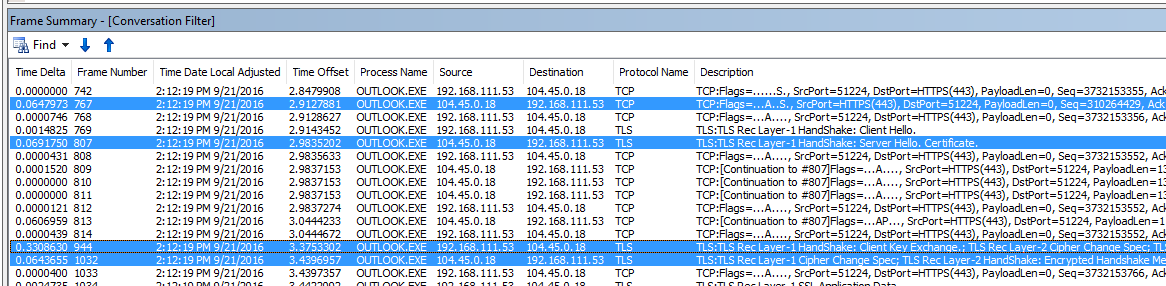
Also, what I noticed is that if you have a device that intermediates the SSL connection the value of Handshake Client Key Exchange will be much higher than Syn/Ack with Server Hello Handshake and Cipher Change Spec
Please look at the Line 944 from the below image. The Time Delta is 330 ms, which is the approximately latency from your PC to outlook.office365.com.
Second Check for Retransmit packages and Connection Resets
- In the Netmon trace click on Outlook.EXE
- In Display Filter type Property.TCPRetransmit == 1 and click Apply
- Check if the Displayed packets are greater than 1% of the Captured packets.
- In this example there are 3 out of 1899. So not even close to 1%
- In Display Filter click Remove
- Replace the filter with TCP.Flags.Syn == 1 and click Apply
- Check if you see many TCP:[SynReTransmits
- Retransmits are often an indication of a network infrastructure problem and network congestion.
- Check also if you see many TCP:Flags=..A.F. “F ” stands for FIN and means that it could have been a delay between the packets, and the sender or the receiver sent a FIN to notify that it has done his part and waiting.
SCENARIO: Outlook authentication prompts.
Authentication prompts can come from various reasons like:
- Outlook is disconnected and request for credentials
- There is a Proxy or other appliance which request authentication on HTTP or HTTPS
- An Outlook Add In
- Internal Public Folder structure, or other accounts.
In a simple scenario when Outlook connect just to Office 365, you should see only HTTP requests made only to Office 365 IPs and URLs.
For this you can use the same troubleshooting made at SCENARIO: Unable to configure Outlook profile.
If you have other external accounts added on the Outlook client, or access to other user mailboxes, shared mailboxes or public folders, I strongly suggest to remove the access temporarily one by one, and check if you are still prompted for credentials while using Outlook.