OAuth Troubleshooting
This article can be considered a continuation of the F/B Troubleshooting that will talk about first steps, in details, that should be done when checking the OAuth configuration.
If your on-premises organization is running only Exchange 2013 servers with Cumulative Update 5 or later installed, you should run the Hybrid Deployment Wizard instead of manually configuring OAuth, however, in case legacy servers are present, it does not mean that it cannot be used! You only need to perform the configuration manually as mentioned in this article: Configure OAuth authentication between Exchange and Exchange Online organizations
Fairly easy… however, what happens if from whatever reason it failed at some point, or, after it worked some time, something just happened and it just stopped working? Well, this article will try to present some steps that you can perform to investigate what’s going on.
Where to start?
First, double check if OAuth is enabled. When talking about availability, if OAuth is enabled, or more exactly, if the Intra Organization Connector (IOC) is enabled and it matches the target domain, regardless if you have the Exchange Federation configured (default federation with Microsoft federation Gateway, also called DAuth), it will fail and not fall back to the OrganizationRelationship configuration, that is used when dealing with DAuth. Depending on where or the direction where it fails, you can focus your investigation to one or both premises.
You can check this with the following command, that you should run in both premises:
Get-IntraOrganizationConnector |fl Name,TargetAddressDomains,DiscoveryEndpoint,Enabled 
(As a temporary workaround, while troubleshooting the OAuth configuration, after all the tests are done in order to check the related errors, you can disable the IOC so the DAuth is used.)
Next, if the connectors are enabled (and while they are still enabled), you should also run in both premises the Test-OauthConnectivity commands below, to see what’s going on and gather some errors.
From EXO:
Test-OAuthConnectivity -Service EWS -TargetUri <external hostname authority of your Exchange On-Premises deployment>/metadata/json/1 -Mailbox <Exchange Online Mailbox> -Verbose | fl
For example:
Test-OAuthConnectivity -Service EWS -TargetUri https://mail.contoso.com/ews/metadata/json/1 -Mailbox testuser1@contoso.com -Verbose | fl
If successful, the output should look similar to this:

You can ignore the “The SMTP address has no mailbox associated with it.” error. You are only interested in the ResultType value. If the result is a failure, based on where it will fail in the above output and the results, you can be pointed towards the error cause. We will see some of those possible locations in this article.
From OnPrem:
Test-OAuthConnectivity -Service EWS -TargetUri https://outlook.office365.com/ews/exchange.asmx -Mailbox <On-Premises Mailbox> -Verbose | fl
For example:
Test-OAuthConnectivity -Service EWS -TargetUri https://outlook.office365.com/ews/exchange.asmx -Mailbox testuser10@contoso.com -Verbose | fl
If successful, the output should look similar to this:

Like before, you can ignore the “The SMTP address has no mailbox associated with it.” Error. You are only interested in the ResultType value. Again, if the result is a failure, based on where it will fail in the above output and the results, you can be pointed towards the error cause. We will see some of those possible locations in this article.
Last, check if OAuth is still enabled on the local endpoints (EWS and Autodiscover), and if yes, and the issue manifests only when requesting F/B from an onpremise mailbox, disable and re-enable the authentication settings on the virtual directories:
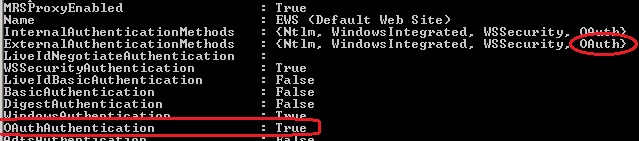
You can do this by running something like this, where the server, is the 2013 ‘frontend’ server:
Get-AutodiscoverVirtualDirectory -Server EXCH15 |Set-AutodiscoverVirtualDirectory -OAuthAuthentication $false
Get-AutodiscoverVirtualDirectory -Server EXCH15 |Set-AutodiscoverVirtualDirectory -OAuthAuthentication $true
Get-WebServicesVirtualDirectory -Server EXCH15 |Set-WebServicesVirtualDirectory -OAuthAuthentication $false
Get-WebServicesVirtualDirectory -Server EXCH15 |Set-WebServicesVirtualDirectory -OAuthAuthentication $true
And, as we mentioned this here, in case the issue is caused by something like the above, the Test-OAuthConnectivity executed in EXO, will return an error like this:
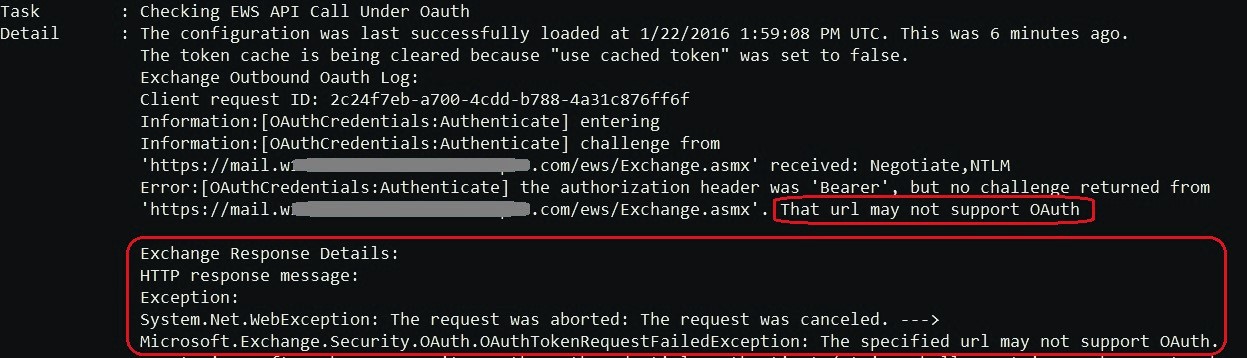
So, reset the OAuth config on the virtual directories, and test again.
Now, to return to the question ‘Where to start?’ In case the errors returned from the tests are not ‘clear’, and you feel that you do not know where to start, the simplest way is to go backwards on the configuration guide from the article I mentioned, and ensure that all the configurations are correct. You can adjust the commands in the article so that you can retrieve the data instead of setting it. In this case, I’ll reverse the order a bit, hence next will be the Intra Organization Connectors, then we’ll talk about the Availability Address Space.
Intra Organization Connectors (IOC)
As mentioned in the beginning, you have two connectors, one on each side. Both connectors must be enabled and properly configured in order to have OAuth requests sent to the right endpoints. What you need to check on them, except being enabled and matching the targeted domain, is the DiscoveryEndpoint that should match the Autodiscover service URL of the targeted domain. You can get the autodiscover endpoints by running the Get-IntraOrganizationConfiguration cmdlet, in both premises.
OnPremise IOC output with the targeted coexistence domain:

Matching cloud configuration:
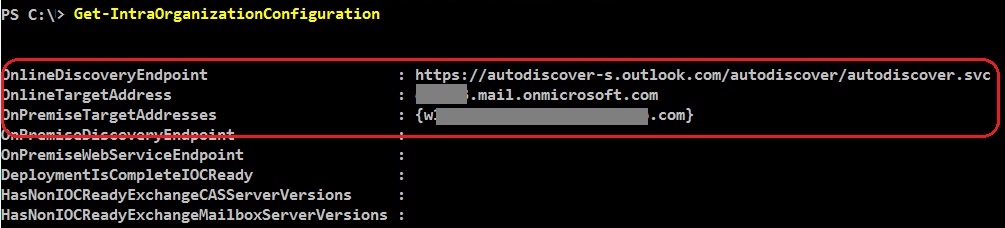
Cloud IOC output with the targeted vanity domain:
OnPremise configuration:

Second thing that needs to be understood, is that while the IOC is used to identify if OAuth should be used for a specific domain (TargetedAddressDomain), it is also used to allow OAUTH requests from that domain. This is one of the reasons that matching IOCs must be present in both organizations.
One fact I did not mentioned until here… You also need to have both users (requested and requestor) present in the both premises. So they must be synced or manually created, however, if this would be the case, the Test-OAuthConnectivity error will mention that there was no user found in the AD for the requested user.
After you confirmed that the IOCs and the discovery endpoints are configured ok and accessible, you can go to the next step. However, not relevant if you only have Exchange 2013/2016 servers.
Availability Address Space
In case you have legacy Exchange servers (pre Exchange 2013 CU4), look for the availability address space and ensure it points the Exchange 2013/2016 server that acts as a CAS. This is usually created by the HCW, however, it might be required to be changed. When created by HCW, the proxy URL points to the internal URL. You can change this to point to the external one, however, you must ensure that is accessible and valid:
Run the following command on premise:
Get-AvailabilityAddressSpace |fl 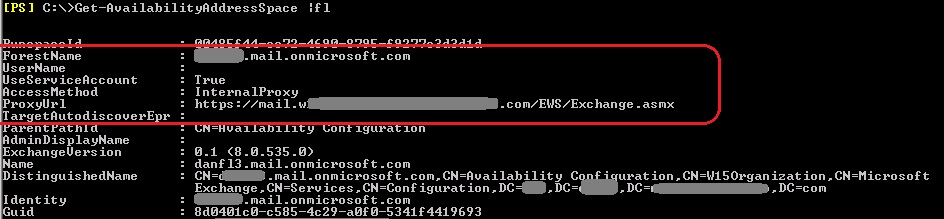
Also, this availability address space contains by default the coexistence domain (something.mail.onmicosoft.com), however, it might (and should) contain other domains that are not part of the hybrid and need to be proxied through the Exchange 2013 server in order to access the availability information using OAuth (if this is the case).
The issue could be related to this if F/B requests towards cloud mailboxes fail when queried using a mailbox located on legacy server, but they are OK when queried from a 2013/2016 one.
Worth mentioning is that if Exchange Federation is also configured and the Organization Relationship enabled, if there is an Exchange 2010 server, that server will use Federation and not fall back to the Availability Address Space.
If everything looks good here, go forward on the next section, the SPNs…
SPN registration
In order to register your onpremise endpoints (EWS, Autodiscover) with Azure, you had to run a script in case you performed the configuration manually.
In order to confirm the current onpremise endpoint, you can run the following, onpremise:
Get-WebServicesVirtualDirectory | FL ExternalUrl 
The external URL should be the one returned by autodiscover, and that points to the same server as the availability address space.
Same goes for the autodiscover endpoint.
In this case, both (Autodiscover and EWS) can be accessed using same *.domain.com URL (see next section), otherwise, you should have and SPN registered for each endpoint where you authenticate with OAuth.
To check what you currently have configured, run the following command in Azure PowerShell:
(Get-MsolServicePrincipal -ServicePrincipalName 00000002-0000-0ff1-ce00-000000000000).ServicePrincipalNames 
You should have here all the SPNs accessible using OAuth. In case you need to add more, use the script from the TechNet article on step 5. If you need to remove, use same script, but change the ‘$externalAuthority="*.contoso.com"’ to the SPN you want to remove, then replace the ‘Add($spn)’ with ‘Remove($spn)’ and run the script.
This will remove the “*.contoso.com” from the SPN list:
$externalAuthority="*.contoso.com"
$ServiceName = "00000002-0000-0ff1-ce00-000000000000";
$p = Get-MsolServicePrincipal -ServicePrincipalName $ServiceName;
$spn = [string]::Format("{0}/{1}", $ServiceName, $externalAuthority);
$p.ServicePrincipalNames.Remove($spn);
Set-MsolServicePrincipal -ObjectID $p.ObjectId -ServicePrincipalNames $p.ServicePrincipalNames;
When you ensure the SPN list is accurate, you can go to the next section
Authorization certificate
This is one of the frequent issues encountered, as the on-premises authorization certificate might change, while in Azure is still the old one, hence there will be certificate related errors, so you need to ensure the on-premises certificate matches the cloud one. You can check this by using the following procedure:
Get the certificate(s) that were previously uploaded to Azure:
Get-MsolServicePrincipalCredential -AppPrincipalId 00000002-0000-0ff1-ce00-000000000000 -ReturnKeyValues $true 
Then, go on-premises, and check/compare the certificate. The following will return the certificate data and the validity that needs to be the same with the one above:
[System.Convert]::ToBase64String(((dir Cert:\LocalMachine\My) | where {$_.Thumbprint -match (Get-AuthConfig).CurrentCertificateThumbprint}).GetRawCertData())
Get-ExchangeCertificate (Get-AuthConfig).CurrentCertificateThumbprint |fl Not* 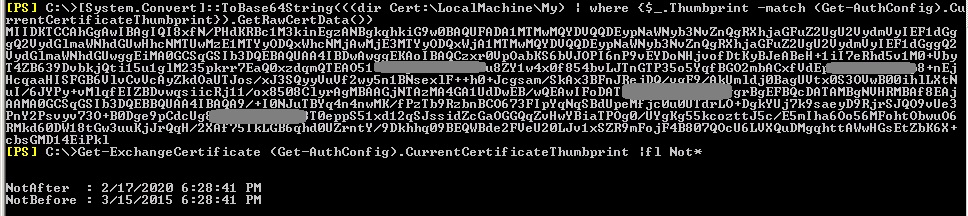
Check when the certificate expires, and take into consideration the time zone difference when comparing the validity.
In case the certificates do not match, export and add the current on-premise certificate by following the TechNet procedure in steps 3 and 4.
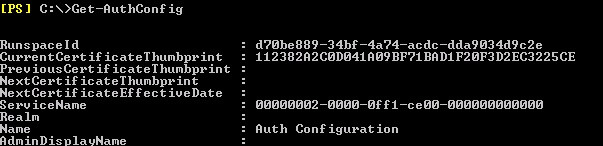
If the above commands return errors, you should break them apart, and see where the error is generated and the respective settings. For example, the commands are based on the thumbprint returned from the AuthConfig:
Partner Application and Auth Server
Check and ensure the partner application is enabled on-premises:
Get-PartnerApplication | ?{$_.ApplicationIdentifier -eq "00000002-0000-0ff1-ce00-000000000000" -and $_.Realm -eq ""}|fl 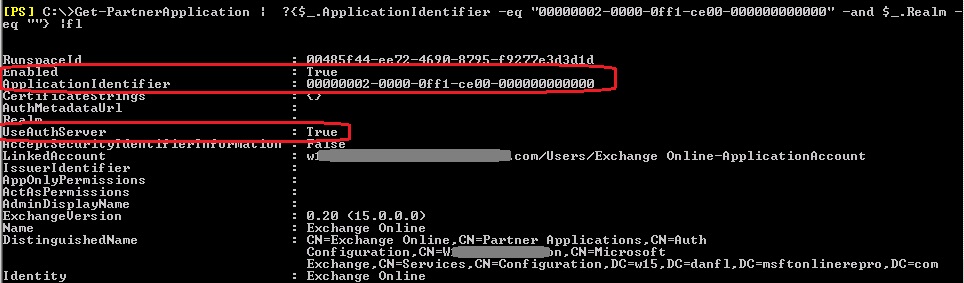
Check the AuthServer object:
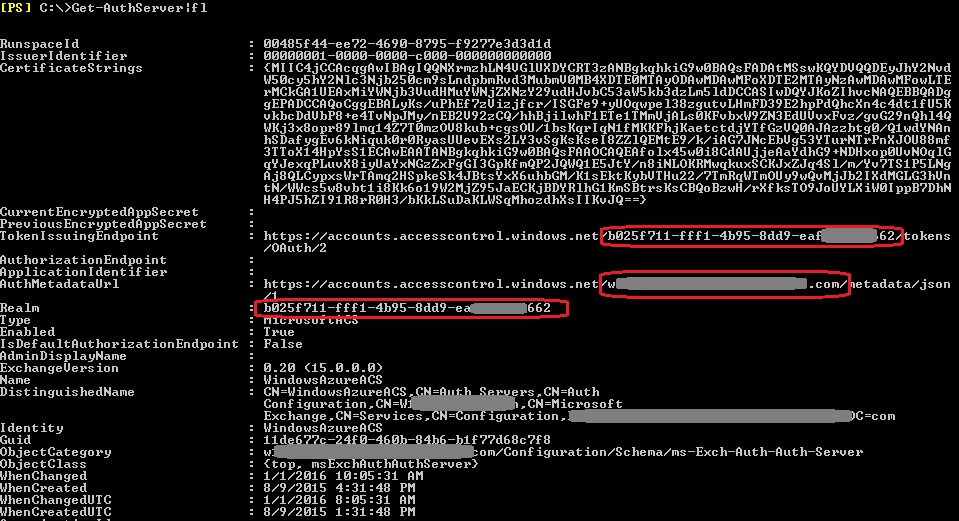
The TokenIssuingEndpoint, and the Realm should contain your Tenant ID. Also, the AuthMetadataUrl should contain your primary domain name (vanity domain).
The AuthServer can be recreated by deleting the object and creating it again using:
To remove:
Get-AuthServer WindowsAzureACS |Remove-AuthServer
To create:
New-AuthServer -Name "WindowsAzureACS" -AuthMetadataUrl https://accounts.accesscontrol.windows.net/\<your verified domain>/metadata/json/1
After this you should run an iisreset. Usually, issues around this cause an error in the ‘[OAuthTokenBuilder:GetAppToken]’ section, in the OAuth test
To finish,
Any OAuth request towards on-premises servers will be logged in the IIS logs on the ‘frontend’, so the previous article can be used to trace those logs for more details.
I hope this was useful and will help in understanding the basic steps in OAuth troubleshooting.
Thank you!