AutoRecovery in Word 2010
If you are interested in how Office 2010 saves you from data loss, you can read the following articles:
Turn on AutoRecover and AutoSave to protect your files in case of a crash
Use the Document Recovery task pane to recover your files
Recover earlier versions of a file in Office 2010
If these links did not help you, or if you are instead looking for step by step examples that show exactly what happens in the background, you may find this blog post below useful. The target audience for this post is administrators with good Windows skills. This post is written for Word, but the concept of the article is the same for Excel and PowerPoint too.
There are 3 scenarios outlined in this blog post:
Scenario 1: Word or the computer crashes
Scenario 2: The user creates a new document, but declines to save when closing it
Scenario 3: The user works on an existing document, but declines to save when closing it
Scenario 1: Word or the computer crashes
This scenario outlines how AutoRecovery will help the user in case Word or the computer crash:
First of all, AutoRecovery is controlled by the following dialogue:
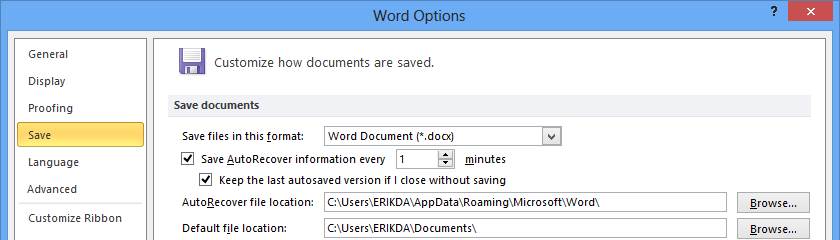
As you can see, the setting above called “AutoRecover file location” is by default set to
C:\Users\%USERNAME%\AppData\Roaming\Microsoft\Word.
If you modify it in the above dialogue, the following registry key will be added:
HKEY_CURRENT_USER\Software\Microsoft\Office\14.0\Word\Options
There you will find an “expandable string value” called AUTOSAVE-PATH containing the location, like this:

For the below test, please set “Save AutoRecover information every 1 minutes”, or you will have to wait quite long. Also make sure you close Office after this, or it will be reset when you crash Office.
Now press OK, restart Word, write “12345” in a blank document, press Enter, then wait 1min 30s. (Just make sure that you have no dialogues open in Word, as this could delay the creation)
After 1 minute, you can see that the following file is created (in case you did not configure another path, using the AUTOSAVE-PATH value above) :
%APPDATA%/Microsoft/Word/AutoRecovery save of Document1.asd
Additionally, the registry key
HKEY_CURRENT_USER\Software\Microsoft\Office\14.0\Word\Resiliency\DocumentRecovery
will be populated.(If you tested for Excel, you may get the impression that no AutoRecovery files are created. If so, please make sure you uncheck "Hide Protected Operating System Files", otherwise they would not be seen. Also, make sure you are not editing a cell or have a modal dialogue open, as this would delay the file creation until the cell editing is done or until the dialogue is closed.)
Now continue to write some more text into the document body. After you stopped writing, wait 1min 30sec.
After 1 minute, you can see that the previously created file
%APPDATA%/Microsoft/Word/AutoRecovery save of Document1.asd
will be updated with a new “time stamp”, indicating that it was updated.Now we can simulate a bluescreen or Word crash, by running this command:
taskkill /f /im winword.exeNow start Word again. Word will query the following registry key during its launch (it always does this when it launches)
HKEY_CURRENT_USER\Software\Microsoft\Office\14.0\Word\Resiliency\DocumentRecovery
In a subkey of the above key, Word will now find a random name, which means that there is a file to be recovered. Therefore, it will present you with the Document Recovery Pane to the left: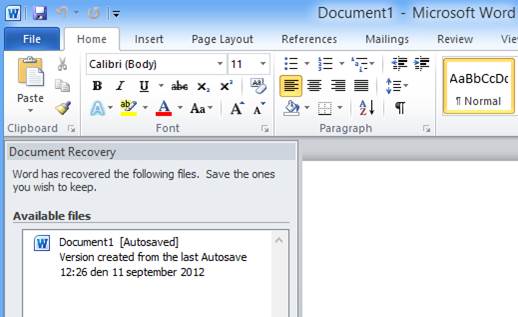
(If the document recovery panel is not coming up after following the above steps, please make sure that
HKEY_CURRENT_USER\Software\Microsoft\Office\14.0\Word\Resiliency\DocumentRecovery
exists, AND that there is a file in the AutoRecovery Folder (%APPDATA%\Microsoft\Word ) . If you still have a problem, you can find some more information here: My Office program did not open a recovered file )Now, press “Alt+F4” to close Word. You will be prompted with the following dialog:
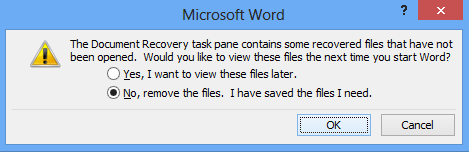
-If you select “No” (second option), the file in the AutoRecovery Folder (%APPDATA%\Microsoft\Word ) will be removed as well as the registry key
HKEY_CURRENT_USER\Software\Microsoft\Office\14.0\Word\Resiliency\ .
If you repeat Step 5 now, it will no longer display the Document Recovery Panel the next time you start Office.)-But if you select “Yes” (first option) instead, both the file and the registry key will remain, so that you will be prompted with the AutoRecovery Pane again at the next time you start Word.
(The above scenario only covered what happens with files directly under
C:\Users\%USERNAME%\AppData\Roaming\Microsoft\<ApplicationName>
You may also find that files are getting stored under
C:\Users\%USERNAME%\AppData\Roaming\Microsoft\<ApplicationName>\FOLDERNAME
If you are running out of roaming profile space because of these, please install this hotfix and set the registry entry mentioned there. More info on this can be found in the below scenarios.)Scenario 2: The user creates a new document, but declines to save when closing it
First make sure that you configured the setting as described in “Step 1” above (“Save AutoRecover information every 1 minute”)
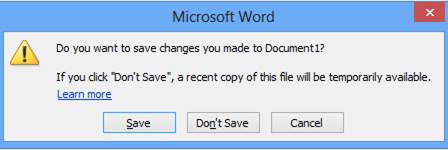
Turn off Word, start Word normally, write 12345 and press Enter. Press Alt+F4 to close Word. You will get this prompt:

Press “Don’t Save”Turn off Word, start Word normally, write 12345 and press Enter. Wait for 1 min 30 s. Press Alt+F4 to close Word. You will get this prompt instead:

As you can see from comparing the pictures in Step 8 and Step 9 above, the recovery file will be available for the user as an “Unsaved File” because we waited long enough for AutoRecovery to create a recovery file. You will find more information about this here: When you close without saving
What happened in the background in the above scenario?
-After waiting at least 1 min 30 s, the results from “Step 2” above happened (meaning that both the DocumentRecovery registry key and the AutoRecovery file were created).-When you pressed “Don’t Save”, the DocumentRecovery registry key was removed, and the AutoRecovery file
%APPDATA%/Microsoft/Word/AutoRecovery save of Document1.asd
was renamed and moved to this folder:
C:\Users\%username%\AppData\Local\Microsoft\Office\UnsavedFiles
The AutoRecovery file became an Unsaved File.-If you pressed “Save” instead, the DocumentRecovery registry key and the AutoRecovery files were removed, but naturally, since you saved, there was no Unsaved File created.
-As seen in the article above, any Unsaved Files created will be kept for 4 days, and its location cannot be moved.
Scenario 3: The user works on an existing document, but declines to save when closing it
Restart Word, write 12345 and press “Save as”. Save as e.g. FILENAME.DOCX.
Press Alt+F4 to shut down Word, and reopen the file. Write something in Word and wait.
After 1 min 30s, Word will create a folder similar to this:
C:\Users\%USERNAME%\AppData\Roaming\Microsoft\Word\FILENAME302492090389241523
In the folder, it will also add a file with a name similar to this:
FILENAME((Autosaved-302492341180058736)).asdIf we keep working in the file, you will see that additional files will be created in the same folder.
Note: If you are running out of roaming profile space because of these .ASD files in the Roaming part of the users profile, please install this hotfix and set the registry entry mentioned there, as this will disable the AutoRevision feature and therefore prevent these additional files from being created). The FilePath for the AutoRevision feature cannot be configured. It is hardcoded to be
C:\Users\%USERNAME%\AppData\Roaming\Microsoft\<ApplicationName>When the user closes the document, he will get this dialogue:
If he chooses not to save the file, the latest file in the previously mentioned folder
C:\Users\%USERNAME%\AppData\Roaming\Microsoft\Word\FILENAME302492090389241523
will remain in that folder for 4 days, and whenever the user opens the FILNAME.DOCX again, he will be able to open File – Info menu, and get an offer to work with the file which he denied to save earlier:

As can be seen from the above examples, Office automatically protects you in different ways from losing data. But it is not advisable to skip saving just because there is a safety net built into the product : Please remember that AutoRecovery, AutoSave and AutoRevision will never replace the normal way to save your work, which is to press “Save” regularly.