Lync 2010, Exchange 2010, SharePoint 2010, and Office 2010 Integration: Part 2
This is part two of a two-part article that describes the many features of Microsoft Lync 2010 communications software that are available to users of Microsoft Office 2010, Microsoft SharePoint 2010, and Microsoft Exchange 2010. Lync 2010 has now become a part of these products through its ability to provision the integration of the many features in Lync 2010. Now the corporate photographs, instant messaging, enhanced presence, and conferencing features that are available in Lync 2010 are accessible through SharePoint 2010 and Office 2010 (these features are available in only Microsoft Outlook 2010, Microsoft Word 2010, Microsoft Excel 2010, and Microsoft PowerPoint 2010).
Part one of this two-part article describes the integration features available through Exchange 2010, Office 2010, and Lync 2010. Exchange 2010 extends Lync Server 2010 instant messaging and enhanced presence features for use with Microsoft Outlook Web App. Exchange 2010 can publish corporate photographs to Active Directory Domain Services. These photos can be accessed through both Lync 2010 and Office 2010. Part one shows how to provision these amenities to Office 2010, Outlook Web App, SharePoint 2010, and Lync 2010.
Author: Mike Adkins
Publication date: April 2011
Product versions: Microsoft Lync 2010, Microsoft Office 2010, Microsoft SharePoint 2010, Microsoft Exchange 2010, Microsoft Lync Server 2010
The release of Microsoft SharePoint 2010, Microsoft Office 2010, and Microsoft Lync 2010 provide a combination of services that can greatly enhance the Microsoft end user's experience. Instant messaging, enhanced presence, e-mail, and conferencing features are now available through the coexistence of SharePoint 2010, Office 2010 (these features are available in only Microsoft Outlook 2010, Word 2010, Microsoft Excel 2010, and Microsoft PowerPoint 2010), and Lync 2010. These new integration features allow users to initiate an audio/video call, a desktop sharing session, schedule a conference, or send instant messages while viewing the presence and picture of the persons with whom they want to communicate.
Lync 2010 Shares Features with Office 2010 and SharePoint 2010
Office 2010 and SharePoint 2010 clients include new design features that are adaptable to the instant messaging, conferencing, and enhanced presence features in Lync 2010. They are available through their respective user interfaces as shown in Figure 1.
Figure 1. SharePoint 2010 client with Lync 2010 conferencing features

The SharePoint 2010 client and Office 2010 must have the following to display these enhanced presence and communications features:
Lync 2010 installed locally and running on a Windows client computer.
Members of the SharePoint 2010 site and Office 2010 users are contacts in the contact list in Lync 2010.
Use Enhanced Presence Features with SharePoint 2010 and Office 2010
The following steps show you how to use the enhanced presence features with SharePoint sites and Office 2010.
1. On a computer that is running a Windows client, open a SharePoint site or an integration-capable Office 2010 application.
Note Outlook 2010 would be an excellent choice with which to test presence features.
2. In one of these applications, locate a user who is listed with an active enhanced presence status.
3. Pause the pointer on the illuminated user name.
4. Locate a user that is active on the Lync 2010 contact list
5. Pause the pointer on the chosen user's presence-illuminated name. The following communications options appear on a shortcut menu:
Contact Information
- Send a Instant Message
- Place a audio call
- Send an e-mail message
More Options include the following:
- Share Desktop
- Start a Video Call
- Schedule a Meeting
These communication choices require that SharePoint 2010 client integrate with Lync 2010 and that it is installed locally on a Windows client. In other words, Lync 2010 has to be up and running on the Windows client. Here's why:
Contact information that consists of work, home, and mobile phone numbers, e-mail address, location, department, and office information are unavailable. This information comes from the attributes of a signed-in user's Active Directory domain user account and is made available to Lync 2010 through locally cached contact information.
The ability to send an e-mail message or schedule a live meeting are still available when a user is not signed in to Lync 2010: however, the other options for communication that are directly related to Lync 2010 are not.
If Lync 2010 is not installed or has not been started prior to opening a SharePoint site or Office 2010, the shortcut menu isn't available to the user who is signed in to the client computer.
Manage Presence Features by Using Office 2010 Group Policies
Presence features can be managed through the SharePoint 2010 and Office 2010 interfaces by applying Active Directory group policy objects to user accounts in the domain. These group policies are made available through the application of the Microsoft Office 2010 Administrative Template files (ADM, ADMX, ADML) and the Office Customization Tool (OCT). They are available from the Microsoft Download Center. The user configuration group policies as shown in Figure 2 can be used to customize the user's presence and shortcut menu choices when using Office 2010 and SharePoint 2010.
These Office 2010 Contact Card group polices are available beneath the Administrative Templates or Classic Administrative Templates group policies for the user configuration in the Windows Group Policy Management Editor that is located on the Programs, Administrative Tools menu as shown in Figure 2.
Figure 2. Viewing the Office 2010 group policies in the Group Policy Management Editor
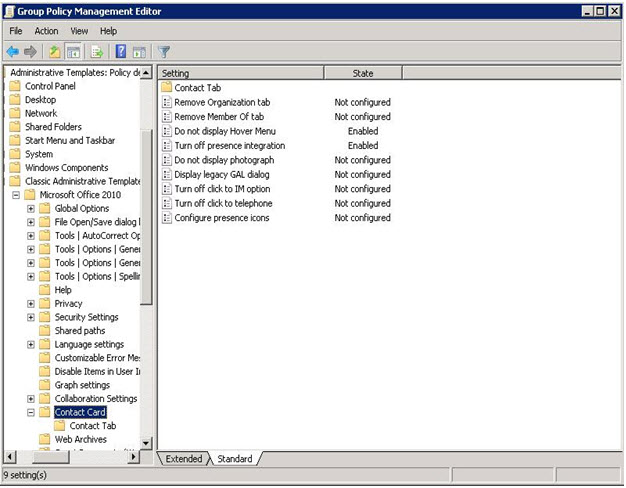
Following are definitions of the Office 2010 group policies that can be used to control Lync 2010 features in both the Office 2010 and SharePoint 2010 clients:
- Do not display Hover Menu Enables or disables the shortcut menu that hosts the range of additional communications options for the Office 2010 user and the SharePoint 2010 site member. This group policy has no effect on Lync 2010.
- Turn off presence integration Enables or disables the presence feature for the Office 2010 user and the SharePoint 2010 site member. This group policy has no effect on Lync 2010.
- Do not display photograph Enables or disables showing the user's photograph with their contact information in Office 2010 and SharePoint 2010 clients.
- Configure presence icons When enabled, this group policy has the following settings that control how Office 2010 displays presence for a user:
- Display all Presence icons are displayed in the UI.
- Display some Presence icons are displayed only in the Contact Card, Quick Contacts, and SharePoint 2010.
- Display none Presence icons are not displayed in the UI.
Note The Configure presence icons group policy has no affect on the SharePoint 2010 client or the Lync 2010 client.
Enable the Lync 2010 Default Corporate Picture by using SharePoint 2010
SharePoint 2010 provides a way to enable an Active Directory domain user account to display user photos. Doing so may require the forest-level permissions of the Schema Admins group and requires the domain-level permission of the local Domain Admins group. This procedure requires a working knowledge of SharePoint 2010 to complete the needed configuration steps.
Verify that thumbnailPhoto has Permissions set on its ACL
The following process is in most cases optional; however, it's prudent to verify that the thumbnailPhoto attribute has the needed permissions set on its access control list (ACL) to allow the thumbnailPhoto attribute to replicate throughout a multiple domain controller environment. The verification process comprises several procedures and is as follows.
To verify thumbnailPhoto attribute ACL verification
1. On the taskbar, click Start, and then click Run. Type regserver32 schmmgmt.dll.
2. In Run, type mmc.exe to open a new Microsoft Management Console (MMC).
3. In MMC, select File Add or Remove Snap Ins to add the Active Directory Schema snap in.
4. Scroll through the Attributes listing to locate the thumbnailPhoto attribute.
5. Double-click the thumbnailPhoto attribute to open it in its Attribute Property Editor.
6. Click the Replicate this value to the global catalog option of the thumbnailPhoto attribute.
7. Close the Attribute Property Editor.
8. Close the MMC that is hosting the Active Directory Schema snap in.
9. If you are in a disparate Active Directory environment, be sure to allow replication to complete.
To ensure that the User Profile Service Application service is started
1. On the SharePoint 2010 Central Administration menu, click Application Management, and then locate the Service Applications area. Click Manage Service Applications.
2. Scroll down to User Profile Service Application; ensure that it is started.
To create an Active Directory connector for thumbnailPhoto attribute synchronization
1. On the SharePoint 2010 Central Administration menu, click Application Management, and then locate the Service Applications area. Click Manage Service Applications.
2. Scroll to and then click User Profile Service Application.
3. Locate the Synchronization area, and then click Configure Synchronization Connections.
4. Click Create a New Connection.
5. Type a meaningful name for the Active Directory connection.
6. Click Active Directory as the type of connection.
7. Complete the operation by entering the rest of the required information (as prompted).
Note SharePoint 2010 can be configured for many environments. To complete these instructions, deployment information may prove helpful. For more information, see Configure Profile Synchronization (SharePoint Server 2010).
To map the thumbnailPhoto attribute to the SharePoint 2010 Picture attribute
1. On the SharePoint 2010 Central Administration menu, click Application Management. Locate the Service Applications area, and then click Manage Service Applications.
2. Scroll to and then click User Profile Service Application.
3. Locate the People area, and then click Manage User Properties.
4. Scroll down to locate the Picture attribute.
5. On the Picture attribute's shortcut menu, click the Edit the Picture attribute.
6. On the Edit User property page, scroll down to Add New Mapping.
7. Click the Source data connection name that was created in step 6 of the To create an Active Directory connector for thumbnailPhoto attribute synchronization section of this article.
Note If the Source data connection name value is not listed as described in the previously shown step 7, open services.msc on the local computer that is running Windows Server. Ensure that Microsoft Forefront Identity Manager Service and Forefront Identity Manager Synchronization Service are started. If either of these services has to be started, the SharePoint 2010 Edit User Profile property page has to be refreshed to view the updates.
8. On the Attribute shortcut menu, click the thumbnailPhoto Active Directory Domain Services attribute.
9. On the Direction shortcut menu, click Export.
10. Click Add. The Property Mapping for Synchronization selections should resemble those shown in Figure 3.
11. Click OK to complete the operation.
Figure 3. Property mapping for the thumbnailPhoto attribute

Warning Using the previously shown step 2 with Action for the attribute mapping set to Import, SharePoint 2010 removes any pre-existing mapping to the image that the Active Directory domain user account thumbnailPhoto attribute contains. This may result in the removal of the user photograph from all user accounts that may have been pre-configured with an image by using the thumbnailPhoto attribute.
To add the SharePoint Workspace e Member's Photo to their User Profile
1. On the SharePoint 2010 Central Administration menu, click Application Management. Locate the Service Applications area, and then click Manage Service Applications.
2. Scroll down to and then click User Service Profile Application.
3. Locate the People area, and then click Manage User Profiles.
4. Type the Active Directory user name for the profile that needs to be updated, and then click Find.
5. On the Account Name shortcut menu, click Edit My Profile.
6. On the User Profile page, scroll to Picture, and then click Choose to select the image file of the user's photo.
7. Click Save, Close to save the user's updated profile information.
To perform the attribute synchronization process
1. On the SharePoint 2010 Central Administration menu, click Application Management.
2. Locate the Service Applications area, and then click Manage Service Applications.
3. Scroll to and then click User Profile Service Application.
4. Locate the Synchronization area, and then click Start Profile Synchronization.
The Profile Synchronization process's completion time can vary based on the hosting environment.
For more information about configuring the SharePoint Server 2010 synchronization process, see Manage profile synchronization (SharePoint Server 2010).
Summary
The default features in Lync 2010 that integrate with SharePoint 2010 and Office 2010 help provide their users with an enriched product experience that captures the efficient use of Lync 2010. Office 2010 group policies provide administrators with efficient ways to control these new product enhancements throughout their unified communications environment.
Additional Information
For more information, check out the following articles:
- Lync 2010, Exchange 2010, SharePoint 2010, and Office 2010 Integration: Part 1
- Manage profile synchronization (SharePoint Server 2010)
- Configure Profile Synchronization (SharePoint Server 2010)
Lync Server Resources
- Lync Server 2010 documentation in the TechNet Library
- NextHop blog
- Lync Server and Communications Server resources
We Want to Hear from You
Keywords: Office, 2010, SharePoint, Outlook, Web, App, remote, client