Authentication Assurance and Claims Based Authentication
Authentication Mechanism Assurance is described in the following Microsoft publication: https://technet.microsoft.com/en-us/library/dd378897(v=WS.10).aspx.
In this post I want to dig a bit more into different configuration options, show how it works and provide example of how it can be configured with AD FS 2.
Authentication Mechanism Assurance is a new feature in Windows 2008 R2 AD DS configured at 2008 R2 Functional level, it provides an ability to assure that user is authenticated with specific type of certificate. Usually it is used to assure that user is authenticated with a specific type of smart card into AD DS. This assurance can then be passed on to applications which will make authorization decision on what user can or cannot do in it. It is very important feature in environments where specific regulations require to provide assurance of Smart Card authentication.
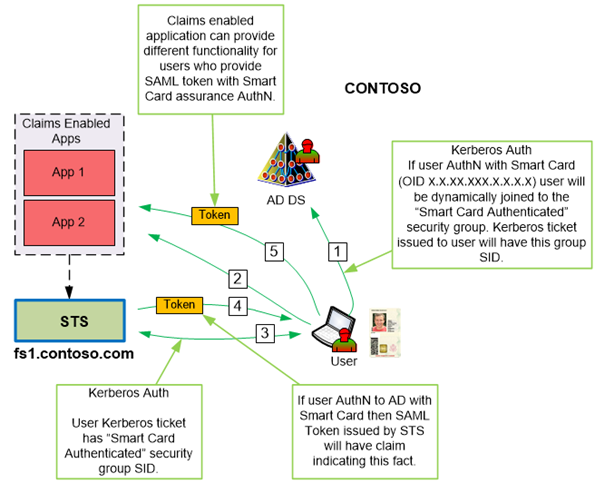
AD DS configured to use Authentication Mechanism Assurance is capable to identify users who used specific type of Smart Cards for authentication and dynamically populate their Kerberos tickets with security group associated with those specific Smart Cards. The linkage between Smart Card and AD DS is done via the OID populated in Certificate Policy certificate extension. Let’s take a quick look at how it works. The following diagram shows a basic flow of authentication to claims based application which can take advantage of the authentication assurance claim. In our example Contoso has Smart Cards with X.X.XX.XXX.X.X.X.X OID populated in Certificate Policy certificate extension. AD DS is configured to link X.X.XX.XXX.X.X.X.X OID with “Smart Card X Authenticated” security group.
In step 1, user authenticates to their desktop by providing Smart Card and PIN number. During authentication process AD DS detects that user authenticates with Smart Card (it is done by finding X.X.XX.XXX.X.X.X.X OID in the user certs) and builds Kerberos ticket. AD DS will include “Smart Card X Authenticated” security group SID in the Kerberos ticket.
In step 2, user tries to access claims based application which will redirect the browser to its trusted STS.
In step 3 and 4 user will be authenticated to the STS. STS will examine user group membership and because user’s Kerberos ticket contains “Smart Card X Authenticated” SID it will issue special claim type indicating that user was authenticated to AD DS with their Smart Card.
This token will be passed to the application. In step 5, application will have a choice to provide different logic for users who authenticated to AD DS with a Smart Card or without. Simple enough.
Let’s take a look how it all can be configured. I’m not going to repeat some of the steps described in the before mentioned Microsoft publication. I’ll refer to it when necessary.
The first step in configuring Authentication Mechanism Assurance is to create proper Issuance Policy in AD DS. The OID in AD DS Issuance Policy must match the OID in Certificate Policy on the Authentication certificate on the Smart Card. It will look something like this on the certificate:
[1]Certificate Policy:
Policy Identifier=X.XX.XXX.X.XXX.X.X.X.X.XX
More likely your AD DS will not have this OID and you’ll need to create one. Fortunately it is easy to do:
- Open Certificate Template management console.
- Open any v2 certificate template.
- Click on Extensions Tab, Click on “Issuance Policies” and then click Edit.
- Click on Add, then click on New.
- In the Name field type: Smart Card AuthN Cert
- In the object identifier field type: X.XX.XXX.X.XXX.X.X.X.X.XX (where XXX – is the OID from the cert on Smart Card)
- Click OK
- Do not save changes to the certificate template. Exit Certificate Management Console.
At this point you are ready to link appropriate security group to the Certificate Issuance policy. Create get-IssuancePolicy.ps1 and set-IssuancePolicyToGroupLink.ps1 files as described in Microsoft article. Run the first one to see if there are policies already in place. Run the second to make the linkage.
To display run this: .\get-IssuancePolicy.ps1 –LinkedToGroup:All
To create new policy: .\set-IssuancePolicyToGroupLink.ps1 –IssuancePolicyName "Smart Card AuthN Cert" –groupOU "Auth Mech Assurance" –groupName "Smart Card Authenticated"
To see new policy: .\get-IssuancePolicy.ps1 –LinkedToGroup:All
So far, so good. We configured Authentication Mechanism Assurance. To verify that it actually working logon to AD DS with Smart Card, open command prompt and type whoami /groups. It will list all the groups that you belong, one of them will be Smart Card Authenticated. Logon with UserID/pwd and you’ll not be member of that group.
The next step is really making some use out of this information. Applications must be designed to take advantage of this information and make authorization decisions based on level of assurance we provide to it. Perfect candidates for it are claims based applications. We can generate a claim type, for example lets name it “LOA”, which stands for Level of Assurance, and assign different value to it. If user used userID/pwd, we assign 2 to LOA, if user used Smart Card then LOA will have 3. Application will decide what to do base on those values in LOA claim type.
Next, we are going to create LOA claim type in AD FS 2 and pass it to the application. I’ll discuss it in the next post.
Thanks for stopping by. See my other blog as well https://CloudIdentityBlog.com for this information and some comments.
