VorlonJS - A Journey to DevOps: Continuous Integration using GitHub and Visual Studio Team Services
If you have any question about this blog post series or DevOps, feel free to contact me directly on Twitter : https://twitter.com/jcorioland .
This post is part of the series “VorlonJS – A Journey to DevOps”
As you maybe already know, Visual Studio Team Services (VSTS) provides a source code version control tool that supports GIT or TFVSC (Team Foundation Version Source Control).
Vorlon.JS source code is hosted on GitHub, because it’s an open source project and because we want that any developers can propose a new plugins or an enhancement using pull requests.
In this post, I will detail how you can easily integrate continuously a source code hosted on GitHub, using Visual Studio Team Services.
Note: if you don’t have a VSTS account, you can read my previous post in the series that explains how to create one.
Connect GitHub to VSTS
The first step to work with GitHub is to connect your account in the VSTS external services configuration page.
Go to the settings of the team project using the  button at the top right of the window and then select the “Services” tab. You can add new services connection, including GitHub using the + New Service Endpoint button:

Click on the Authorize button to connect your GitHub account and use your login and password to authenticate on your GitHub account.
Create the build definition
Once your GitHub account is well configured, go back on your team project and click “BUILD” to access the build definitions.
The new build service proposes a very open system, that can run on different kind of build agents (Linux, Windows, Hosted or not) and that can handle a lot of build tasks like MSBuild, Maven, Ant, packaging Android applications, executing NPM or Gulp tasks and more…
In fact, the build system is now totally open and it’s possible to create your own task if Microsoft do not propose one that correspond to your need. All the existing tasks are open-sourced in this GitHub repository. There are also tasks dedicated to packaging and deployment (Azure Resource Manager, Web App, Docker, Tom Cat…) but we will discuss about them in a next post, when we’ll talk about Release Management with VSTS.
Basically, there are a few steps to do in order to create a new build definition.
Define the different task that compose the build workflow
This is the most important step, and maybe the one that will take the more time, depending on the solution you want to build. In the case of Vorlon.JS we wanted to:
- Launch a NPM install in order to install all the application dependencies and execute the default Gulp task that will generate the JavaScript and CSS files from TypeScript, Less…
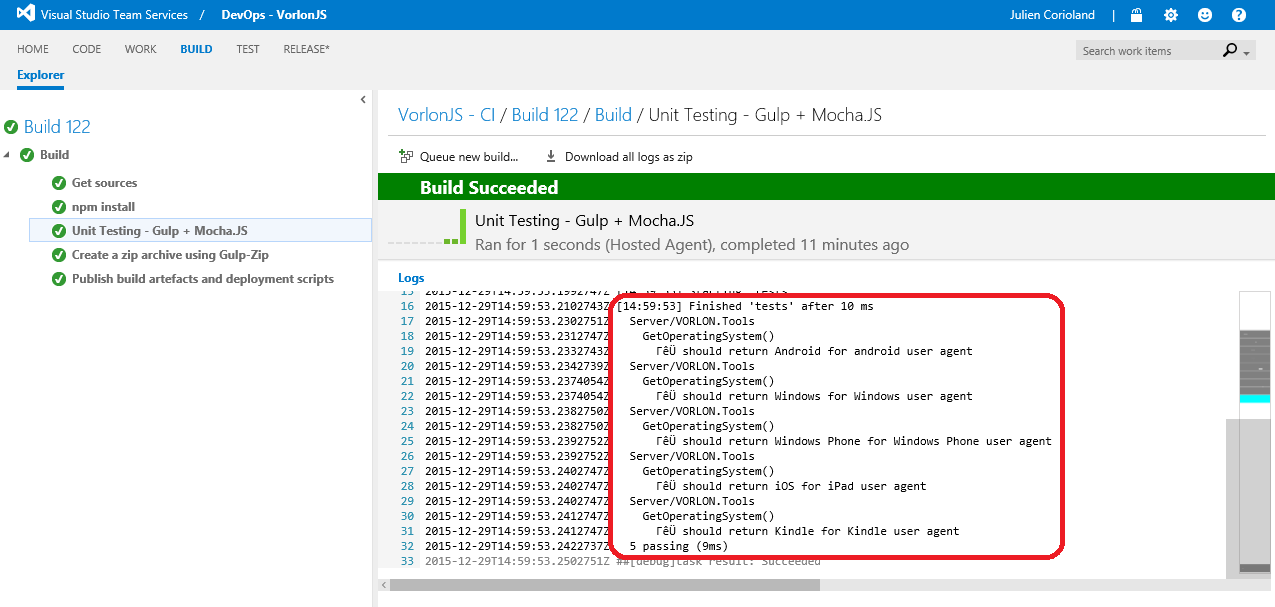
- Launch the “tests” Gulp task that is responsible for executing the unit tests with Mocha.JS
- Launch the “zip” Gulp task that is responsible for creating a zip archive that contains the application
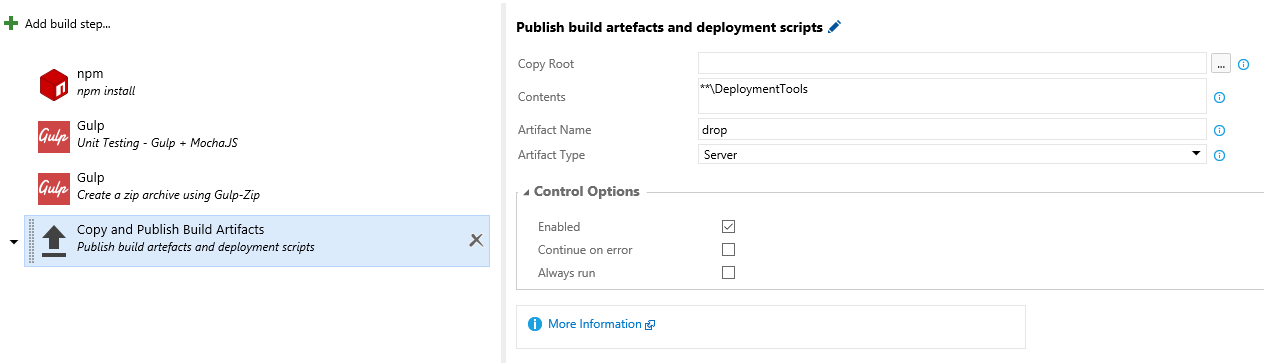
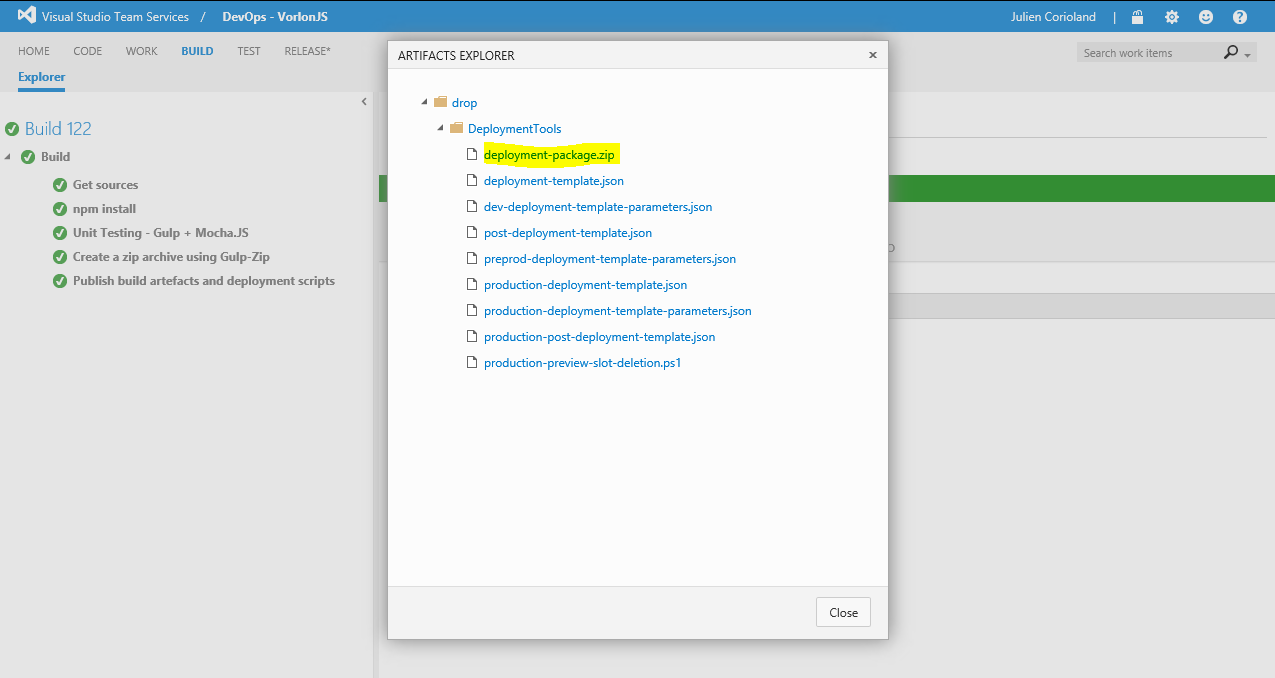
- Publish the build artefacts (the zip file created in the step before and some other deployment scripts that we will discuss in a next post). These artefacts will be used by the Release Management service to publish the application in different environments (development, QA, pre-production, production…)
On the Build tab, click on the  icon, on the left pane to create a new build definition. You can choose to start from an existing template or an empty definition:
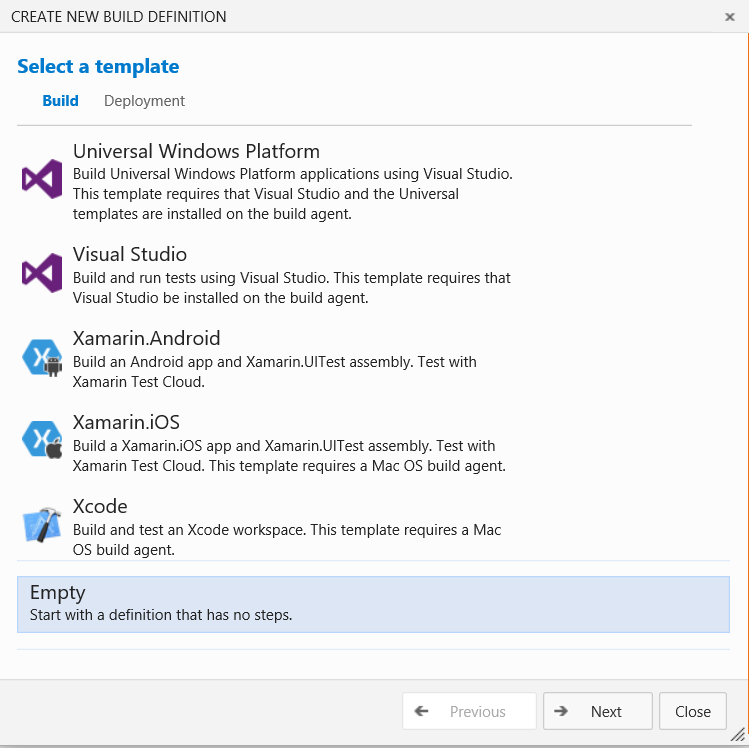
In this case, I have chosen an Empty one. Click Next to access the Settings page where you can configure the source code repository type that will be linked to this new build, the agent queue to use when a build is triggered and if you want to do continuous integration, to build each time a commit is done:
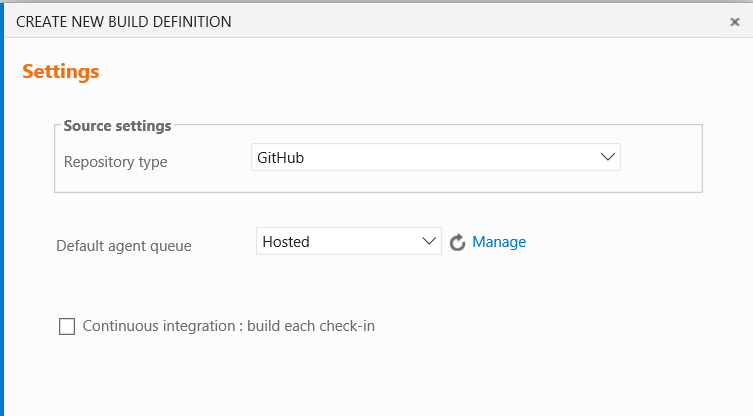
There are two types of build agents that can be used:
- Hosted build agents are provided as a service in Visual Studio Team Services and you pay the usage by minutes
- Private build agents that you can configure on custom machines (or virtual machines) that may run Windows or Linux.
At this step, we can use the Hosted agent that supports natively all the tools we are going to use in the build workflow.
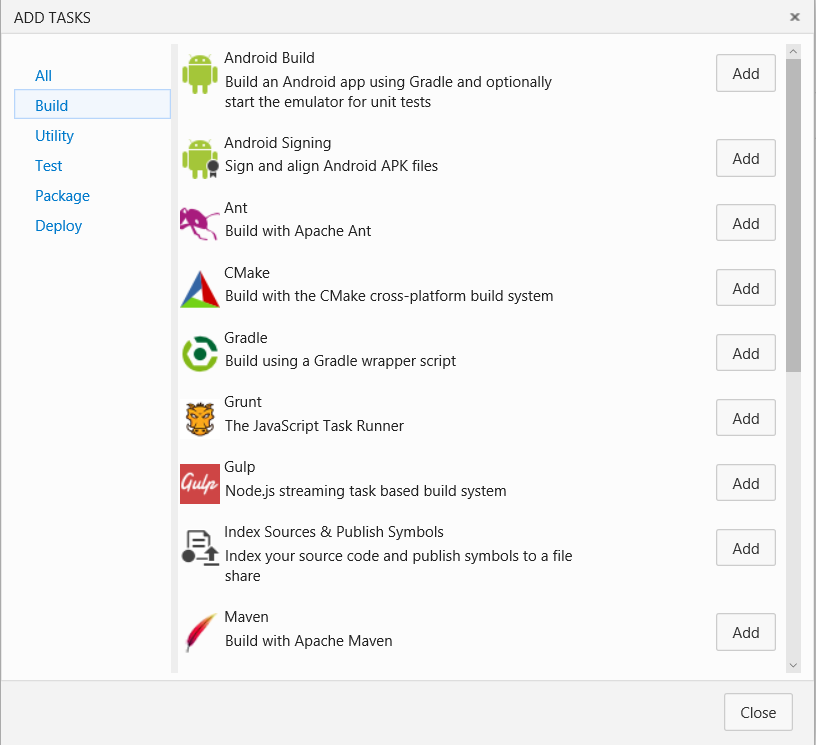
Click « Create » to create the build definition. You are now redirected in the build definition designer that will allow to define the workflow to execute. A build is composed of steps that will execute one by one.
Click the  button. You can choose the different step you want to add to the build:
Here is the workflow we have done to build VorlonJS:
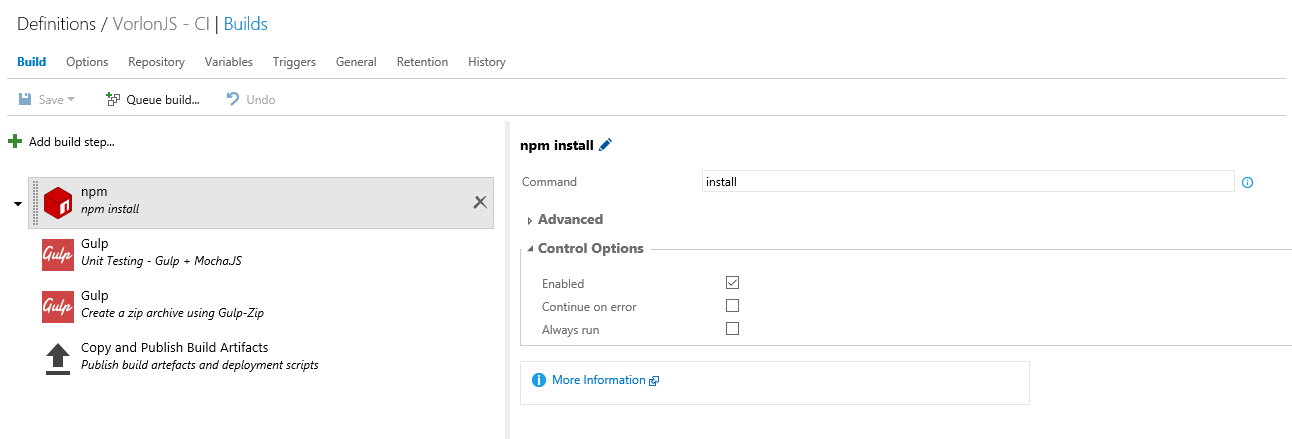
As you can see, each task can be configured on the right side. For example, the first task executes an “NPM install” command after cloning the repository. Then two gulp tasks are executed: the first one “zip” that will make an archive with all the code and node modules, the second one that will execute unit tests with Gulp, using the mocha Node.JS test framework. The last task is used to publish the build artefact on the build agent in order to be able to use these artefacts with Release Management, to deploy the application. Release Management will be treated later in this series.
Define the source repository
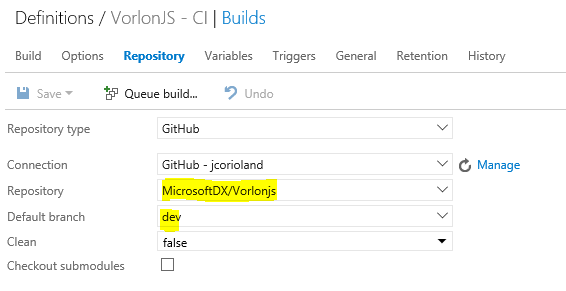
Once you have added all the steps required to your build workflow, go to the Repository tab to configure the source code repository that should be used by this build definition. In the case of Vorlon.JS we are using a GitHub repository:
Trigger the build
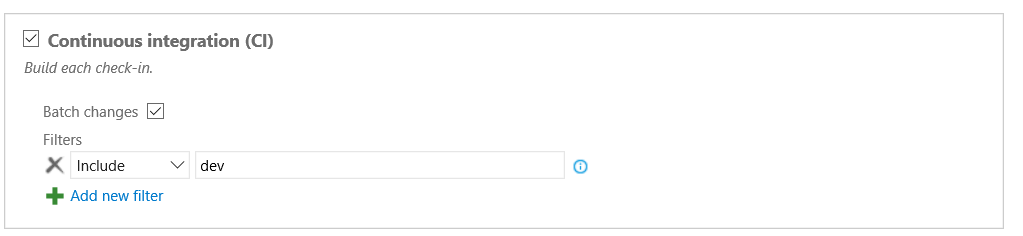
In this case, we want that a new build is triggered as soon as a commit has been done in the GitHub repository. To do that, you just have to go in the “Triggers” tab and select Continuous Integration, as shown in the screenshot below:
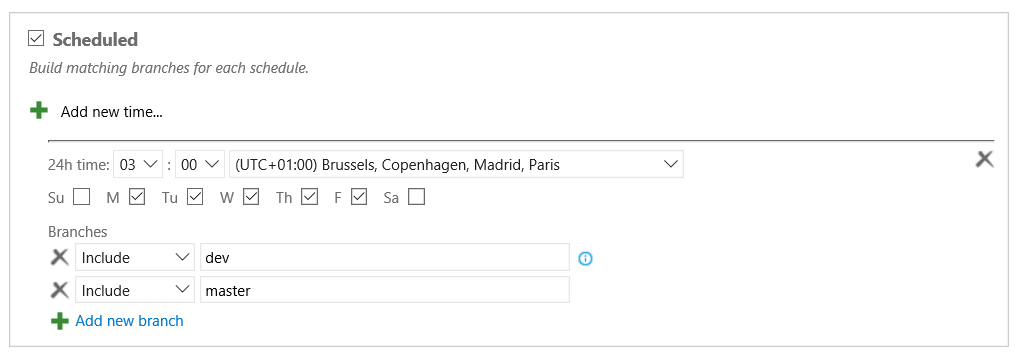
You can also choose to schedule the build on different branch of the repository, to do nightly build, for example:
Click the “Save” button in the toolbar. The first time, a pop up will open to ask you to name your build.
The next step is to commit some code in your repository and check that the build is triggered and works well. Here, we have used GitHub as source code provider, but all the steps done to create the build definition may be done with VSTS code providers (GIT or TFVSC), so GitHub is not an obligation!
In our case, we are using Visual Studio Code that provides a native integration with GIT, so it’s super easy to code and them commit our changes on GitHub!
Inspect build results and output
To access the latest build, click on the build definition in the left pane. You can choose to displayed queued builds and completed builds.
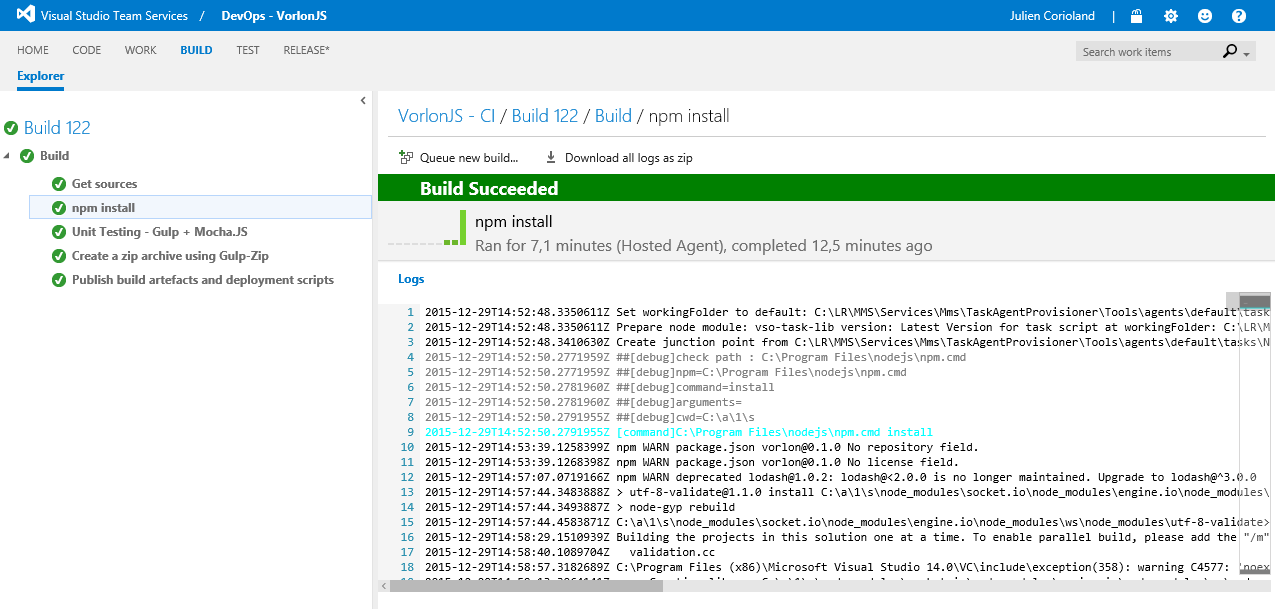
Once the build is completed, you can access the logs directly from the VSTS portal to see if all steps were correctly executed:
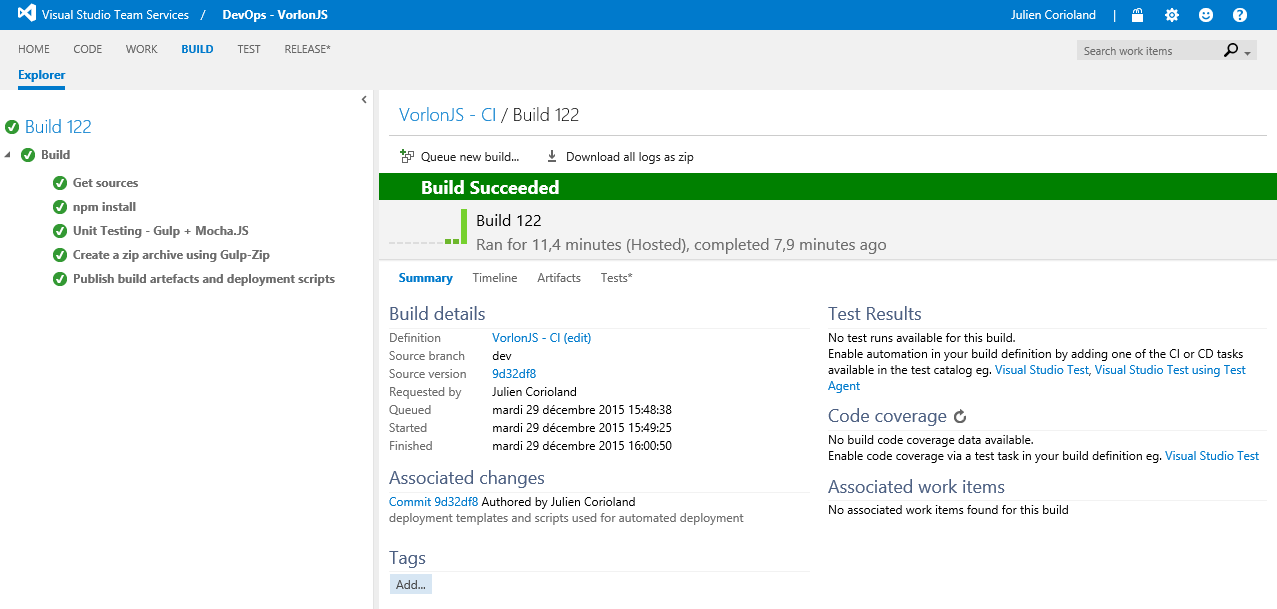
You can get the logs for each steps:
It’s also possible to browse the build artefacts from the portal, so you can see what was published on the build agent during the build. We will use these artefacts in a next post, when discussing about release management.
But, before going deeper in release management, the next post in this series will explain what is Infrastructure as Code and how it can improve the way you are creating environments and deploying applications.
Stay tuned!
If you have any question about this blog post series or DevOps, feel free to contact me directly on Twitter : https://twitter.com/jcorioland .