How To: Use the Azure Key Vault to Manage the Key for a TDE enabled Database
There are many posts available showing the steps to create an Azure Key Vault and to use it for TDE, but I've not found a good post which helps detail the end to end steps required to do this “smoothly” - so here goes...
In this post I'll go through:
- Creating the “custom” application – this is basically creating the credentials SQL Server will use to authenticate inside the Key Vault
- Creating the Azure Key Vault
- Creating an Azure IaaS VM with SQL Server configured to use the Key Vault
- Create a TDE enabled Database with the key stored in the Key Vault
Before i go through these steps, lets first look at what the Azure Key Vault actually is quoting the Azure online documentation:
“Azure Key Vault helps safeguard cryptographic keys and secrets used by cloud applications and services. By using Key Vault, you can encrypt keys and secrets (such as authentication keys, storage account keys, data encryption keys, .PFX files, and passwords) by using keys that are protected by hardware security modules (HSMs). For added assurance, you can import or generate keys in HSMs. If you choose to do this, Microsoft will process your keys in FIPS 140-2 Level 2 validated HSMs (hardware and firmware).
Key Vault streamlines the key management process and enables you to maintain control of keys that access and encrypt your data. Developers can create keys for development and testing in minutes, and then seamlessly migrate them to production keys. Security administrators can grant (and revoke) permission to keys, as needed.”
Creating the "Custom" Application
Log into the Azure Portal and select Active Directory – this will open the “Classic Portal”.
In the "classic portal" select active directory.
Select the desired directory
Select "APPLICATIONS"
Select "ADD" at the bottom of the page:
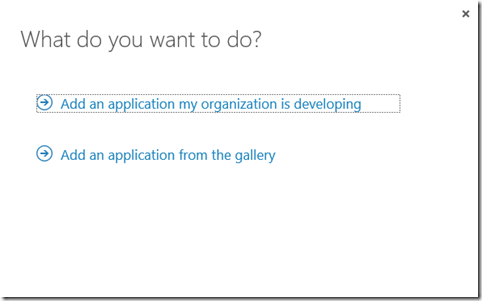
Select "Add an application my organization is developing":
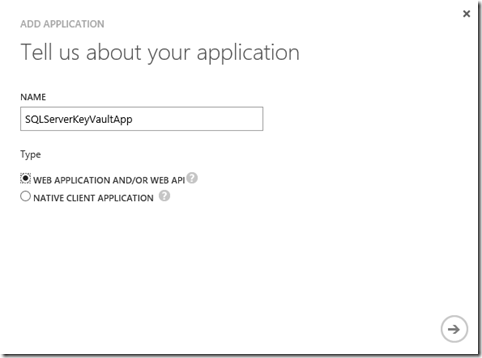
Enter a custom name. This can be anything you want.
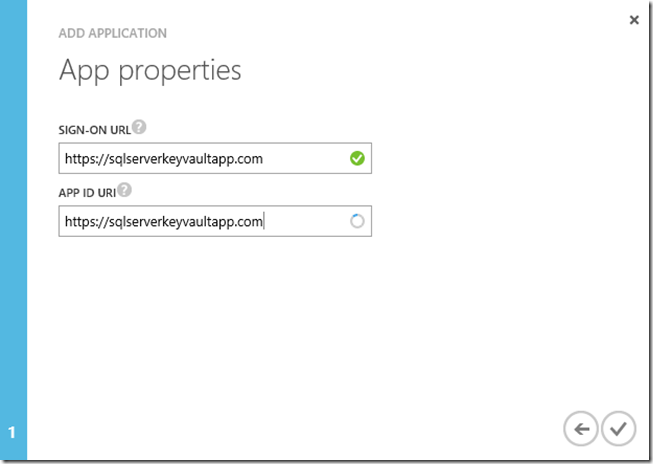
Enter a custom URL (this can be made up).
Select the tick to create the custom application.
Select "CONFIGURE"
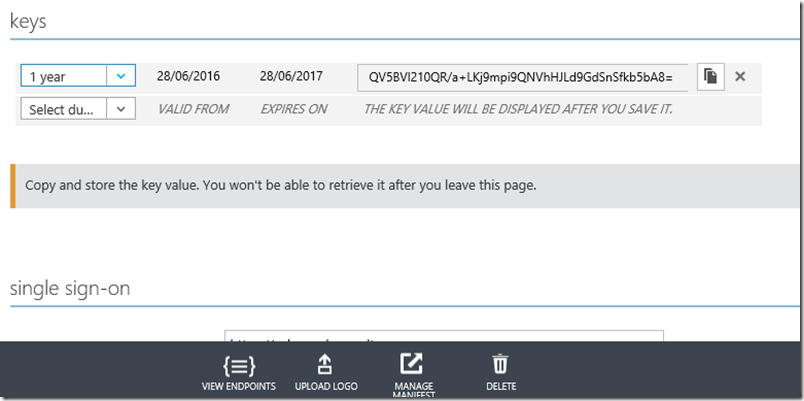
Scroll down the page to "Keys"
Select a duration from the drop down and click save at the bottom of the screen. This will then generate the key value. Be sure to save this value as once you navigate away from this screen as you cannot get the key value back.
Make a note of the ClientID and the Key Value. These will be used for the SQL Server credential that’s used to log into the azure key vault.
Oh – don’t worry about me showing the clear text of my ClientID and Key values – this app doesn’t exist anymore ![]()
Create the Azure Key Vault
Ensure that you have the latest version of azure PowerShell installed - https://azure.microsoft.com/en-us/documentation/articles/powershell-install-configure/
Open PowerShell ISE
Log into your Azure account.
Login-AzureRmAccount
Create a resource group
New-AzureRmResourceGroup -Name "AzureKeyVaultRG" -Location "North Europe"
Create the Azure Key Vault
New-AzureRmKeyVault -VaultName 'sqlserverkeyvault' -ResourceGroupName 'AzureKeyVaultRG' -Location 'North Europe'
Note: Make a note of the URL which is provided in the output of New-AzureRmKeyVault
URL: https://sqlserverkeyvault.vault.azure.net
Set permissions for the custom app to access the new Azure Key Vault
Note: -ServicePrincipalName is the ClientID from the custom app (created in Azure AD)
Set-AzureRmKeyVaultAccessPolicy -VaultName 'sqlserverkeyvault' -ServicePrincipalName ea9f18d8-b7a0-499e-b1f0-7145d919586b -PermissionsToKeys get, list, wrapKey, unwrapKey, create
Note:
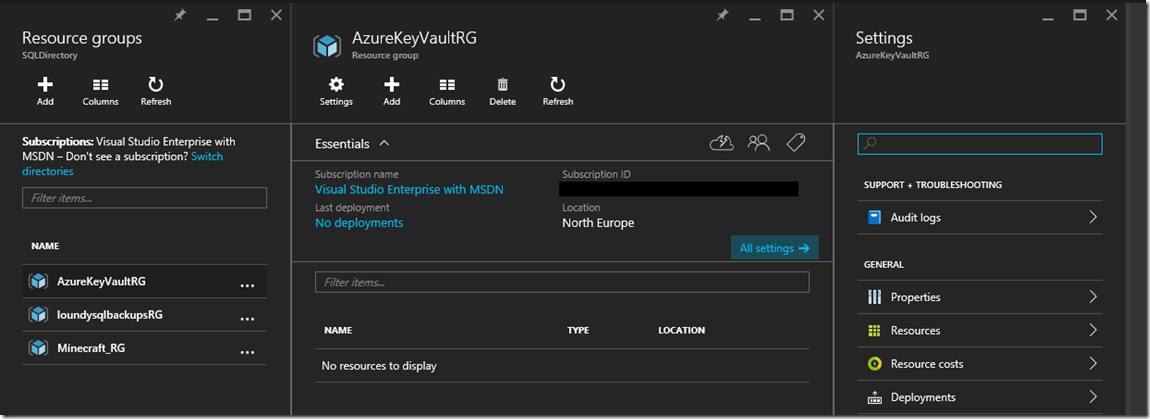
You will notice that in the Azure portal under the newly created resource group that no resources are visible. This is because there is currently no GUI support for Azure Key Vault:
Create the Azure IaaS VM
Create a new Virtual Machine. There's nothing super special here. The main thing to note is configuring the SQL Server setting in stage 4, but here's the whole process for completeness.
Select the desired SQL version from the gallery. Here I'm selecting SQL 2016 with the "Resource Manager" deployment model.
Enter Basic Configuration information:
Choose the VM size:
Configure option settings
In "SQL Server Settings" select "Azure Key Vault Integration"
Select Enable
Enter the required details.
- Key Vault URL - this was provided in the output of New-AzureRmKeyVault
- Principal Name - this is the ClientID provided when creating the custom application in Azure AD
- Principal Secure - this is the application key provided when creating the customer application in Azure AD
- Credential name - this is the name to give the credential that gets created inside SQL Server when the VM is created
Accept the config then click ok
Let validation run on the summary blade. Once validation has passed click ok to start the VM build process
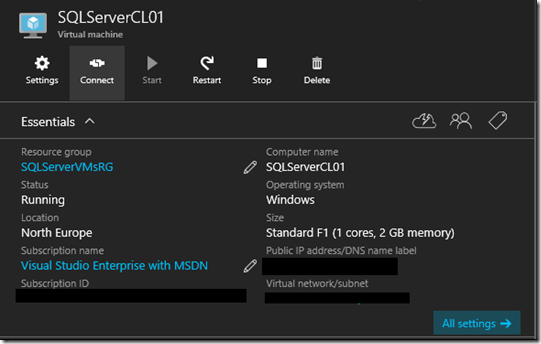
Once the VM has been created, connect to it
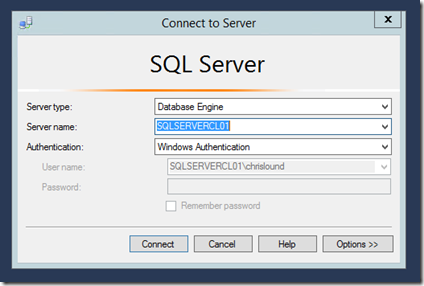
Connect to SQL Server
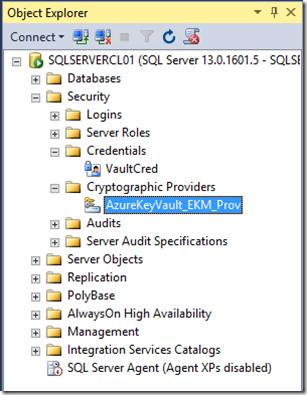
You will notice that the Azure Cryptographic provider and credential has been created
This is the SQL Server Connector and is installed in the following location
Create a TDE enabled Database with the key stored in the Azure Key Vault
Now that the key vault is installed and configured inside SQL server, we now need to create a login, map it to the credential, create a key and enable a database for TDE
Create your database which is to use TDE
Map your credential to your desired login. This is the login that's about to create the key in the key vault. Here I'm using my own admin login - be sure to disconnect your session and reconnect again if using this login!
Create the key in SQL server.
This can be by either creating a new key in the vault or creating the key in the vault and opening it in sql server
Creating the key in SQL server (which creates the key in the vault)
 CREATE ASYMMETRIC KEY tdekey
FROM PROVIDER [AzureKeyVault_EKM_Prov]
WITH PROVIDER_KEY_NAME = 'tdekey'
,ALGORITHM = RSA_2048
,CREATION_DISPOSITION = CREATE_NEW;
Side track!
At this point I got an error message:
Error 2050 basically means the Azure SQL Connector had a run time error but didn't know what it is:
Looking in event viewer we can get a bit more information. Here we can see that it looks to be a permissions problem:
What I'd failed to do was give the custom application CREATE permissions.
Reset the permissions and ensure CREATE is added:
Set-AzureRmKeyVaultAccessPolicy -VaultName 'sqlserverkeyvault' -ServicePrincipalName ea9f18d8-b7a0-499e-b1f0-7145d919586b -PermissionsToKeys get, list, wrapKey, unwrapKey, create
Note: I’ve included the create permission in the original code above.
Back on track!
The key now creates successfully:
Looking inside the Key Vault we can now see that they key has been created inside:
Get-AzureKeyVaultKey -VaultName sqlserverkeyvault
Now enable the database for TDE
Create a login for TDE which uses the key
The asymmetric key needs a login associated with it for TDE to work or you will get an error like:
 USE [master]
GO

CREATE LOGIN TDE_LOGIN FROM ASYMMETRIC KEY tdekey;
The newly created login needs a credential associated with it in order to access the key vault. Either create a new one or un-map the old one and remap it to the newly created login
I'm un-mapping and remapping here
 ALTER LOGIN [SQLSERVERCL01\chrislound] DROP CREDENTIAL [VaultCred]
GO

ALTER LOGIN [TDE_LOGIN] ADD CREDENTIAL [VaultCred]
GO
Create a database encryption key based off our newly created Asymmetric Key
 CREATE LOGIN TDE_LOGIN FROM ASYMMETRIC KEY tdekey;

USE [TDETest]
GO

CREATE DATABASE ENCRYPTION KEY
WITH ALGORITHM = AES_256
ENCRYPTION BY SERVER ASYMMETRIC KEY tdekey ; -- WE ARE ENCRYPTING THE DEK WITH THE KEY FROM THE EKM
Enable TDE
ALTER DATABASE TDETest SET ENCRYPTION ON;
The database is now encrypted using an EKM :)
Learn More
EKM Management Using Azure Key Vault - https://msdn.microsoft.com/en-us/library/dn198405.aspx
What is Azure Key Vault - https://azure.microsoft.com/en-us/documentation/articles/key-vault-whatis/





![clip_image001[7] clip_image001[7]](https://msdntnarchive.blob.core.windows.net/media/2016/06/clip_image0017_thumb.png)
![clip_image002[9] clip_image002[9]](https://msdntnarchive.blob.core.windows.net/media/2016/06/clip_image0029_thumb1.png)
![clip_image003[6] clip_image003[6]](https://msdntnarchive.blob.core.windows.net/media/2016/06/clip_image0036_thumb.png)
![clip_image004[5] clip_image004[5]](https://msdntnarchive.blob.core.windows.net/media/2016/06/clip_image0045_thumb.png)
![clip_image005[5] clip_image005[5]](https://msdntnarchive.blob.core.windows.net/media/2016/06/clip_image0055_thumb.png)
![clip_image006[6] clip_image006[6]](https://msdntnarchive.blob.core.windows.net/media/2016/06/clip_image0066_thumb.png)
![clip_image007[5] clip_image007[5]](https://msdntnarchive.blob.core.windows.net/media/2016/06/clip_image0075_thumb.png)
![clip_image008[6] clip_image008[6]](https://msdntnarchive.blob.core.windows.net/media/2016/06/clip_image0086_thumb.png)
![clip_image009[7] clip_image009[7]](https://msdntnarchive.blob.core.windows.net/media/2016/06/clip_image0097_thumb.png)

![clip_image001[9] clip_image001[9]](https://msdntnarchive.blob.core.windows.net/media/2016/06/clip_image0019_thumb1.png)
![clip_image002[11] clip_image002[11]](https://msdntnarchive.blob.core.windows.net/media/2016/06/clip_image00211_thumb.png)
![clip_image003[8] clip_image003[8]](https://msdntnarchive.blob.core.windows.net/media/2016/06/clip_image0038_thumb.png)
![clip_image004[7] clip_image004[7]](https://msdntnarchive.blob.core.windows.net/media/2016/06/clip_image0047_thumb.png)
![clip_image005[7] clip_image005[7]](https://msdntnarchive.blob.core.windows.net/media/2016/06/clip_image0057_thumb.png)
![clip_image006[8] clip_image006[8]](https://msdntnarchive.blob.core.windows.net/media/2016/06/clip_image0068_thumb.png)
![clip_image007[7] clip_image007[7]](https://msdntnarchive.blob.core.windows.net/media/2016/06/clip_image0077_thumb.png)