PAW host buildout
Continuing with the PAW series, in this blog post, I'd like to share the details of what we are planning to configure the host. I'd love to hear your thoughts, feedback about the design. For a recap on the PAW overall solution, you can find it in this blog post.
The PAW host is designed to run as little workload as possible. Ideally, it would just be the hypervisor. However, in reality there will be some applications which must be running on the physical host, such as hardware management tools, a browser for handling captive WiFi authentication portals, and an application to manage the virtual machines. I'm using Windows 10, version 1709 Enterprise Edition for my prototype.
Pre-requisites:
- A machine installed with Windows 10, version 1709 Enterprise Edition
- A physical device
- Has TPM2.0 (TPM reset and cleared)
- UEFI running in Native Mode (not Compatibility/CSM/Legacy mode)
- Second Layer Address Translation (SLAT) and Virtualization Extensions (Eg, Intel VT or AMD V) enabled
- SecureBoot enabled
- Recommended hard disk size 500GB or above
- Device storage layout:

Adding features
1709 Windows release has a new feature to support Windows client to run shielded VMs. On the host, we will create shielded VMs to run the secure workload. The following features are enabled on the PAW host:
- Hyper-V
- Guarded Host (a.k.a. HostGuardian)
- Windows Defender Application Guard is also enabled, to allow more network protection of the host
Enable security settings
The solution leverages a number of Windows built-in security features, some are enabled by default, some requires configuration changes.
- Windows Defender is enabled by default to monitor malware;
- Control Flow Guard is also enabled by default to combat memory corruption vulnerabilities;
- Credential guard protects logon credentials with VSM, you can enable it with group policy;
- Code Integrity policy defines the trusted software can run on the device, you can create a Code integrity policy for the device by running this cmdlet:
New-CIPolicy -Level Publisher -UserPEs -FilePath <CIpolicypath.xml>
You will need to follow this document to deploy the policy on the local machine.
Alternatively, Windows now comes with a built-in sample Code integrity policy you can build on, under %windir%\schemas\CodeIntegrity\ExamplePolicies. We recommend you deploy a code integrity policy in enforcement mode.
- Windows Defender Exploit guard (WDEG) is designed to prevent host intrusions. There are four features in WDEG:
- Exploit protection can apply exploit mitigation techniques to apps your organization uses, both individually and to all apps;
- Attack surface reduction rules can reduce the attack surface of your applications with intelligent rules that stop the vectors used by Office-, script- and mail-based malware;
- Network protection extends the malware and social engineering protection offered by Windows Defender SmartScreen in Edge to cover network traffic and connectivity on your organization's devices;
- Controlled folder access helps protect files in key system folders from changes made by malicious and suspicious apps, including file-encrypting ransomware malware.
WDEG adds more protection on Windows, you can find more details on how to configure it here.
- Security baseline policy has been drafted for the 1709 release, and it is also included as part of the PAW host customization.
Host guardian client configuration
To allow the PAW host to attest to the Host Guardian Server (HGS), you will need to have a HGS server deployed on-premises, or use the Cloud service we have prototyped.
- On-premises: Once you have followed this deployment document to set up the HGS server, you can configure the PAW Host using this guide.
- Cloud: the service is by invitation only. You will need to get this information from us.
To verify the configuration is done correctly, you can run this cmdlet on the PAW host after you have completed the deployment:
Get-HGSClientConfiguration
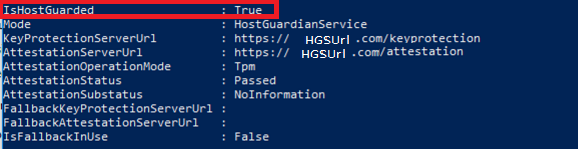
You can also use Test-HGSClientConfiguration to check for attestation result.
Deploy using a pre-built prototype image
We built a customized ISO image with all the customizations included in the document, you can enroll to our evaluation program to get a copy. I'm planning to release the evaluation copy early next week. Once you download the ISO image, you can copy it to a pre-formatted USB drive (8GB or above). To create a bootable USB:
From an elevated command prompt run DISKPART, and execute the following commands:
 list disk
select disk <number of your USB disk... e.g 'select disk 1'>
clean
create partition primary
select partition 1
active
format quick fs=fat32
assign
exit
USB drive is now bootable.
Copy the image file we shared with you to the USB disk by mounting the ISO image first, then copy the files inside the mounted drive to the USB drive (don't copy the actual iso file to the USB, that will not work).
Boot laptop using the USB drive, and follow the MDT prompts for deploying the PAW image. I recorded a short video to demo this experience:
[video width="988" height="720" mp4="https://msdnshared.blob.core.windows.net/media/2017/10/PAWHost.mp4"][/video]
Conclusion
Now your device is configured to run shielded VMs. There are a few more configurations we will add to later test builds, such as BitLocker, networking policies, create standard user for logon, lock down further on the user experience on host. Stay tuned.
In the next blog post, I will show you how to create VMs on this device. As always, we welcome your feedback.