Step by Step - Shielded VM Recovery
Shielded VMs protect the data and state of a Virtual Machine against inspection, theft and tampering from malware and datacenter administrators and they do so both at rest and in-flight. One of the ways we achieve is to block the features in Hyper-V that are there for an administrator’s convenience, e.g. we block console access and PowerShell Direct (among others) to ensure that no one but the tenant (or VM owner) has access.
This works great until there is a problem with the remote connection to a shielded VM. Troubleshooting these problems often requires a console connection. The question is how can we limit shielded VM access to tenant admins exclusively? One way to solve this problem is to use Encryption Supported instead of Shielded. The Encryption Supported mode is useful here because it does permit console connections but using it directly on a hoster's fabric exposes the VM to attack vectors that shielding prevents. As a result, you might argue that the Shielded mode is effectively rendered useless for anyone who wants to enable the strongest possible protections on their VMs but also have a supportability story should the guest OS break in some way—a supportability story that typically requires a console connection. There is a detailed comparison of Shielded vs Encryption Supported in the Shielded VM deployment guide.
So if you want to have your cake and eat it, too, read on. The solution came with the advent of the Hyper-V nested virtualization feature in Windows Server 2016. This feature enables a Virtual Machine to run Hyper-V and function just like it would on a physical machine (Note that, this feature is currently supported only on Intel processors). Using nested virtualization, we can simply put the damaged VM inside a shielded recovery VM (a.k.a. a repair garage), and lower the security policy of the damaged VM to Encryption Supported, where console connection to the damaged VM is permitted and access to the repair garage is limited to only the tenant admins. With all these building blocks in place, this blog post will show you the step-by-step instructions to establish console access to shielded VMs.
The diagram below illustrates how a repair garage is used to enable a console connection to a damaged shielded VM:
[caption id="attachment_615" align="alignnone" width="300"]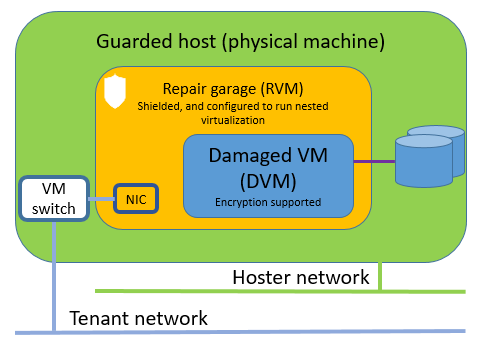 Damaged VM inside a repair garage, offer console access to tenant admin[/caption]
Terminology
Damaged VM (i.e. DVM): the shielded VM which needs to be enabled for console access.
Repair Garage VM (i.e. VMRE): a shielded VM which is configured with nested virtualization. It acts like a repair garage, inside which, the damaged VM can be accessed through the console.
Tenant host: a host machine that stores the owner guardian (including its private key) of the DVM. If you want to learn more about the owner concept, you can refer to the deployment guide.
Process outline
If a VM is shielded, we assume the VM owner or tenant wants to ensure that fabric admins CANNOT access their VM so it is important to maintain shielding protections throughout the recovery process.
The recovery process starts with the tenant admin (TA) who wants to establish console access to a shielded VM (i.e. DVM).
- TA first provisions a shielded VM (i.e. VMRE),
- TA then notifies the fabric admin (FA) that he wants to move the DVM inside the RVM.
- To do this, FA will first create a new VHDX for the repair garage (RG VHDX)
- FA then export the DVM to the data VHDX file
- FA dismounts RG VHDX file and attaches the RG VHDX to the VMRE
- FA configures VMRE to enable nested virtualization
- TA then RDPs to VMRE(remember, VMREis shielded and only accessible to the tenant)
- TA imports the DVM from the RG VHDX
- TA changes the security policy on DVM to 'Encryption Supported' in order to gain console access to DVM from within VMRE
- TA completes the troubleshooting on DVM and exports it back to RG VHDX
- Fabric admin puts it back on the fabric
Step by step instructions
Pre-requisites:
- TA wants to connect to a shielded VM, for simplicity, name it DVM
- TA provisions another shielded VM with the name VMRE
- VMRE and DVM connect to the same Virtual Switch on the same host
- VMRE memory size must be large enough to allow DVM to start as a VM inside it
Prepare for recovery
To make this process easier, I have written PowerShell scripts, which is now published to the PowerShell Gallery, you can follow the instructions on the page to deploy the model, and run the module functions to accomplish the tasks in the recovery process.
Fabric admin (FA):
FA runs the Export-ShieldedVMToVMRE on the guarded host which has both the RVM and the DVM running:
- FA configures VMRE to run nested virtualization
- FA creates a repair garage VHDX (RG VHDX), mounts it, formats it and exports DVM onto it
- FA attaches the RG VHDX to VMRE
Tenant admin (TA):
TA connects to the RVM, and runs the Import-ShieldedVMInVMRE which performs the following prerequisite tasks:
- Install Hyper-V role on VMRE, this requires reboot. TA will rerun Import-ShieldedVMInVMRE after reboot.
- Import DVM within VMRE
- Retrieve the current Key Protector of DVM
- Create a temporary recovery guardian certificate
- Copy the files created in step #3 and #4 to tenant host where the owner private key of DVM is stored. Run the Grant-VMREAccess to create a new Key Protector on the tenant host.
- Copy the new Key Protector to VMRE, continue with the Import-ShieldedVMInVMRE function, which attaches the new Key Protector to DVM, then changes DVM security policy to encryption supported.
Now, tenant admin can access DVM console inside VMREremote connection.
Cleanup
Tenant admin:
Once the troubleshooting process completes, tenant admin runs the Export-RecoveredVMToFabric in VMRE to:
- Change the DVM security policy back to be shielded;
- Export DVM to the data VHDX;
- Remove files created during the recovery process
Fabric admin:
Runs the Import-RecoveredVMtoFabric on the same guarded host (where DVM and VMREruns) to bring the (now fixed) DVM back on the fabric.
Conclusion
There is plenty of room for improvement to make this recovery process simpler and that’s something we’re hoping to do going forward. I hope the scripts are helpful in reducing the complexity in the meantime. As always, your comments and feedback will tell us where to focus our energy and resources. You can share them to us, or submit and vote on a request through the User Voice website.