Step by Step - Configuring Key Protection for the Host Guardian Service in Windows Server 2016
[This post is authored by Sumesh Kumar, Program Manager for the Enterprise and Security Product Team]
The “Key Protection Service” (KPS) is one of the two services that run as part of a Windows Server role called the Host Guardian Service (or HGS). The second of those two services is called Attestation and will be covered in a separate blog. KPS provides the keys (known as Transport Keys or TKs) needed to unlock & run Shielded VMs on affirmatively attested (or healthy) Hyper-V hosts. In this Blog post we will cover the installation and configuration of KPS in Windows Server 2016.
1 Installation/Configuration
KPS is automatically installed when you install the HGS server role. Check out how to install the HGS role here.
1.1 Initializing with HSM Backed Keys
If you followed the instructions to install the HGS role, then you now have a HGS initialized with a pair of software keys. You also have the option to use Hardware Security Module (HSM) backed keys. HSMs provide strong physical protection of secure assets, including keys, and should be considered a best practice when deploying HGS.
To initialize the HGS server using signing and encryption keys that are backed by an HSM, use the following PowerShell syntax:
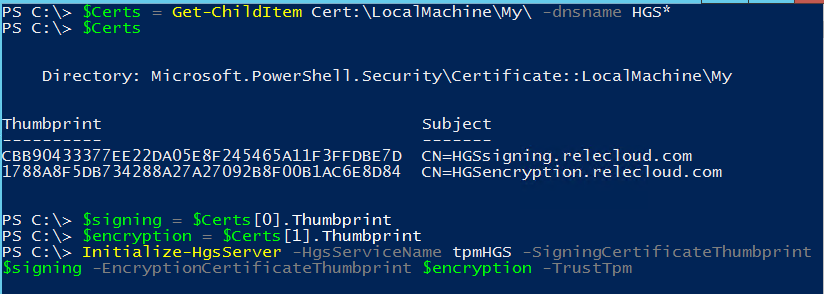
The signing and encryption keys used to initialize HGS will be the default keys used for protecting Shielded VMs.
1.2 Adding HSM Backed Keys
If you initialized HGS using keys other than those in an HSM or you simply want to replace the default keys that HGS uses, you can add the new encryption and signing keys using the Add-HgsKeyProtectionCertificate PowerShell cmdlet.
To view HGS’s current certificates, use Get-HgsKeyProtectionCertificate.
1.3 Marking HSM Backed Keys as Primary
You can set newly added HSM backed keys as the primary set of encryption and signing keys with Set-HgsKeyProtectionCertificate.

1.4 KPS and Key Management Tips
1. When importing a new set of signing and encryption keys, ensure you add them to the Certificate Store under “Local Computer” (referred to as “Local Machine” in PowerShell).

2. Ensure the user account under which the KPS service executes (KeyProtection app pool), has “read” access rights to the private keys of the HSM backed keys. This requires two steps:
Step #1. Launch IIS Manager and select “Application Pools” and note the account (as shown below) under which the KeyProtection app pool is running.

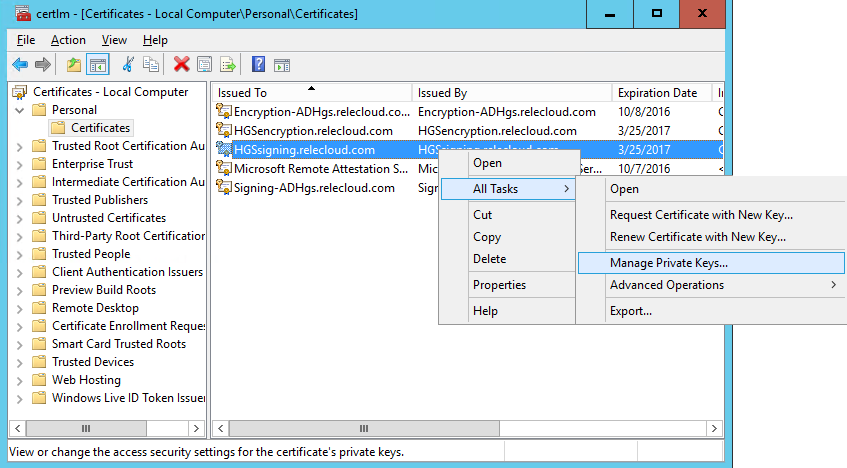
Step #2. Run the Local Machine Certificate Management Console (certlm.msc). Locate the encryption and signing certificates under the “Personal” folder, right click each of them in turn and verify (or add the permission if necessary to) the user account from Step #1 to the list of Groups and Users permitted to manage the private keys. Allow “Read” is the only needed permission.
3. To confirm KPS has access to the private keys of your encryption and signing certificates, run the HGS diagnostics using Get-HgsTrace. If any tests fail, be sure to remediate the identified problem(s) before continuing to configure any additional nodes.

4. The signing and encryption keys must be available on every node in the HGS cluster. On each of these nodes, you will need to install the same encryption and signing certificates according to your HSM manufacturer’s directions. Once the certificates are installed, grant the KPS App Pool identity read access to the private keys, as before.
2 Bring Your Own Key scenario (BYOK)
Security-sensitive tenants may prefer to use their own HSM-backed keys for signing and encryption instead of the default keys configured and owned by the hoster. To support this, the hoster and tenant need to agree on a process to copy the tenant’s keys into the hoster’s HSM. This is a sensitive process and is subject to far greater scrutiny than other key management methods—it can even take place via in-person, offline methods. The actual process of either migrating keys from the tenant HSM to the hoster HSM or having the hoster’s HSM create the keys (so they’re “born” in the HSM) should be done according to the HSM manufacturer’s guidance.
Once the tenant’s encryption and signing keys are known to the hoster’s HSM, the hoster must install the certificates on each HGS node and grant the KPS App Pool access to the private keys, as shown in sections 1.2 and 1.4. Note that the certificates you install onto each HGS node only hold the public key, the private key never leaves the HSM. Finally, the hoster must not assign the tenant’s keys as the primary KPS keys because KPS’ primary key is assumed to be appropriate for all tenants, not an individual tenant. When the hoster has finished configuring all HGS nodes with the tenant’s keys, tenant may now deploy new Shielded VMs based upon them.