Windows 7/cannot launch JRE with IE8 though TMG Firewall
問題描述︰Windows 7/ cannot launch JRE with IE8 though TMG Firewall


說明與方法︰Windows 7的IE8 透過TMG Firewall 無法正常執行 java based 的應用程式, 但在XP的IE6卻不會有此現象產生.
原因分析︰
1. 比較正常和不正常的Process Monitor log,我們看到以下的現象:
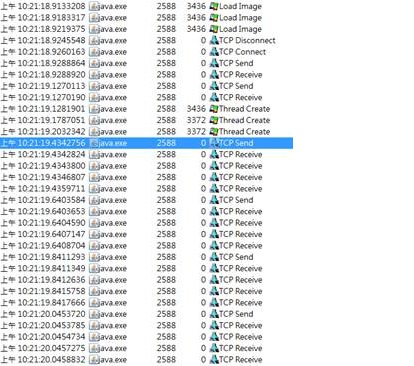
不正常的連線:
2. 從上面的比較,我們得出以下兩個結論:
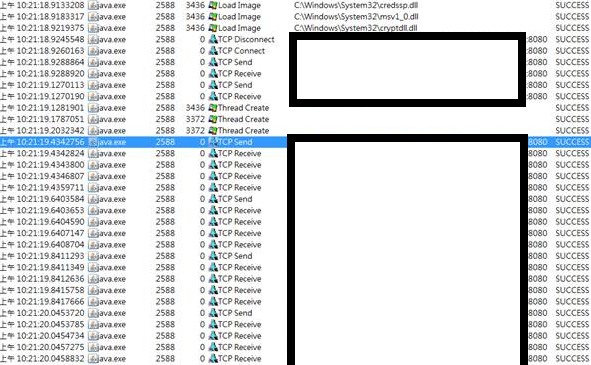
· 在正常的連線中,我們看到java.exe的程式和 TMG 連線之後,有成功的連線到Internet並且將要載入的Java程式下載執行。
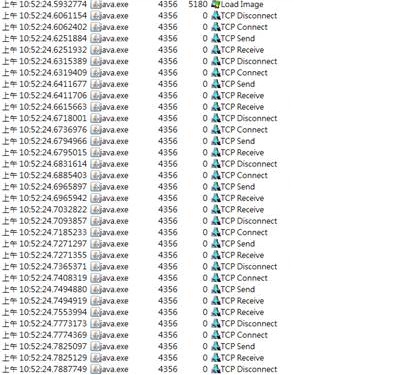
但是在不正常的連線中,我們看到java.exe的程式和Proxy只有快速的交握->驗證->斷線 的動作(根據行為判斷,確實行為需要收集無加密或解密後的網路封包),因此這個現象也說明了無法正確執行Java程式的現象。
· 從Process Monitor Log中看到,IE可以正確地和TMG取得驗證連線Internet,但是java.exe卻無法正常的連線Internet。因此真正的問題出在java.exe這個程式和TMG中間的驗證行為。
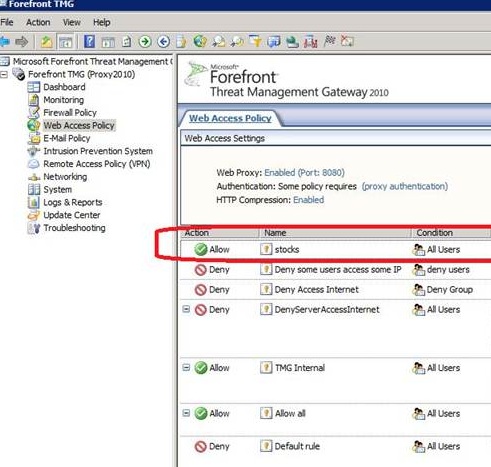
3. 我們測試建立一筆rule, 僅允許網站執行 java 應用程式, 在此設定之後client就可以正常執行 java, 所以有可能是 java.exe跟TMG的驗證問題.
參考連接︰
An ISA server or Forefront Threat Management Gateway server requests credentials when client computers in the same domain use Internet Explorer to access Web sites that contain Java programs
https://support.microsoft.com/kb/925881
Symptom:
· You have a client computer that uses a Microsoft Internet Security and Acceleration (ISA) Server server or a Microsoft Forefront Threat Management Gateway, Medium Business Edition server as a proxy server.
· You configure Windows Internet Explorer on the client computer to use a proxy server.
· You have a Java Virtual Machine (JVM) that is running on the client computer.
In this scenario, when the client computer uses Internet Explorer to access a Web site that contains Java programs, the ISA Server or the Microsoft Forefront Threat Management Gateway, Medium Business Edition server may request that the client computer provides credentials. This issue occurs even if the client computer is located in the same domain as the ISA server or the Microsoft Forefront Threat Management Gateway, Medium Business Edition server.
Cause:
The ISA or the Microsoft Forefront Threat Management Gateway, Medium Business Edition proxy client computer is requested for credentials because the JVM cannot authenticate itself to the proxy server.
Workaround:
Method 1
Clear the Require all users to authenticate check box, and then create an anonymous access rule for all outgoing traffic. Additionally, add the site that contains Java programs to the Access Rules destinations. To do this, follow these steps.
For Microsoft Forefront Threat Management Gateway, Medium Business Edition
1. Click Start, point to All Programs, point to Microsoft Forefront TMG, and then click Forefront TMG Management.
2. Expand Server_Name, where Server_Name is the server that is running Microsoft Forefront Threat Management Gateway, Medium Business Edition, and then click Firewall Policy.
3. Click Networking, right-click Internal network on the Networks tab, and then click Properties.
4. Click the Web Proxy tab, and then click Authentication.
5. Make sure that the Require all users to authenticate check box is cleared, and then click OK two times.
6. Right-click Firewall Policy, click New, and then click Access Rule.
7. In the Access rule name box, type a name for the rule, and then click Next.
8. On the Rule Action page, click Allow, and then click Next.
9. On the Protocols page, click Selected Protocols in the In this rule applies to list. Click Add, add HTTP protocol and HTTPS protocol, and then click Next.
10. On the Malware inspection page, choose the appropriate radio button, depending on whether you want to enable malware inspection.
11. On the Access Rule Sources page, click Add.
12. In the Add Network Entities dialog box, expand Networks, click Internal, click Add, and then click Close. Click Next.
13. On the Access Rule Destinations page, click Add.
14. In the Add Network Entities dialog box, click New, and then click URL Sets/Domain Name sets.
Note URL sets are for HTTP traffic whereas Domain Name Sets are for HTTPS traffic.
15. In the New URL Set Rule Element/New Domain Name Set Policy Element dialog box, type an appropriate name.
16. Click Add, type the URL or the domain of the sites that contain Java programs, and then press ENTER.
Note If you want to enter more than one URL in the URL set or in the Domain Name set, repeat step 16.
17. Click OK.
18. In the Add Network Entities dialog box, expand URL Sets/Domain Name Set, click the URL set that you created in steps 16 to 17, click Add, and then click Close. Click Next.
19. Make sure that the This rule applies to requests from the following user sets list contains the All Users entry, click Next, and then click Finish.
20. Click Apply to save the changes and to update the firewall policy.
21. Click OK.