The Lync Server Deleteomatic
Have Fun and Delete Things, Too:
The All-New Lync Server Deleteomatic
Between the Lync Server Management Shell, the Lync Server Control Panel, and all the assorted Lync Server Resource Kit tools you're probably thinking, "You know, I already have all the Lync Server management tools I could ever need." But guess what? If you are thinking that you already have the Lync Server management tools you could ever need that can mean only one thing: you haven't heard about the Deleteomatic yet.
The Whatomatic?
The Deleteomatic. The Deleteomatic is a little PowerShell script (well, OK, not that little; it does have more than 600 lines) that's designed to delete things. (Hence the clever name.) More specifically, the Deleteomatic is designed to delete Lync Server things, things like client policies, dial plans, Address Book configuration settings, Response Group queues, and – well, you get the idea. With one or two exceptions, if it can be deleted from Lync Server then the Deleteomatic can delete it.
Note. And yes, as a matter of fact, it does slice, dice, and make julienned fries!
It just doesn't do any of those things very well.
Ah, that's a good question: can't you just use the Lync Server Management Shell and/or the Lync Server Control Panel to delete things from Lync Server? Of course you can; for that matter, there are probably all sorts of other tools that you can use to delete things from Lync Server. However, as incredibly useful as the Management Shell and the Control Panel are, the truth of matter is that both of these tools do have a few limitations. (For one thing, just try making julienne fries with the Control Panel and you'll soon see what we mean.) In addition to that:
· Not everything that can be deleted from Lync Server can be deleted by using the Control Panel; for example, Address Book settings can't be found anywhere in the Control Panel. Admittedly, you can pretty much delete everything that's deletable by using the Management Shell; if you couldn't, the Deleteomatic (which relies on Lync Server PowerShell) wouldn't work. At the same time, however, using the Management Shell sometimes requires you to deal with … interesting … commands like this one:
Remove-CsRgsAgentGroup -Identity service:ApplicationServer:atl-cs-001.litwareinc.com/1987d3c2-4544-489d-bbe3-59f79f530a83
And yes, there are ways to work around the need to use Identities like the one shown above. But even then, typing commands from the Management Shell prompt will always require you to, well, type commands at the Management Shell prompt. And typing things is often-times easier said than dnoe.
Er, done.
· The Control Panel only allows you to delete one item at a time. Again, you can delete multiple items using the Management Shell, but even then you can only do that if those items fit a well-defined pattern. (For example, all the client policies configured at the per-user scope.) But supposed you wanted to delete the DublinClientPolicy, the RedmondClientPolicy, and the site:Redmond policies, and delete them all in one fell swoop? Can you do that with the Management Shell? No, you cannot.
Well, OK, so maybe you can. But it's not especially intuitive how you would go about doing it.
And no, we're not going to give you a hint on how you would do that; if we did, you wouldn't need the Deleteomatic, now would you? But here's a hint on how you can do that:
"DublinClientPolicy","RedmondClientPolicy","site:Redmond" | Remove-CsClientPolicy
That works. But, again, it is a lot of typign.
Er, typing.
· One of the golden rules of Lync Server management is this: it's never a good idea to delete a per-user policy without first unassigning that policy from any users who have been assigned that policy in the first place. Can you do that using either the Management Shell or the Control Panel? You bet you can. However, you're on your own to figure out how to unassign and then remove that per-user policy.
And this time we mean it. (OK, fine: later in this article we'll show you code that does that.)
· Neither the Management Shell nor the Control Panel provides an obvious way to back something up before it gets deleted. As a general rule, that doesn't matter: after all, if you're planning on deleting something that's usually because you don't want the thing anymore anyway. And yet, still, there is that whole notion of being better safe than sorry. In other words, there might be times when it would be a good idea to make a backup copy of your Address Book configuration settings before you delete those settings. However, with no Backup command in the Control Panel, and with no Backup-CsAddressBookConfiguration cmdlet, well, that, too is much easier said than done.
Fortunately, though, the Deleteomatic has been designed to address all these issues, and more. For example, with the Deleteomatic you can delete multiple items at once, and without having to know the item's Identity. (Instead, the Deleteomatic will show you the Identity; you don't have to have all your Identities memorized.) If you choose to delete a per-user policy then the Deleteomatic will automatically unassign that policy before deleting it. And, if you want to, you can even ask the Deleteomatic to make a backup copy of something before that something gets deleted. Needless to say, it's the greatest Lync Server tool ever!
Official Disclaimer
Having said that, you should not consider the Deleteomatic to be the greatest Lync Server tool ever; in fact, you shouldn't even consider the Deleteomatic to be a Lync Server tool, period. The Deleteomatic came about because we wanted to show people how to write GUI "applications" using Windows PowerShell. (If we haven’t made it clear yet, the Deleteomatic is written entirely in Windows PowerShell.) When we first came up the idea of showing people how to add GUI elements to their scripts, we thought we'd just demonstrate how you could do something simple like, say, display a window that shows a list of all your client policies or something. However, that seemed a bit lame.
Yes, even for us.
Because of that, we started adding features to our sample script and, before we knew it, we had a Deleteomatic on our hands. (Very similar to the process Michelangelo underwent when he just started painting over a couple marks on a wall and then somehow ended up with the ceiling of the Sistine Chapel.) All of these additional features are nice, and they make the Deleteomatic look like a real application. Keep in mind, however, that the Deleteomatic is, at heart, just a demonstration of how you can write GUI "applications" using Windows PowerShell. The Deleteomatic is intended to show you the kinds of things that you can do using Windows PowerShell and the Lync Serve cmdlets. As such, it's not a real Microsoft application, it's not a supported utility, it's largely untested, it will never be localized into other languages, and we can't say with 100% certainty that, if you use the Deleteomatic, all your hair won't immediately fall out.
Which might explain why one of authors of the Deleteomatic always wears a baseball hat. Hey, you never know, right?
Note. Good point: if the Deleteomatic is just a way to demonstrate the sorts of things that you can do with Windows PowerShell and the Lync Server cmdlets, shouldn't we have an article that explains the code behind the Deleteomatic? Well, for once at least, we're way ahead of you.
But enough about that. Let's see if we can figure out what the Deleteomatic does and how it actually does it.
Note. Yes, considering the fact that we wrote the Deleteomatic we should be able to figure out what it does and how it actually does it. But we learned a long time ago never to take anything for granted, especially anything that we happen to be involved in.
So Where Can I Buy One of These Deleteomatics?
Well, you can't: the Deleteomatic is not for sale. However, what you can do is get a free copy of the thing instead: all you need to do is grab a copy of the ZIP file Deletomatic.zip (located at the end of this article) and then extract Deleteomatic.ps1 to a folder of your choice (for example, C:\Scripts).
Got that? Perfect. Next, start up the Lync Server Management Shell. (Or, if you prefer, start a remote session of Windows PowerShell and import the Lync Server module.) As soon as the Management Shell is up and running, type the full path to your script file and then press ENTER. In our case, that would mean typing the following at the PowerShell prompt:
C:\Scripts\Deleteomatic.ps1
With any luck, the Deleteomatic will soon appear in all its glory:
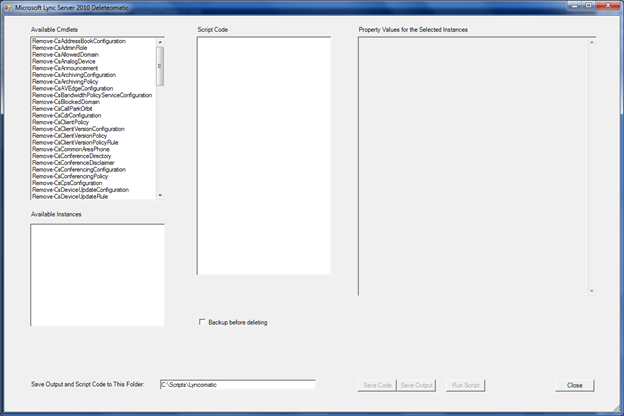
And you're right: that doesn't look like much, does it? But just wait until you see it in action.
The Deleteomatic in Action
To begin with, take a peek at the upper left-hand portion of the screen. What you'll see there is a list of all the Remove-Cs cmdlets:
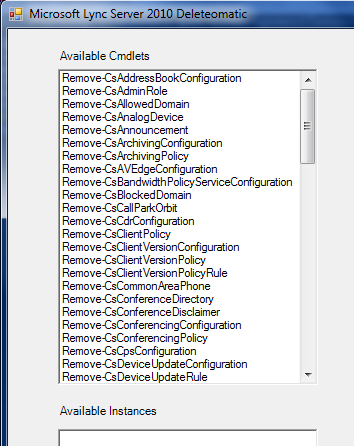
Note. OK, what we should say is that you'll see most of the Remove-Cs cmdlets. As a general rule, you'll see all the Remove-Cs cmdlets that use an Identity parameter. However; there are a few Lync Server cmdlets that don't use an Identity parameter. (Case in point? Most of the Remove-CsLis cmdlets, the cmdlets used with the Location Information Service, don’t use an Identity parameter.) In order to make our life easier, and in order to keep the Deleteomatic code as simple as possible, we decided to leave out cmdlets that don't play by the rules.
Or at least cmdlets that don't include an Identity parameter. But we'll talk more about that in the articles that talk about the Deleteomatic code.
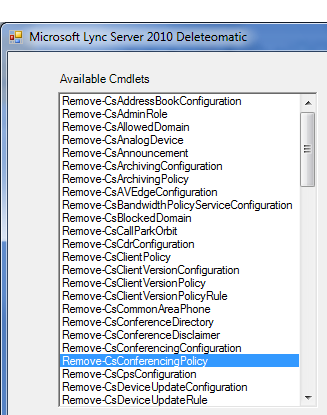
So what are you supposed to do with that list of Remove-Cs cmdlets? We'd suggest you do this: click on a cmdlet of interest. For example, click on the Remove-CsConferencingPolicy cmdlet:
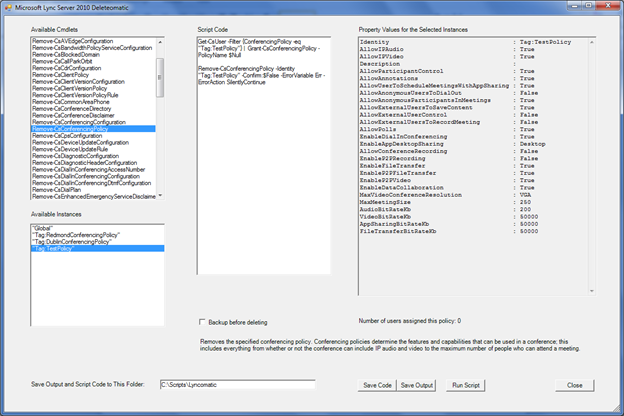
When you do that, two things are going happen. (Three, if you count the feeling of peace and tranquility that will likely sweep over your body.) First, you should see a brief description of the cmdlet and what it does:

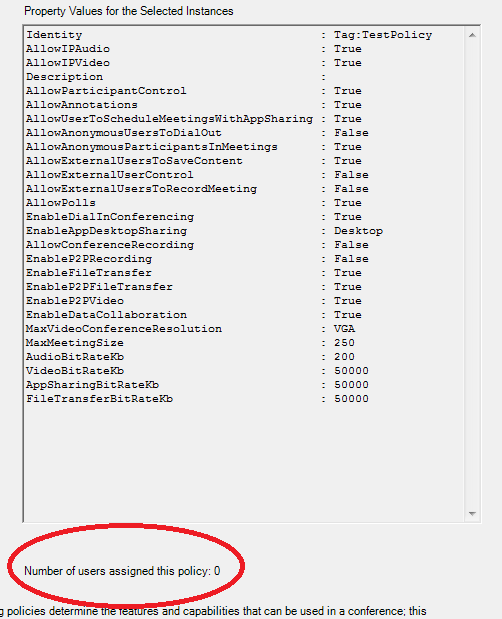
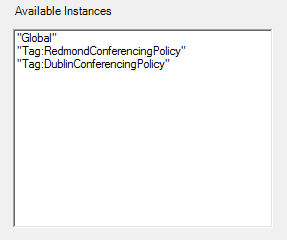
More important, you should also see a list of all your existing conferencing policies:

Why is this list of existing policies important? That's easy. Thanks to this list, the Deleteomatic can now do what it was born to do: delete things.
Note. What if you don't have any existing conferencing policies? Well, to tell you the truth, that's impossible: at the very least, you'll always have a global conferencing policy. However, it is possible to click on a cmdlet – like, say, Remove-CsRgsAgentGroup – only to discover that you don't have any Response Group agent groups. But that's OK. All that means is that nothing will show up in the Available Instances listbox, and that there won't be anything for the Deleteomatic to delete. It kind of takes the fun out of using the Deleteomatic, but it doesn't hurt anything.
So did you click on the Remove-CsConferencingPolicy cmdlet like we suggested? Excellent. Now, go ahead and click one of your existing conferencing policies; when you do that, the Deleteomatic should light up like a Christmas tree:
Note. OK, not like a particularly nice Christmas tree; it's really more of a Charlie Brown kind of Christmas tree. But a Christmas tree nonetheless.
So what exactly is all this information that has suddenly festooned the Deleteomatic? Well, on the right-hand side of the screen you'll see all the property values for the selected policy:
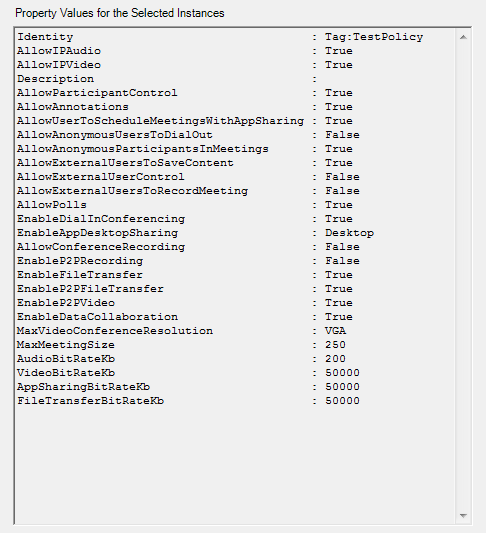
Why does the Deleteomatic show you all the property values for the selected item? You got it: because that way you'll know exactly what it is you're deleting before you actually delete it.
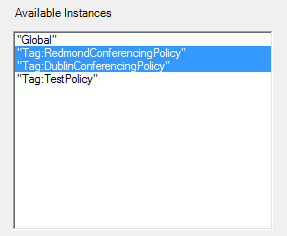
We thought that was kind of handy, too. And guess what? One of the cool things about the Deleteomatic is that it lets you select (and then, if you want to, to delete) multiple items. For example, suppose you click one conferencing policy, then hold down the Ctrl key and click a second conferencing policy. That means the selected instances will look like this:
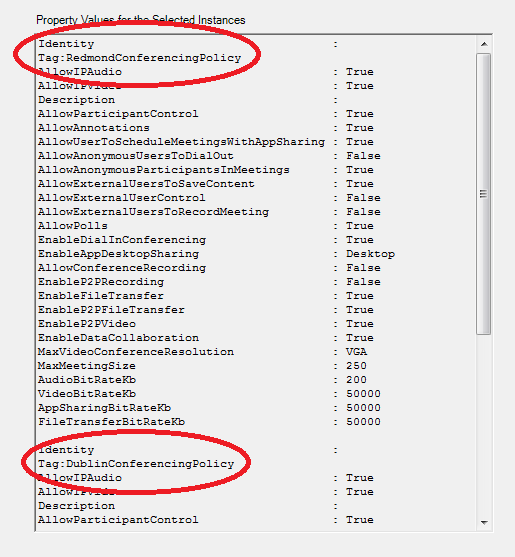
On top of that, property values for both of the selected policies will show up in the Property Values box:
Could there be anything better than that? No. That's as good as life will ever get.
Sorry to have to be the ones to break that to you.
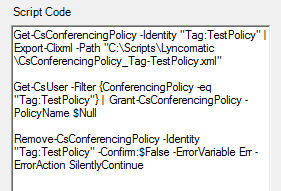
We're the first to admit that working with multiple items is pretty exciting; for now, though, let's go back to our original scenario, the one where we selected only a single conferencing policy (TestPolicy). When we do that, we should also see the following code in the Script Code box:
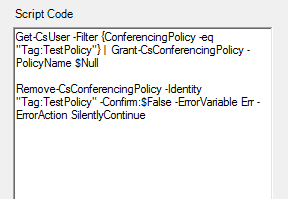
What's that code for? As it turns out, that's the code that deletes the selected policy.
And yes, we know what you're thinking: that does look like a lot of code just to delete one little conferencing policy, doesn't it? Because of that, let's take a moment to explain why there's so much code there.
For starters, we have this little block of PowerShell coding:
Get-CsUser -Filter {ConferencingPolicy -eq "Tag:TestPolicy"} | Grant-CsConferencingPolicy -PolicyName $Null
What this code does is unassign the selected policy (TestPolicy) from any users who have been assigned the policy (and it does this before the policy is deleted). What's the point of that? Well, as you probably know, if you try to delete a per-user policy and that policy is currently assigned to one or more users, you're going to be presented with a confirmation prompt similar to this:
The policy "TestPolicy" is currently assigned to one or more users. Assign a different policy to the users before removing this one.
The policy is in use.
[Y] Yes [N] No [S] Suspend [?] Help (default is "Y"):
If you answer yes (Y), you can go ahead and remove the policy without first unassigning it from the affected users; Lync Server has no problem with you doing that. However, from that point on any time you do anything that involves user accounts and Lync Server PowerShell (even a simple thing, like listing the display names of all your users) you'll get annoying little warnings like this in your output:
DisplayName
-----------
Pilar Ackerman
Patrick Hines
WARNING: "TestPolicy" with identity "14" assigned to "sip:kenmyer@litwareinc.com" has been removed from configuration store.
Ken Myer
Ann Reagan
These warnings aren't fatal, and they don't cause any real problems. But they can be annoying.
Note. You say this has already happened to you? Or, more correctly, to a … friend … of yours? Bummer. But don't despair; our article Getting Rid of Policies You Thought You Already Got Rid Of should help you get rid of those unwanted warnings.
At any rate, code like the following unassigns a per-user policy before the Deleteomatic actually deletes that policy:
Get-CsUser -Filter {ConferencingPolicy -eq "Tag:TestPolicy"} | Grant-CsConferencingPolicy -PolicyName $Null
We should also note that you'll see a block of code like that only when you're dealing with a per-user policy; if you're dealing with a global, site, or service policy, or if you're dealing with a collection of configuration settings you won't see that code:
Why don't you see code for unassigning the policy? We know why: because those other items (like a global policy or like configuration settings) are never directly assigned to users. You don't have to worry about unassigning something that was never assigned to begin with.
Note. Good question: has anyone ever been assigned the selected per-user policy in the first place? Beats us. But the Deleteomatic will also show you the total number of users currently assigned a policy:
Just something we decided to throw in when the Deleteomatic kept burning the fries instead of julienning them.
So does all that make sense? Let's hope so, because now we're moving on to our next chunk of code:
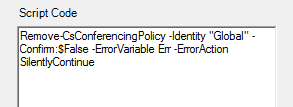
Remove-CsConferencingPolicy -Identity "Tag:TestPolicy" -Confirm:$False -ErrorVariable Err -ErrorAction SilentlyContinue
Believe it or not, that's the code that actually deletes the TestPolicy policy. Again, you're probably wondering, "Why is there so much code?" After all, wouldn't this little bit of code work equally well:
Remove-CsConferencingPolicy -Identity "Tag:TestPolicy"
In this case, yes, that little snippet of code would work equally well. However, some of the Remove-Cs cmdlets prompt you before you actually delete something. That's fine, except that this prompt appears in the Management Shell window instead of in the Deleteomatic. There are probably all sorts of ways that we could try to trap that prompt and display in the Deleteomatic window instead. To be honest, though, that was too much trouble; we wanted to keep the Deleteomatic as simple as we could. (And we didn’t want to put too much work into the thing considering the fact that this was just a little side project and has nothing at all to do with our real work.) Therefore, we took the easy way out and added this bit of code to each command in order to suppress the confirmation prompt:
-Confirm:$False
Admittedly, you don't always need to do this: most of the Remove-Cs cmdlets don't have a confirmation prompt anyway. But, again, it was easier to just tack this on to every command rather than sit down and try to figure out which commands actually needed it and which ones didn't.
Then there's little addition to each command:
-ErrorVariable Err -ErrorAction SilentlyContinue
This code is there on the off-chance that something goes wrong when you try to delete an item. For example, suppose you try to delete a policy and, for some reason (maybe another administrator has just deleted it), that policy can't be deleted. Without the preceding code, the error message received would appear in the Management Shell window; that means you might never see the message. All we're doing here is capturing the error message so it can be displayed in the Deleteomatic; that's what the ErrorVariable parameter is for. Meanwhile, the ErrorAction parameter tells PowerShell to keep chugging away even if an error does occur. In turn, that means the Deleteomatic will not get hung up if, say, a particular policy can't be deleted.
OK. Let's assume that we will really do want to delete the TestPolicy conferencing policy. How do we do that? By clicking the Run Script button, of course:
Do that and the Deleteomatic will run all the code in the Script Code box. In the example we've been using, that means the Deleteomatic will unassign TestPolicy from any users who were previously assigned that policy and then remove TestPolicy from the system.
Just that easy, just that quick.
Two notes about the Run Script button. First, why do we even have a Run Script button; couldn't we just delete an item the moment you clicked on that item in the Available Instances box? Yes, we could. But that would mean that you could only delete items one-by-one. It would also mean that you could never make a mistake; after all, if you accidentally clicked on the wrong policy the Deleteomatic would go ahead and delete that policy. Based on our own personal experience, we decided it was best not to assume that a mistake would never be made.
Second, yes, you can modify the code in the Run Script box, and the Deleteomatic will dutifully run whatever code appears in there. We're not sure that's a great idea: for one thing, it sort of defeats the whole purpose of the Deleteomatic. For another, we can't guarantee what will happen if you type something really crazy into the Run Script box. But suppose you type this in the box and then click Run Script:
Get-CsDialPlan
In turn, information about your dial plans will be displayed in the Deleteomatic:
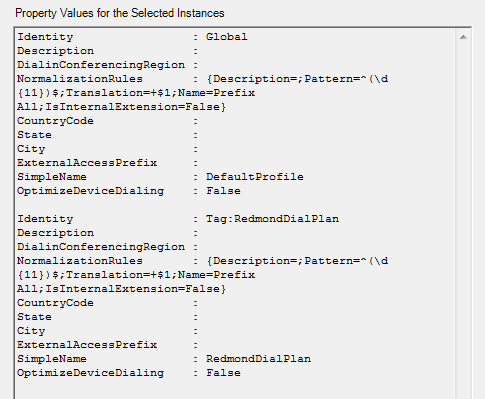
Kind of a weird thing to do, yes. But it works.
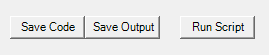
Just a few more notes and then we'll call it a day. Some of you might have noticed the Save Code and the Save Output buttons in the Deleteomatic user interface:
The Save Code button does exactly what the name suggests: it saves the current code to the default folder. (That's the path listed in the text box labeled Save Output and Script Code to This Folder.) Want to turn the code generated by the Deleteomatic into a regular old .ps1 script file? Then just click the Save Code button.
As for Save Output, clicking that button simply saves the data displayed in the Property Values box. So, yes, if you wanted to you could use the Deleteomatic to retrieve information and then save that information to a text file. Click a cmdlet, click an instance (or instances), and then, instead of deleting those instances, click Save Output to save the information.
Consider that another little bonus that we threw in, just for the heck of it.
And then there's this:
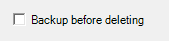
What's the Backup before deleting checkbox for? Well, to begin with, if you select this checkbox you'll end up with another little hunk of code in the Script Code box:
In other words:
Get-CsConferencingPolicy -Identity "Tag:TestPolicy" | Export-Clixml -Path "C:\Scripts\Lyncomatic\CsConferencingPolicy_Tag-TestPolicy.xml"
What this command does is make a copy of the selected item (or items) in XML format; in turn, that gives you a sort of backup copy of the selected item. And that gives you a way to restore the item should you later regret deleting it.
Note. With some limitations. See the article How to Undo That Thing You Wish You Had Never Done in the First Place for more information.
Finally, we should point out that the Deleteomatic is actually a fairly dynamic little application. For example, suppose we select the conferencing policy TestPolicy and then click Run Script. As soon as the policy has been removed, the Deleteomatic will automatically update the Available Instances listbox:
What more could you ask for?
Oh. Well, that would be a nice addition, wouldn't it? And so would that. Tell you what: if you have suggestions for or run into problems with the Deleteomatic, drop us a line at cspshell@microsoft.com and we'll see what can do. In the meantime, enjoy version 1.0, and keep your eye for our upcoming series of articles that explain how you can write your own Deleteomatic.
And no, sorry: we have no plans for a series explaining why you might want to write your own Deleteomatic. You're on your own there.