The Ultimate Intune Setup Guide – Stage 3: Sync accounts from on-prem
So far in this series, we’ve signed up to the Intune service and configured our public domain. In this post we’ll sync our on-premises Active Directory accounts to the Azure AD instance that Intune will use. This allows our users to logon to their Intune based services with their corporate credentials. I highly suggest that you enable these features, otherwise the user experience of having a separate username and password for Intune will not be good.
Now, just to confuse things, there are generally two scenarios in which this has to be configured in different ways. I’m going to cover both.
- No on-prem Active Directory sync to the cloud* is currently in place
- Some form of Active Directory sync to the cloud* is currently in place
* by cloud, I mean anything that might use DirSync such as Office 365, Dynamics Online, Azure AD, etc
To confuse things even more, we have multiple options for Single Sign-On (SSO)/Same Sign-On (SSO) end user experience. I’m going to cover both, too!
- Password hash sync to Azure AD enabling Same Sign-on
- On-prem Active Directory Federation Services (ADFS) performing the authentication for Single Sing-On
Note: A quick word on DirSync vs Azure AD Connect vs Azure AD Sync
DirSync and FIM (Forefront Identity Manager) have long been the tools used to sync on-prem AD with cloud based services. While both tools have been around for a long time and are well known, there are some disadvantages to using them. DirSync for example doesn’t play well in multi-forest environments. While FIM does a great job in multi-forest environments, it is a large product and has quite a steep learning curve.
The AD team have released a two new tools which replace the DirSync functionality.
Azure AD Sync is a supported product that performs most of the functions of traditional DirSync, but adds extra functionality such as mutli-forest support and password write back. It is recommended to use the Azure AD Sync tool. You can download the public release from here
Azure AD Connect is currently in Connect Preview and is not supported. It has many of the same features as DirSync and Azure AD Sync (in Preview), and has plans for many other features such as non-AD LDAP support and extended writeback support. You can download the Connect Preview from here
For a full feature comparison across all four directory integration tools, please see the following MSDN page
https://msdn.microsoft.com/en-us/library/azure/dn757582.aspx
If you plan to use the Azure AD Connect or Azure AD Sync tool for your directory synchronization, just replace all of my steps that include DirSync with the new tools.
New on-prem Active Directory sync required
Your first decision to make is how you’d like your users to logon using their corporate AD credentials. There are two ways we can achieve this.
1. Password hash sync to Azure AD enabling SSO
This is by far the easiest option. By enabling password hash sync, your users can logon using their corporate AD username and password. The service works via syncing a double hashed password (hashed once in your AD database, and a second hash via the DirSync tool) into the Azure AD cloud identity service. When the user logs on, the password is hashed and compared to that stored in the Azure AD service. If the hash matches, authentication is successful.
2. Authentication redirect via Active Directory Federation Services (ADFS)
ADFS is a secure way to redirect an authentication request to a locally managed server. Corporations install and configure their own ADFS infrastructure which handles the authentication requests. When a user attempts to logon to their Intune service, the authentication request is redirected to the corporately managed ADFS servers which perform authentication against the on-premise Active Directory.
While ADFS is seen as slightly more secure than password hash sync, the management and cost overhead is often outweighs the small security increase. ADFS is also the only way to provide a true Single Sign-On experience.
1. Password hash sync to Azure AD enabling SSO
Enable Active Directory synchronization in Intune
Go back to the Users subheading, find the Active Directory synchronization: Set up option and click Setup

You’ll then be given a page with six steps to enable Active Directory sync.
I’ve done the reading, so you don’t have to! (though it probably is a good idea to read each through)
Prepare for directory synchronization
- Review object limits – 300,000 sync objects for a verified domain
- Review requirements for DirSync – Windows Server 2008+, joined ot the domain, .NET 3.5 SP1 and Windows Powershell
- Review requirements for domain controllers – Windows Server 2003+, Windows Server 2003 forest functional mode
- Ensure you have administrator permissions – local admin on the sync server and sufficient AD permissions
- Add alternate UPN suffix to AD – your users UPN suffix needs to match the domain you’ve added previously. This wont be required in most circumstances, however it’s a major reason for issues with the Intune service. Be sure your users UPN suffix matches the activated domain or your users can’t login!
Verify domains – ensure the domains are verified as previously posted
Activate Active Directory synchronization


This step will enable the AD synchronization features across the entire tenant you manage

You’ll receive confirmation that Active Directory synchronization is enabled
Install and configure the Directory Synchronization tool

We’re now prompted to download and install the DirSync tool. This is the agent that will run on a schedule and upload your directory objects into the Azure AD cloud service. Download and install this on your designated sync server.
When prompted by Internet Explorer, save the dirsync.exe file

Once downloaded, run the executable. It will extract the files and give you the installation UI

Click Next when prompted to start the setup

Accept the EULA and select Next

Target the installation to wherever you desire. I’m leaving it as the default C:\Program Files\Windows Azure Active Directory Sync. Click Next

Installation will then automatically start

Once complete, click Next

You’ll then be given the opportunity to run the Configuration Wizard. Select it and press Next

On the Windows Azure Active Directory Sync tool Configuration Wizard, start it by clicking Next

Enter your Intune tenants credentials and select Next

Enter your local Active Directory credentials

You’ll then be asked if you would like to enable a “Hybrid Deployment”. Hybrid Deployment allows attributes to be synced BACK from Azure AD into your locally stored Active Directory.
Intune does not require a Hybrid Deployment, so don’t select this option
For more information, and a list of the objects that can be written back, please see these links:
As discussed earlier, the easiest way to provide an SSO experience is with Password Sync. To enable Password Sync, select the check box Enable Password Sync and press Next
Note: If you plan on using ADFS, you want to disable this setting.

The wizard will then configure your DirSync services and notify you when complete


NOTE: I was getting the following error when running this from my Domain Controller
System.Management.Automation.CmdletInvocationException: A constraint violation occurred
We don’t suggest that you run the DirSync tool from a Domain Controller, however we do support it. The trick to overcome this error is to logoff and logon before running the configuration wizard.
Finally, select Synchronize your directories now and select Finish

Verify directory synchronization
Check the event logs of the synchronization server for sync start and stop events
View your synchronized users from the Users view in the Account Portal

Note: the important part is the UPN for each user
Activate Synchronized users – once you’re synced users appear, you need to activate the users on the Intune side. This is essentially assigning the users a license to use the Intune service. Note that for each activated user, a license fee may be required.
Select all of the users in which you want to enable Intune access, and select Activate synced users

Finally, test the SSO experience by logging in with a test users account. Open an new Internet Explorer sessions using InPrivate Browsing

Browse to https://portal.manage.microsoft.com and enter your Domain credentials

You should be presented with a custom Organizational Intune portal page.


2. Authentication redirect via Active Directory Federation Services (ADFS)
If your organization requires true Single Sign-on and does not want to sync password hash to the cloud, the second option is to use ADFS. If your organization already has ADFS configured for other services, the majority of the work is already completed. If you don’t have ADFS, you should consult your AD team as it’s likely they’d be the ones installing the service.
For this guide though, I’m going to install the ADFS services in the most simple manner to ensure our Intune users can logon using their corporate AD credentials.
Start by logging into the https://account.manage.microsoft.com page, and selecting Users. This time we’re going to select Single sign-on: Setup

From this page, we’ll have 10 steps involved in configuring SSO. Again, I’m going to do all the hard work for you!
Prepare for Single Sign-on
- Ensure Active Directory is running in either Windows Server 2003 R2, 2008, 2008 R2, 2012 or 2012 R2 and has a functional level of mixed or native mode
- Decide on your ADFS service design – for example, are you going to have an ADFS Proxy?
- If you plan to use Shibboleth Identify Provider, install and prepare it
- Install any required Windows Updates - https://technet.microsoft.com/en-us/library/hh967624
Plan for and deploy Active Directory Federation Services 2.0
In my environment, I wanted to have ADFS running on a separate server. As it’s an Azure Virtual Machine, it’s quite easy for me to publish a public endpoint so that the server will be publically available for the Intune service to use it for authentication.
In your environment, it may be configured differently.Firstly, as the server is going to be publically accessible, we need to secure the communications with an SSL certificate. Our ADFS configuration later will ask us to choose the required certificate, so lets get it ready now.
I’ve got a wildcard certificate provided by the Digicert Certificate Authority (CA)
From your CA, download the public certificate. Open the Certificates MMC by going Start > Run > mmc

File > Add/Remove Snap-in…

Select Certificates and press Add

Select Computer account and press Next

Select Local Computer and press Finish

In the Certificates MMC, expand Personal > Certificates

Right-Click Certificates, and select All Tasks > Import

In the Certificate Import Wizard, press Next to get started

Browse to the CA provided certificate and press Next and then Finish

You’ll then have the certificate stored in the Personal certificate store, ready for use with ADFS

Now, to install the ADFS role. On the new server, open up Server Manager, select Manage and click Add Roles and Features

Next, Next, Next through the wizard until you come to the Server Roles section


Select the Active Directory Federation Services role and select Next

Leave the Features selection as it is, and press Next. You’ll be prompted with an ADFS confirmation screen, press Next to continue. Finally, press the Install button to install the ADFS role


Once the role has been installed, select the Warning message in the Server Manager console. You’ll see a button to Configure the federation service on this server. Click that to launch the configuration wizard

Select the Create the first federation server in a federation server farm from the radio boxes, and select Next

As I’m running the installation using my Domain Admin account, I don’t need to specify a user. If you are running this with a restricted account, you’ll need to provide an account with Domain Admin permissions to configure ADFS

Select the SSL Certificate we imported earlier, set the Federation Service Name to the name of the server you’re hosting ADFS on, and set a Federation Service Display Name and press Next

Specify a Service Account which will run the ADFS services

In most environments, you’ll want to use a Windows Internal Database. In larger environments, you may want to store the ADFS configuration in a SQL Database instead

Review Options, confirm Pre-requisite Checks were successful and press Configure to setup the ADFS services.


Install the Microsoft Online Services Module for Windows PowerShell
To create the trust relationship between your on-prem ADFS server and the Microsoft Intune service, you need to install the Microsoft Online Services Module for Windows PowerShell. These are a set of PowerShell cmdlets that will allow you to configure Single Sign-On
Before installing the PowerShell module, you need to install the Microsoft Online Services Sign-In Assistant v7.Download the Microsoft Online Services Sign-In Assistant v7 from https://www.microsoft.com/en-au/download/details.aspx?id=41950and run the installer

The installer will quickly complete

Now download the 32-bit or 64-bit version of the Microsoft Online Services Module for Windows PowerShell via the https://account.manage.microsoft.com page

Run the installer

Click Next on the installer splash screen, Accept the Terms and select a location for the installation to be installed to
Click Install and confirm the installation was successful

Verify additional domains
Browse to the Domains tab in the https://account.manage.microsoft.com portal and confirm your domain is Verified

For 5. Prepare for directory synchronization, 6. Activate Active Directory synchronization, 7. Install and configure the Directory Synchronization tool, 8. Verify directory synchronization and 9. Activate synchronized users, follow the steps provided when configuring the Password Hash sync above.
The final step, Verify and manage single sign-on is a little vague, as we actually haven’t completed all of the steps required.

Before our Single Sign-On is working, we need to setup a trust relationship between the on-prem ADFS server and Microsoft Online
All the required information can be found at https://technet.microsoft.com/en-us/library/jj205461
On your ADFS server, Open the Microsoft Azure Active Directory Module, by browsing Start > Programs > Windows Azure Active Directory and run the console as Administrator

Store your Intune Administrator credentials into a variable for later use, by typing
$cred = Get-Credential
Supply your credentials when prompted

Next, connect to the Microsoft Online Service by typing
Connect-MsolService –Credential $credSet the ADFS server configuration by entering (note: if your Azure AD PowerShell module is installed and running on the ADFS server, you don’t need to perform this step)Set-MsolAdfscontext –Computer adfs.mattslabs.com You’ll be prompted for credentials. These are your domain credentials.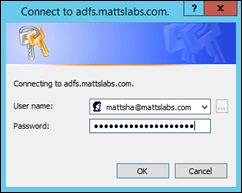
You now have two choices. First is to setup the Federated Domain if you have not configured Azure AD SSO with password hash sync. The second option is to convert a previously configured Azure AD password hash sync into a ADFS Federated SSOIf you haven’t configured Azure AD Password Sync previously, run the following commands to setup the federationNew-MsolFederatedDomain –DomainName mattslabs.comYou’ll be prompted to create a DNS record to verify that you own the domain
As per my previous steps, create the DNS TXT record.
Once the domain is authorized, re-run the following command to complete the configurationNew-MsolFederatedDomain –DomainName mattslabs.comIf you have previously configured Azure AD Password Sync, instead of setting up a new Federated Domain, we need to convert the domain from a Standard Authentication Domain into a Identity Federation Domain
Convert-MsolDomainToFederated –DomainName mattslabs.com

Finally, you should verify that your ADFS instance is working correctly. Perform the following steps
Check your ADFS server is publically available.
From an external address, ping your ADFS server and ensure it resolves correctly

From a web browser, browse the ADFS URL https://adfs.mattslabs.com/adfs/ls

Browse to https://portal.manage.microsoft.com, enter your on-prem credentials

If ADFS is working, when you tab to the password box it should redirect you to your ADFS instance

And prompt for your domain credentials

Finally, you can see the ADFS redirection and authentication happening if you watch the browser path closely

And we’re in!


Active Directory sync already configured
If you’re using one of the many Microsoft cloud platform applications such as Office 365 or Dynamics Online, it’s likely you’ll already have DirSync configured and synchronizing your on-prem directory with the Azure AD service.
If this is the case, the majority of the work has been done for you!
In my Intune Users console view, there are currently no users, other than my service administrator accounts.

Verify that Active Directory sync has been configured. You’ll need to speak with whoever configured the first instance of DirSync for your organization. Have them logon to their Azure AD console and display the domain configuration.
Browse to https://manage.windowsazure.com
In the Azure management portal, find the Active Directory node and select it

In the Active Directory node, you should see your organizations domain has been synced and it’s status is Active

Verify that your domain has been added to Intune. From the https://account.manage.microsoft.com console, select Domains and confirm it has been added and authorized. If your organizations domain does not appear, follow the instructions from my previous post on adding your managed domain.
Enable Active Directory synchronization by browsing to Users, and pressing the Set up link

It’s a bit confusing here, because we’re not really setting up AD Sync, rather we’re associating a previously configured AD Sync with our Intune tenant.
Because DirSync and/or ADFS, has been configured previously, we can skip to step 3 and just activate the Active Directory synchronization

When prompted, press Activate

Step 3 will return success when this is completed

Now either wait for DirSync directory synchronization to run, or force it to run using Start-OnlineCoexistenceSync (https://www.msexchange.org/blogs/walther/news/dirsync-change-forcingmanual-syncs.html), and check the Users console. You should not have all of your synchronized users appear in Intune


We’ve now configured the Intune service to use your on-prem Active Directory accounts for logon.