Deploying the App-V 5.0 Client Using Configuration Manager 2012 SP1
Whether you’re currently an App-V 4.x shop or just starting to get your feet wet with App-V 5.0, one of the questions you may have is how best to deploy the App-V 5.0 client using Configuration Manager 2012.
If you aren’t yet on ConfigMgr 2012 SP1, you’ll need to upgrade to SP1 first (see my other blog post on the SP1 install topic here) as the App-V 5.0 client requires PowerShell 3.0, and PowerShell 3.0 will cause health-check related issues for your clients if you aren’t on SP1, so you’ll need to upgrade your 2012 clients to 2012 SP1 before deploying the WMF 3.0 update package. WMF v3 should be set as a pre-requisite within the App-V 5.0 application so that it will automatically install it if it is not already installed on a specific client.
If you’ve done some research on the App-V 5.0 pre-requisites, you’ll notice that you need to set the .NET Framework 4 (Full Package) as the first pre-requisite. If you look at your clients and notice they have “Microsoft .NET Framework 4 Client Profile” and/or “Microsoft .NET Framework 4 Extended”, these are not sufficient, as you must install the full package version of .NET Framework.
Creating & Prepping the App-V 5.0 Client for Deployment
Preparing the Prerequisites
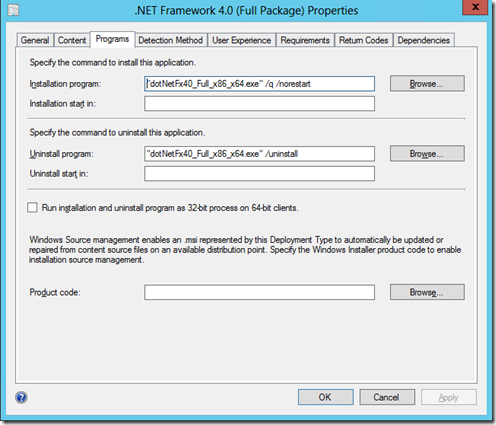
.NET Framework 4.0 (Full) - If you don’t already have a package or application for .NET Framework 4 Full, download it here, and create a script installer application for it, adding /q /norestart switches for the install command-line, and /uninstall for the uninstall.
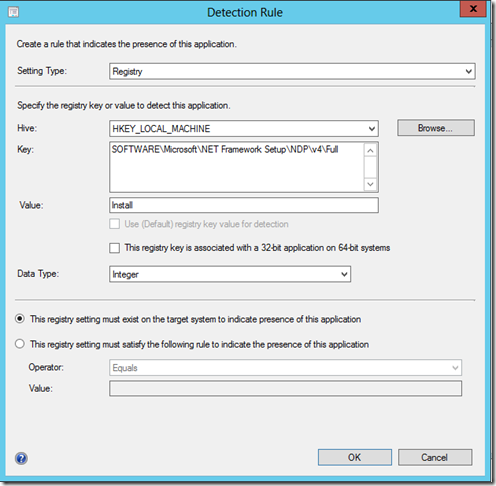
If you’re using an application (versus a package) to deploy it, you can have it detect installation by looking at the registry key HKLM/Software/Microsoft/NET Framework Setup/NDP/v4/Full and the registry value “Install” with a Data Type “Integer”.
There are many ways you could detect .NET Framework Full being installed, but this is one viable option.
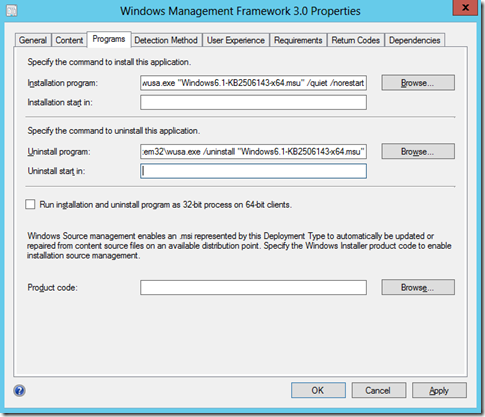
Windows Management Framework 3.0 – PowerShell 3.0 which is a component of Windows Management Framework (WMF) 3.0 is also a required pre-requisite on Windows 7 SP1 and 2008 SP2/R2 SP1 clients. WMF 3.0 is downloadable from https://www.microsoft.com/en-us/download/details.aspx?id=34595. Create a new package for WMF 3.0 using the Installation command line: c:windowssystem32wusa.exe “Windows6.1-KB2506143-x64.msu” /quiet /norestart and the Uninstall command-line: c:windowssystem32wusa.exe /uninstall “Windows6.1-KB2506143-x64.msu” .
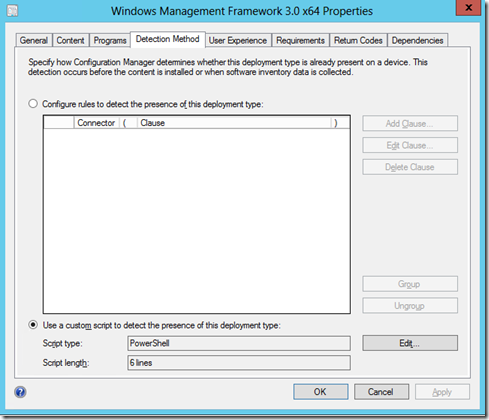
For the Detection Method, select “Use a custom script to detect the presence of this deployment type: ”
Click “Edit…” and paste this small PowerShell script I put together into the window:
$osresult = $null
$os = (Get-WmiObject Win32_OperatingSystem).Name
if ($os -like "*Windows 8*") {$osresult = "True"}
if ($os -like "*Server 2012*") {$osresult = "True"}
$hfchk = Get-WmiObject -Query "select HotFixID from Win32_QuickFixEngineering where HotFixID like 'KB2506143'" | foreach-object{Write-Host $_.HotfixID}
$osresult
What the PowerShell script does is first checks the currently running OS Name in WMI by querying the WMI class Win32_OperatingSystem to see if it’s Windows 8 or Server 2012. If it is, it won’t find KB2506143 since it’s not applicable (nor required), so it sets the variable $osresult to equal “True” and will echo “True” at the end of the script so the result of the detection type will be a success. Note: I could’ve set $osresult to equal “Foobar” here and the end result will be the same - any value echoed by the script which also completes with an exit code of 0 is considered a successful application detection. If the OS is not Windows 8 or Server 2012, it will instead have to pass the HotFixID query check which looks for a hotfix within the Win32_QuickFixEngineering WMI class containing a HotFixID value containing “KB2506143”. If $osresult ends up being NULL AND KB2506143 is NOT found, nothing will be written to STDOUT, so the requirement check will not pass, and KB2506143 will therefore be installed. For more information on how to use a script to determine the presence of a deployment type, see https://technet.microsoft.com/en-us/library/gg682174.aspx.
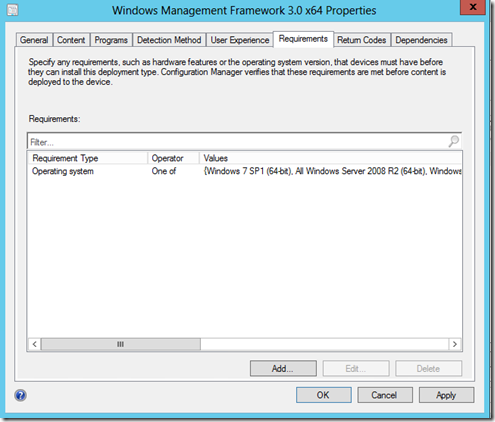
Next, go to the Requirements tab of the WMF 3.0 x64 application, and Add a Category: Device, with the Condition: Operating System, and an Operator: One of and select Windows 7 SP1 64-bit, Windows 2008 SP2 64-bit, and Windows 2008 R2 SP1 64-bit as these are the only supported OSes WMF 3.0 x64 will successfully install and are applicable on.
If you need to also deploy the 32-bit WMF 3.0, be sure to add another deployment type to call the 32-bit version of the MSU, and set it for 32-bit requirements of the 32-bit Win7 SP1 and 2008 SP2/R2 SP1 OSes. The same PowerShell script should work just fine to check for the existence of the WMF 3.0 hotfix on these.
Finally! Creating the App-V Client Application
Now, you’ll need to create a new Manually specified application using the "Script Installer” deployment type in order to deploy the App-V client. If you’re thinking of piecing the installation out into individual MSIs, I’d recommend reconsidering that plan and following the KISS principle by using the provided appv_client_setup.exe within the App-V clients directory on the MDOP 2012/2013 ISO. The reason for this, is that this wrapper install will take care of most of the pre-requisites, namely the very version specific C++ installs required. It will also automatically detect whether you’re installing on a 32 or 64-bit OS and install the matching architecture version of the App-V client. Save yourself some headaches and don’t over-complicate things by importing the App-V client MSIs directly. DO, however, use the MSIs to create the detection method within the deployment type of your application. The 32-bit and 64-bit MSIs have different product codes, so if you have both 32 and 64-bit OSes in your environment, you have a little extra work to do.
Language Packs - If you install using the .exe, the installer will also automatically install any language packs which match the language of the OS running on the client. If you want to deploy any additional language packs, you can deploy the appv_client_LP_xxxx_x86.msi or appv_client_LP_xxxx_x64.msi for each language to each client as needed.
Creating the deployments - You can create two deployment types, one for each processor architecture, and add the MSI Product Code clause for each individually. The primary advantage to doing it this way, is you also get the benefit of importing the MSI product code for windows installer source management in the event the installation ever needs updated or repaired on your clients.
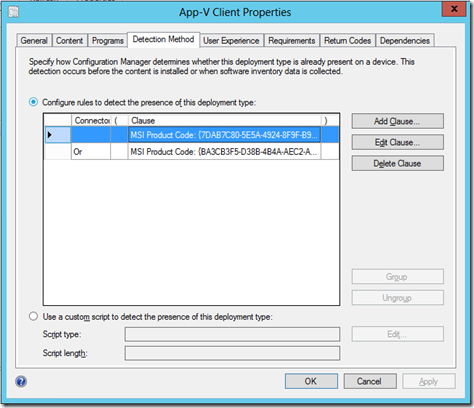
If you decide you don’t need this benefit, you could do a single deployment type with no x86 & x64 requirement separation, and then you can combine the detection method into an OR’ed clause within your detection method as follows:
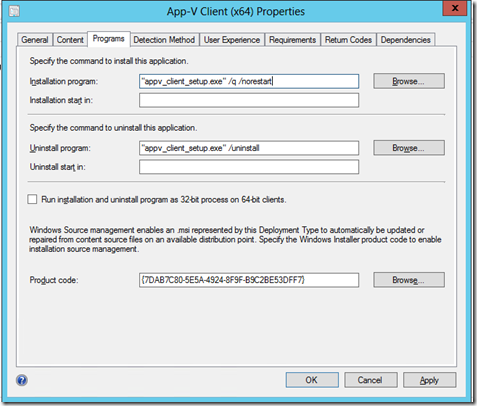
I personally recommend breaking them out into two deployment types, one for each OS architecture if you do have to support both x86 and x64 clients. The windows source management is a nice feature to leverage, so it’s worth the small effort. Assuming you take my advice and create separate x86 vs. x64 deployment types for your clients, your programs screen should appear something like this for the x64 type:
As you can see, I’ve imported the x64 product code into the Windows Source management blank by browsing to the appv_client_msi_x64 for self-healing sake.
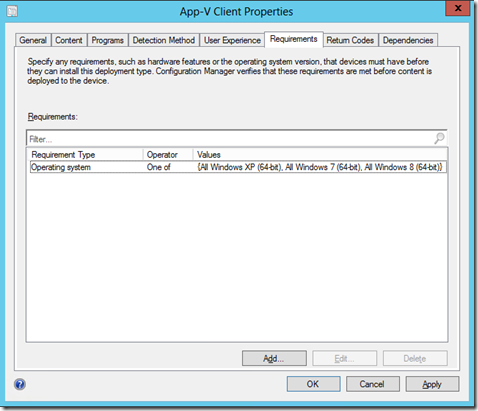
Your Requirements tab should look like the snip below if you’re supporting XP, Windows 7, and 8:
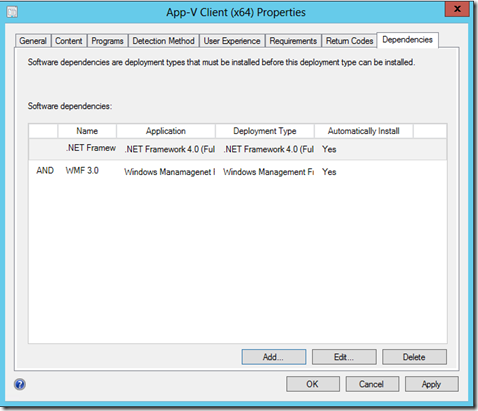
For dependencies, just add the .NET Framework 4.0 (Full) and WMF 3.0 applications you created above, and they will install if they aren’t already installed on your clients when you deploy the App-V client.
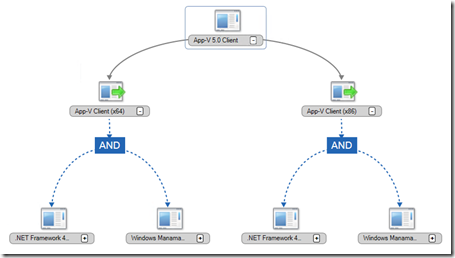
When you’re all done, open the App-V Client and click “View Relationships” and it should look something like this (assuming you had to follow both the 32 and 64-bit paths).
Now you can successfully deploy the App-V client to your clients and verify the prerequisites and App-V 5.0 client installs successfully.
In an upcoming blog post, I’ll cover how to sequence the Configuration Manager 2012 SP1 Admin Console using App-V 5.0. Stay tuned!
