Using Export-CSV in Azure Automation
Introduction
Whether you are just getting started with Azure Automation or you are pretty well in tune with it, there will likely come a point where you will want to capture the output of your scripts to a CSV. With Azure Automation, your scripts are run in a virtual environment and when you output your data to a file/csv it will only be saved in that temporary instance from where that script was executed. After the script is complete, that data that you 'thought' was going to persist is deleted. In order to capture that information and persist it you have to save it to an external environment. You do have a few options, but the most cost effective and intuitive approach is to save it to a blob storage account.
Prerequisites
- Azure RM Module must be installed in Azure Automation. You can accomplish this by going to the PowerShell Gallery and having it "Deploy[ed] to Azure Automation"
- Azure RM Module installed on your local workstation. If your running PowerShell 3.0 or later, you can run Install-Package AzureRM as an administrator.
- Azure Subscription
How To
Creating a Storage Account
First create a Storage Account. If you don't already have one, you'll to connect to Azure Resource Manager through your local PowerShell client:
Login-AzureRmAccountOnce you have authenticated, ensure that you are connected to the correct subscription. You can view your subscriptions but using Get-AzureRmSubscription.
 Get-AzureRmSubscription -SubscriptionName "Office 365 Test and Validations" | Select-AzureRmSubscription
    Environment                   : AzureCloud
    Account                     : paul@domain.com
    TenantId                   : 72f988bf-86f1-41af-91ab-212cd011db47
    SubscriptionId                : 1edb6f86-8931-40e4-a70e-d2128ce0ee32
    SubscriptionName              : Microsoft Azure Internal Consumption
    CurrentStorageAccount         :
Next you'll want to create a Storage Account:
 New-AzureRmStorageAccount -SkuName “<"Standard_LRS,Standard_ZRS,Standard_GRS,Standard_RAGRS,Premium_LRS"> -ResourceGroupName  -Name  -Location
Sample: New-AzureRmStorageAccount -SkuName "Standard_LRS” -ResourceGroupName CloudLogicRG -Name clstorageacct -Location “Central US”
And finally, create a Storage Account Container:
New-AzureStorageContainer -Name "savedfiles"
Setting up Automation to Export to CSV
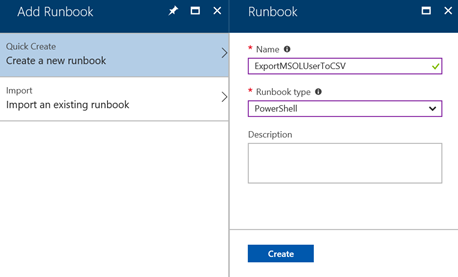
Now that the foundation is established, you'll want to create a new Runbook of the type "PowerShell".
Connect to AzureRM with a Service Principal Account
 $connectionName = "AzureRunAsConnection"
try
{
    # Get the connection "AzureRunAsConnection "
    $servicePrincipalConnection=Get-AutomationConnection -Name $connectionName

    "Logging in to Azure..."
    Add-AzureRmAccount `
        -ServicePrincipal `
        -TenantId $servicePrincipalConnection.TenantId `
        -ApplicationId $servicePrincipalConnection.ApplicationId `
        -CertificateThumbprint $servicePrincipalConnection.CertificateThumbprint
}
catch {
    if (!$servicePrincipalConnection)
    {
        $ErrorMessage = "Connection $connectionName not found."
        throw $ErrorMessage
    } else{
        Write-Error -Message $_.Exception
        throw $_.Exception
    }
}
Select the subscription you are going to work with
Select-AzureRmSubscription -SubscriptionId '<SubscriptionID>'Set the Current Storage Account to the approperiate location
Set-AzureRmCurrentStorageAccount -StorageAccountName -ResourceGroupNameStore O365 Credentials – For sake of clarity, we are storing the credentials in a variable. For security reasons, it is best to securely store the credentials and call them when required.
 $MSOUser = "@.onmicrosoft.com"
$MSOPwd = ConvertTo-SecureString -String "" -AsPlainText -Force
$MSOCred = New-Object –TypeName System.Management.Automation.PSCredential –ArgumentList $MSOUser, $MSOPwd
Connect to Office 365
Connect-MsolService –Credential $MSOCredCapture All MSOLUsers in a variable
$users=get-msoluser -AllExport CSV to Local Automation Storage
 foreach ($user in $users){
    write $user
    $user | export.csv $FileName -NoTypeInformation -Append
}
Capture the file that is local to automation and save to Storage Blob
Set-AzureStorageBlobContent -Container savedfiles -File AutomationFile.csv -Blob SavedFile.csv
Notes
- The real magic is done with the very last cmdlet "Set-AzureStorageBlobContent -Container savedfiles -File AutomationFile.csv -Blob SavedFile.csv". The container should be the name of the container that you are saving the file to; in association to the Storage Account your connected to. -File is the name of the local (to the automation) file you wish to make a copy of and the -Blob will be the (new) name of the file that is created in the container.
- You can use Microsoft Storage Explorer to view the content of the storage account and download the blobs
- To download the full Automation Script please see: AzureAutomationExportCSV