Time to look at Records Management
Definition of Records Management
The ISO 15489-1: 2001 standard ("ISO 15489-1:2001") defines records management as "[the] field of management responsible for the efficient and systematic control of the creation, receipt, maintenance, use and disposition of records, including the processes for capturing and maintaining evidence of and information about business activities and transactions in the form of records".[
Records Management and SharePoint
Records Management has been built into the SharePoint product in many different ways and with the release of SharePoint 2010 and SharePoint 2013 it has been improved on in many way. So let's take a look at the Records Management feature.
To make Records Management work in an Enterprise like yours there are several things that I think you will need
- Content Analysis - A process which describes Enterprise content.
- File Plan - A plan of what to do with all the different types of records.
- Compliance Requirements - The rules that IT must follow to stay within Compliance.
- Automation Layer - This layer will provide the heavy lifting for the rest of the system
- Monitoring and Reporting System - We need to monitor and report on records at all stages in their life.
Bringing it all together…
Looking at a high level I'm going to discuss how I would implement Records Management in an Enterprise like yours. First realize you cannot do this alone you will have to work with groups like Corporate Lawyers, Records Managers, and Compliance Officers/Security Officers. Once you have gathered your group together you need to go thru the environment and analyze the different file types and the content that is contained within those files. You will then want to categorize the content so that you can begin deciding what is actually a record and how to treat that record, this is possibly already created due to other Enterprise Content Management Systems.
Now let's look at what we can do in SharePoint to implement your Records Management plan, first we need to plan where we want to store our records you can choose either in-place or in a site based on the Records Center, of course you could do a combo having several locations where you store records. Remember often you are trying to move this data to cheaper storage since it will be accessed less and performance is not as big an issue, here is an example where each is used
Example of setting a record
John has finished writing the contract with company ABC123 inc, they have been going back and forth for several months and both parties are happy and have signed the document. The document is the scanned and uploaded into SharePoint where he set's it as a Record in-place for the duration of the contract, once the contract expires the Record is sent to the Contract Record Center where it is maintained for the next 10 years in case of litigation or other reasons to recall the file.
In-Place - The file becomes a record in the same location it has always been stored, based on settings you will not be able to edit the document. It does requires that you enable the feature "In Place Records Management" in the Site.
Send to - The file becomes a record in another Site based on Record Center location. The location can be in another farm or Web Application and generally you try to have it implemented on cheaper drives and hardware since performance at that point is generally not as important. You would create the Connection for the Web Application in Central Admin by following this article https://technet.microsoft.com/en-US/library/ee424395(v=office.14).aspx
So it seems proper to next discuss the Record Center as it will most likely be very central to your plan. The Record Center template has several features that will help SharePoint Administrators and other interested parties maintain records. When you first create your site you will want to setup the site by going to Site Actions -> Manage Records Center you should see a screen like this
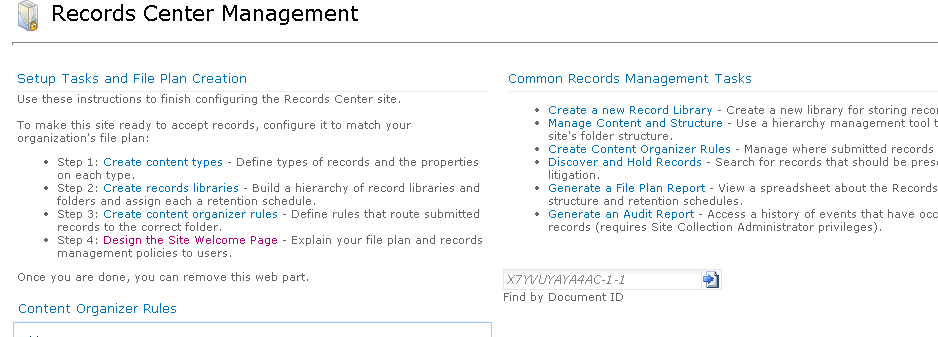
My suggestion is to follow each link and build out the rules to match your organizations record management plan or file plan. Some fantastic improvements from MOSS 2007 that you should really use is
- Content Organizer - This is an engine that allows you to have a single drop off library, where you can then move documents to other libraries based on Content Type and it's metadata.
- Document ID - All documents are assigned an ID for easier searching, you can modify the first 4 - 12 characters if you wish.
Last comment on Record Center is that we can now maintain much larger repositories in a supported manner as long as we can maintain certain IO levels please read thru these articles to understand them https://technet.microsoft.com/en-us/library/hh395916(v=office.14).aspx#recommendations and https://technet.microsoft.com/en-us/library/hh867542(v=office.14).aspx
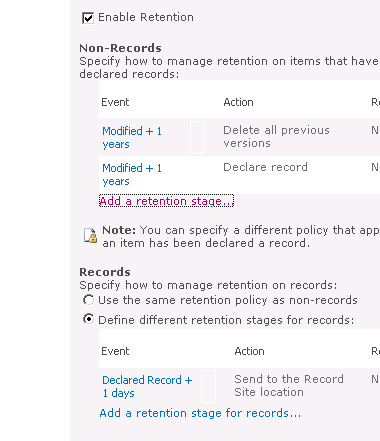
We now know what we are settings as records, we know where we are going to store those records, and we know how to move them there, but what about enforcing our plan or automating it. We will now discuss the final portion and that is the Retention Policy these are the rules of what to do with the files, we set these at the Content Type level (So if you're using a Content Type Hub this can be controlled at Web Application or Farm level) what you will want to do is go to the Content Type Library and select the Content Type you want to manage then click on the 'Information management policy settings' then check the box to Enable Retention you will see a screen like this one.
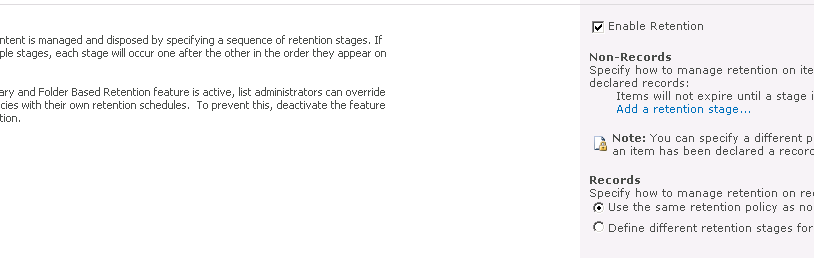
My suggestion is that you use both the Non-Records and Records policies, this way you can use Workflows, Manual, or retention policy to set as a record and get the same results.
Either way you go you will setup at least one stage or possibly many more, each stage will be comprised of an Event and Action. The event is what will trigger the action, this can be based on one of several columns.
Some of the actions you can choose are Move to recycle bin, Permanently delete, Transfer to another location, Start a Workflow, Skip to Next stage, Declare Record, Delete previous drafts, Delete all Versions.
Once you have created your stages it should look something like this, and this way as I mentioned if you wanted you could use a SharePoint Designer workflow to declare a record and it would skip the non-record stages.
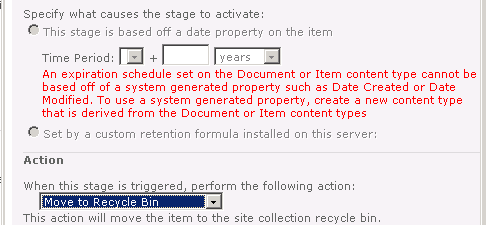
NOTE: To be able to use the event you will need to create a Custom Content Type as per the message in the screen shot below
Articles
Records management in SharePoint Server 2010
https://technet.microsoft.com/en-us/sharepoint/ff598594.aspx>
Policy and Retention in SharePoint Server 2010
https://blogs.msdn.com/b/ecm/archive/2011/10/12/policy-and-retention-in-sharepoint-server-2010.aspx
SharePoint 2010 – Records Management
https://blogs.msdn.com/b/mcsnoiwb/archive/2009/11/05/sharepoint-2010-records-management.aspx
Manage a connection to a document repository or a records center (SharePoint Server 2010)
https://technet.microsoft.com/en-US/library/ee424395(v=office.14).aspx
Plan how records are collected (SharePoint Server 2010)
https://technet.microsoft.com/en-US/library/cc263464(v=office.14).aspx