SCVMM 2008 R2 & Cluster Shared Volumes (CSV) Migration from one CSV to Another
You often do your job of “planning” for your virtualization farm well in advance of when you can realistically foresee the amount of storage you will need. If you like me, you often take the amount of known needed space and you triple it – shh, don’t tell management. This technique works great until you decide to take on a lot of additional work that ends up completely blowing away your growth plans.
You decide to quickly order up a new storage LUN to get carved off and presented to your virtualization farm or, worse case, you order a whole new SAN chassis and wire that guy up as fast as possible. You’ve now got a brand new LUN at its peak performance (no data stored on the disk) but oh no… How might I move my VMs to the new LUN?
First Step: Add New LUN to the Cluster
Before going far, you should go ahead and use your SAN’s configuration tool to set the LUN to present to the Cluster. To do this, you select all the hosts and you then add them to have access. After this, you can verify connectivity using Server Manager’s Disk Configuration tool and hitting re-scan disks. You should now see the un-configured LUN as a listed disk and one, you will need to format the disk.
For most purposes, you will setup the LUN to use GPT if you plan on going above 4 TB’s of data. For MBR partitions, you will only get to see 4+ TB’s and any size larger than than will be unusable.
Second Step: Add Storage to Cluster
The cluster will need to have the storage added in order to add it as a potential CSV (which supports Live Migration). To add storage, you will need to re-run the Validate your Configuration in Failover Cluster administrator tool.
After doing this, you can add the storage to the Cluster and then promote it as CSV-based storage. When you are complete, you should see two volumes listed in your Failover Cluster manager -
Third Step: Virtual Machine Manager 2008 (VMM) R2 is your Friend
Unfortunately, without System Center’s Virtual Machine Manager you would be in a heck of a pickle. Luckily, this isn’t the case for customers running the Microsoft Virtualization stack. VMM R2 offers the ability to migrate a Virtual Machine from one location to another and this includes storage. This is a very nice feature even when you are doing it for CSV-based volumes.
For example, assume the following:
| VM Name | Current Location | Target Location |
| vmclient1 | CSV 1 | CSV 2 |
| vmclient2 | CSV 1 | No Change |
| vmclient3 | CSV 1 | CSV 2 |
With VMM 2008 R2, you can migrate either just the storage or the entire VM which is nice. Let’s get started…
The steps to migrate from CSV 1 –> CSV 2 are the following:
- Open Virtual Machine Manager Console
- Locate your Cluster, highlight it, and select the server/client (vmclient1) you would like to migrate storage
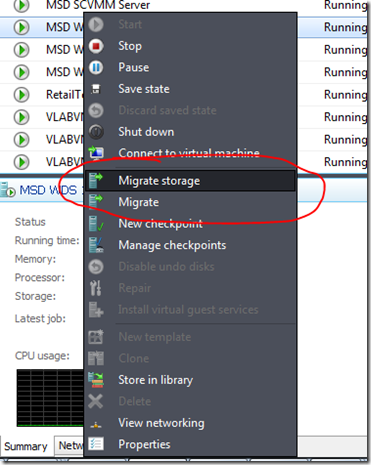
- Right-click on vmclient1, select Migrate Storage

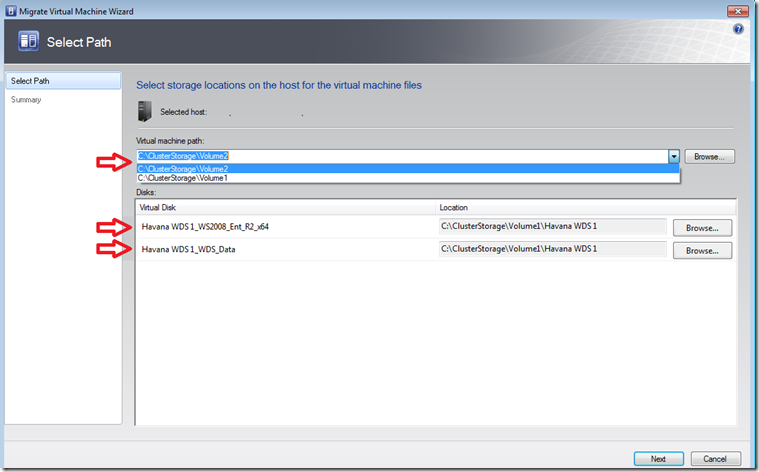
- In the Migrate Storage wizard, you are asked for two pieces of data at minimum – Virtual Machine Path (Configuration) and Disk Path (Storage)

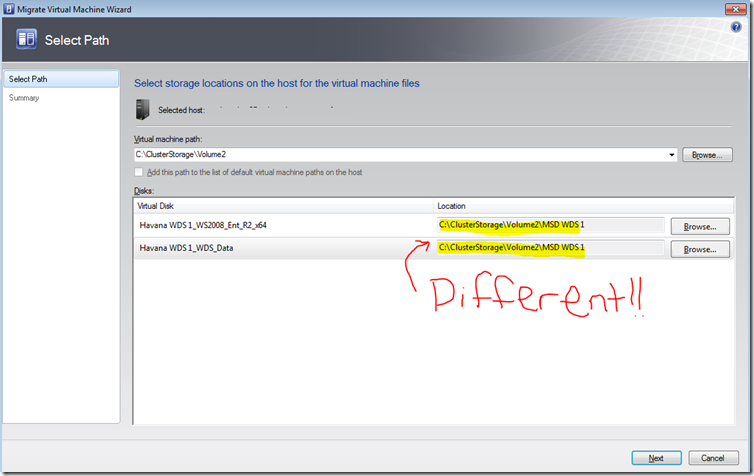
- Select Volume 2 (or CSV 2 corresponding name) for the Virtual Machine path, and for each disk click Browse and change to the correct location for the Disk files

- Click Next
NOTE: The Virtual Machine is required to be powered off for the migration. Thus, it does required an outage.
Summary
Adding storage to your CSV is often a trivial action but the actual migration of VMs to use the new CSV is often non-trivial. With Virtual Machine Manager 2008 R2, you can easily use the Migrate Storage feature to move the VM configuration and the disks to a new location. In fact, if you like, you could even move CSV-based VMs off the cluster and to an individual host using the Migrate Storage functionality. Happy migrating!
Thanks,
-Chris
