如何使用Office 365账号配置SMTP中继服务器
如何使用Office 365账号配置SMTP中继服务器
应用场景
===================================================================
客户的所有邮箱都位于 Office 365 中时如何从设备和业务应用程序发送电子邮件。例如:
•您有一个扫描程序或者是扫描仪,您希望将扫描过的文档通过电子邮件发送给自己或其他人。
•您有一个业务线 (LOB) 应用程序用于管理约会,您希望向客户发送电子邮件,提醒他们约会时间。
方案
==================================================================
通过设置SMTP中继服务器来发送邮件
步骤1:在Windows Server安装IIS和SMTP服务
Windows Server 2012
1) 在服务器管理(Server Manager),选择添加角色(Add Roles)
2) 在“开始之前”页面上,确定目标服务器和网络环境已为要安装的角色和功能做好准备。单击“下一步”。
3) 在“选择安装类型”页面,选择“基于角色或基于功能的安装”
4) 在“选择目标服务器”页面上,从服务器池中选择一台服务器,选择您需要安装运行SMTP服务的服务器,点击“下一步”
5) 在“选择角色”页面上,勾选Web Server (IIS),然后点击下一步,点击增加功能,接着点击下一步。
6) 在“选择角色服务”页面上,确保“安全”下面“基本认证Basic Authentication”被选中,然后点击下一步
7) 在“确认安装选择”页上,检查您的角色、功能和服务器选择。如果准备好安装,单击“安装”
Windows Server 2008
1) 在服务器管理(Server Manager),选择添加角色(Add Roles)
2) 在“开始之前”页面上,确定目标服务器和网络环境已为要安装的角色和功能做好准备。单击“下一步”。
3) 在“选择角色”页面上,勾选Web Server (IIS),然后点击安装
4) 点击“下一步”多次直到“选择角色服务”页面
5) 在“选择角色服务”页面,确保“ODBC Logging”,“IIS Metabase Compatibility”以及“IIS 6 Management Console”被选中,然后点击下一步。
6) 当提示安装IIS时,点击安装。
安装SMTP服务
1) 打开服务器管理器(Server Manager),然后根据服务器版本,采取以下相应的操作:
Windows Server 2012,点击添加角色和功能
Windows Server 2008,点击添加角色和功能
2) 根据服务器版本,采取以下相应的操作:
Windows Server 2012,在“添加角色和功能”页面,点击服务器选择,确认您需要安装SMTP服务的那一台服务器已被选中,然后点击功能。在“选择功能”页面,点击SMTP服务器,然后在弹出的“安装额外的组件”页面,选择安装需要的角色,点击“下一步”
Windows Server 2008,在“选择功能”窗口,选择“SMTP Server”,然后如果有弹出窗口,选择“安装需要的角色”,点击下一步。
3) 点击安装
4) 安装完成之后,您需要重启SMTP服务(使用Services.msc)
步骤2:配置SMTP中继
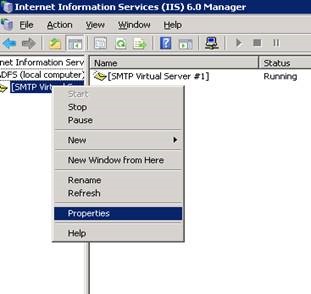
1) 打开 Internet Information Services (IIS) 6.0
2) 右键点击SMTP Virtual Server,然后点击Properties ,如下图
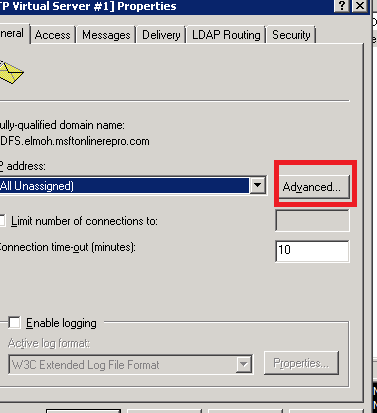
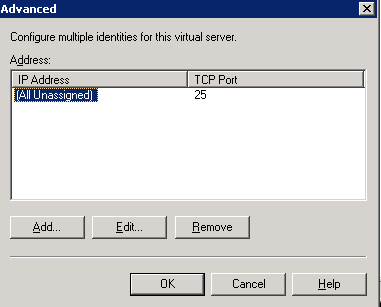
3) 在General,点击Advanced,如下图
4) 确认SMTP端口是25
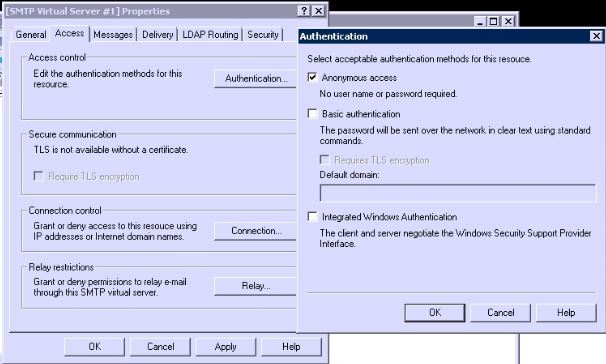
5) 在Access栏,点击Authentication,然后勾选Anonymous access,如下图
6) 如果您需要允许所有的设备连接到SMTP Server,则点击Connection,然后选择All except the list below,如下图
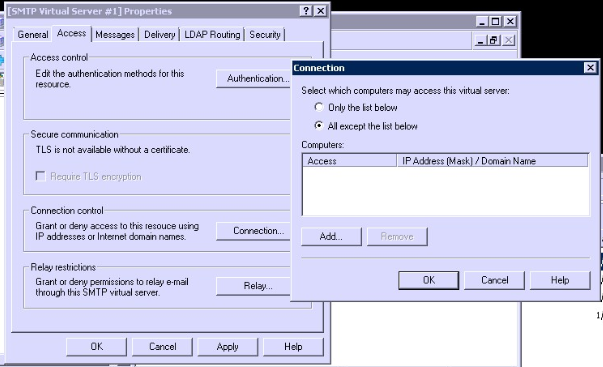
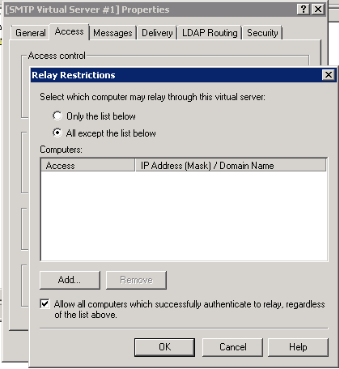
7) 接着,点击Relay,选择All except the list below,勾选Allow all computers which successfully authenticate to relay, regardless of the list above,如下图:
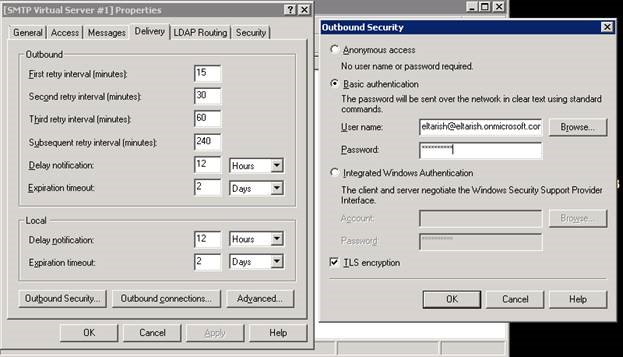
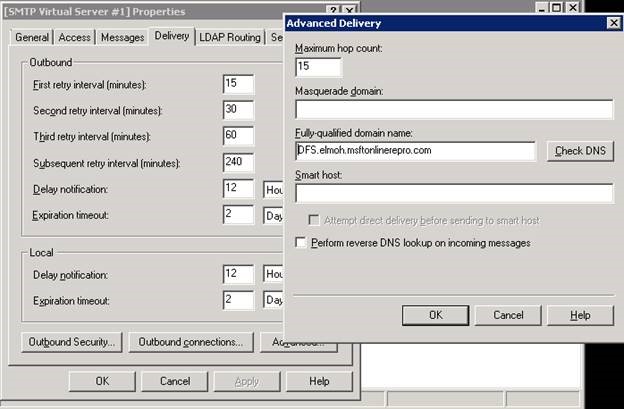
8) 点击delivery, 然后Outbound Security,选择Basic Authentication,然后输入Office365账号和密码,勾选TLS encryption,如下图:
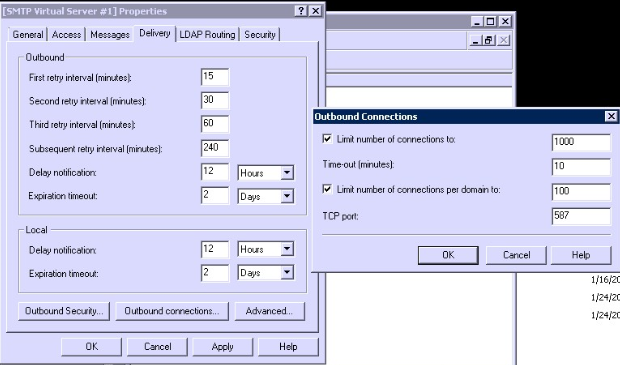
9) 点击Outbound connection,确认TCP端口是587,如下
10) 点击Advanced,输入SMTP服务器的FQDN,如下
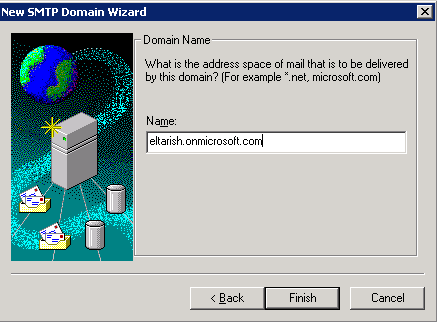
11) 邮件点击Domains, 点击New->Domain,选择Remote Domain,如下

12) 输入Office365默认域名,如下
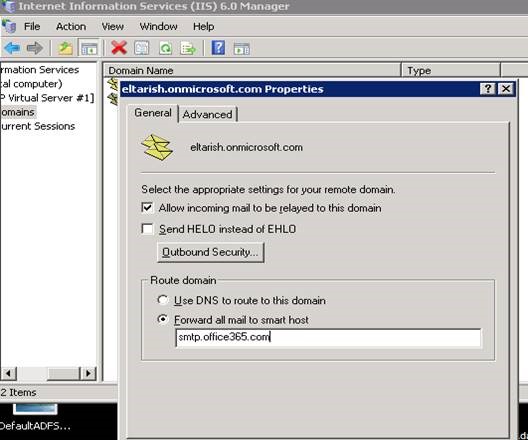
13) 双击Remote domain,勾选Allow incoming mail to be relayed to this domain, forward all mail to smart host: smtp.office365.com
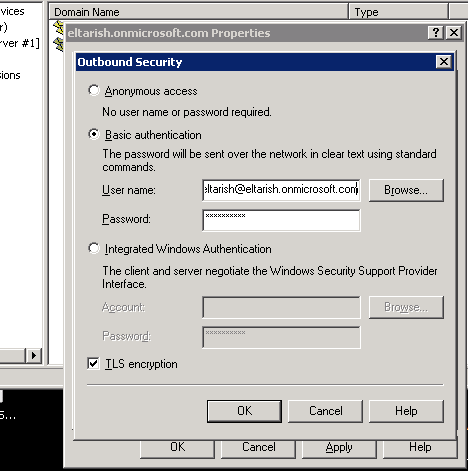
14) 点击outbound security,选择Basic authentication,输入Office365账号和密码,勾选TLS encryption,如下
步骤3:测试SMTP 中继
1) 创建一个txt文档,如名为email.txt,内容如下:
FROM:eltarish@eltarish.onmicrosoft.com
TO:eltarish@eltarish.onmicrosoft.com
SUBJECT: Test email from SMTP
This is a test email sent from my SMTP server
2) 将email.txt复制到如下路径c:\inetpub\mailroot\pickup

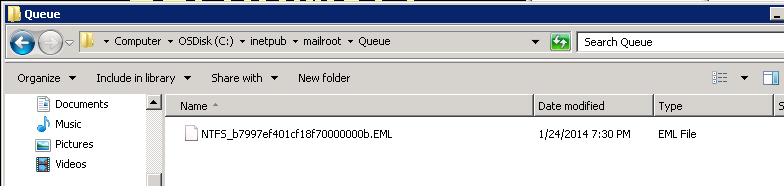
3) 等待片刻,邮件会进入c:\inetpub\mailroot\Queue,如下图
4) 之后,测试邮件就会被发出,如果发送失败,则邮件会被移到C:\inetpub\mailroot\Badmail里面,我们可以查看Badmail来获取更多信息。
除此之外,我们可以查看SMTP log来查看邮件是否传递成功,如下是一个成功传递的示例日志:
#Software: Microsoft Internet Information Services 7.5
#Version: 1.0
#Date: 2014-01-24 08:01:45
#Fields: date time c-ip cs-username s-sitename s-computername s-ip s-port cs-method cs-uri-stem cs-uri-query sc-status sc-win32-status sc-bytes cs-bytes time-taken cs-version cs-host cs(User-Agent) cs(Cookie) cs(Referer)
2014-01-24 08:01:45 111.221.114.166 OutboundConnectionResponse SMTPSVC1 DFS - 0 - - 220+HKNPR03CA006.outlook.office365.com+Microsoft+ESMTP+MAIL+Service+ready+at+Fri,+24+Jan+2014+08:01:38++0000 0 0 108 0 94 SMTP - - - -
2014-01-24 08:01:45 111.221.114.166 OutboundConnectionCommand SMTPSVC1 DFS - 0 EHLO - DFS.elmoh.msftonlinerepro.com 0 0 4 0 94 SMTP - - - -
2014-01-24 08:01:45 111.221.114.166 OutboundConnectionResponse SMTPSVC1 DFS - 0 - - 250-HKNPR03CA006.outlook.office365.com+Hello+[167.220.224.140] 0 0 62 0 187 SMTP - - - -
2014-01-24 08:01:45 111.221.114.166 OutboundConnectionCommand SMTPSVC1 DFS - 0 STARTTLS - - 0 0 8 0 187 SMTP - - - -
2014-01-24 08:01:45 111.221.114.166 OutboundConnectionResponse SMTPSVC1 DFS - 0 - - 220+2.0.0+SMTP+server+ready 0 0 27 0 281 SMTP - - - -
2014-01-24 08:01:45 111.221.114.166 OutboundConnectionCommand SMTPSVC1 DFS - 0 EHLO - DFS.elmoh.msftonlinerepro.com 0 0 4 0 687 SMTP - - - -
2014-01-24 08:01:45 111.221.114.166 OutboundConnectionResponse SMTPSVC1 DFS - 0 - - 250-HKNPR03CA006.outlook.office365.com+Hello+[167.220.224.140] 0 0 62 0 797 SMTP - - - -
2014-01-24 08:01:45 111.221.114.166 OutboundConnectionCommand SMTPSVC1 DFS - 0 AUTH - - 0 0 4 0 797 SMTP - - - -
2014-01-24 08:01:45 111.221.114.166 OutboundConnectionResponse SMTPSVC1 DFS - 0 - - 334+UGFzc3dvcmQ6 0 0 16 0 890 SMTP - - - -
2014-01-24 08:01:47 111.221.114.166 OutboundConnectionResponse SMTPSVC1 DFS - 0 - - 235+2.7.0+Authentication+successful 0 0 35 0 2515 SMTP - - - -
2014-01-24 08:01:47 111.221.114.166 OutboundConnectionCommand SMTPSVC1 DFS - 0 MAIL - FROM:<eltarish@eltarish.onmicrosoft.com>+SIZE=468 0 0 4 0 2515 SMTP - - - -
2014-01-24 08:01:47 111.221.114.166 OutboundConnectionResponse SMTPSVC1 DFS - 0 - - 250+2.1.0+Sender+OK 0 0 19 0 2656 SMTP - - - -
2014-01-24 08:01:47 111.221.114.166 OutboundConnectionCommand SMTPSVC1 DFS - 0 RCPT - TO:<eltarish@eltarish.onmicrosoft.com> 0 0 4 0 2656 SMTP - - - -
2014-01-24 08:01:47 111.221.114.166 OutboundConnectionResponse SMTPSVC1 DFS - 0 - - 250+2.1.5+Recipient+OK 0 0 22 0 2781 SMTP - - - -
2014-01-24 08:01:47 111.221.114.166 OutboundConnectionCommand SMTPSVC1 DFS - 0 BDAT - 468+LAST 0 0 4 0 2781 SMTP - - - -
2014-01-24 08:01:48 111.221.114.166 OutboundConnectionResponse SMTPSVC1 DFS - 0 - - 250+2.6.0+<DFSFRaqbC8wSA00000002@DFS.elmoh.msftonlinerepro.com>+[InternalId=35235911696874,+Hostname=SIXPR03MB029.apcprd03.prod.outlook.com]+Queued+mail+for+delivery 0 0 170 0 3969 SMTP - - - -
2014-01-24 08:01:48 111.221.114.166 OutboundConnectionCommand SMTPSVC1 DFS - 0 QUIT - - 0 0 4 0 3969 SMTP - - - -
2014-01-24 08:01:48 111.221.114.166 OutboundConnectionResponse SMTPSVC1 DFS - 0 - - 221+2.0.0+Service+closing+transmission+channel 0 0 46 0 4094 SMTP - - - -
关于Office 365 SMTP中继的相关信息,您可以参考https://technet.microsoft.com/zh-cn/library/dn554323.aspx