Setting up Multicasting in ConfigMgr 2012
Setting up Multicasting in ConfigMgr 2012
Multicasting was a feature added into ConfigMgr 2007 R2, that has continued support into ConfigMgr 2012. Multicast allows for image deployment with a much reduced network load in the environment. By utilizing multicast in ConfigMgr 2012, you can significantly reduce the network utilization. Normal deployment of operating systems in an environment with ConfigMgr 2012 OSD for a 500MB image to 20 devices would result in about 10GB of network utilization. However you take the same deployment and use multicasting and you now are going to see as little as about 500MB of network utilization to deploy the same 20 devices.
So, I am sure at this point you are saying, sign me up and how do I configure multicast?
If you are like me, you like to know the flow of how things are designed to work and the expected steps that should fall into that dance, with that said, I would suggest taking a moment to read over the "Planning a Multicast Strategy in Configuration Manager" article, you can find here: https://technet.microsoft.com/en-us/library/hh397406.aspx . This article will give you a good feel of the Multicast deployment process and a visual of how the flow should feel and look and knowing what good looks like is essential for troubleshooting.
So what are the requirements to have Multicast enabled in your ConfigMgr 2012 environment? You will need to have a site server with the following:
1) Distribution Point
2) Windows Deployment Services (required for the transport server)
You will also want to make sure that from a network stand point the following is true:
1) TCP Port 445 for Server Message Block (SMB) is not blocked
2) UDP Ports 63000-65000 for Multicast Protocol is not blocked
3) Network switches are configured for support of Multicast data transmissions
So lets get to it, go ahead and open your ConfigMgr 2012 Console:
1) Once you have the console open, navigate to "Administration \ Site Configuration \ Servers and Site System Roles". You will want to select the Site Server that houses the Distribution Point you plan to enable for multicast, please note this should be a Distribution Point that you use also for housing content for your Operating System Deployments as well.
2) Once you have the site server selected, look in the Site System Roles results at the bottom half of the console screen, select the Distribution Point so its highlighted.
3) Right click the Distribution Point and select "Properties" and once the "Distribution Point Properties" dialog window is open, select the "Multicast" tab
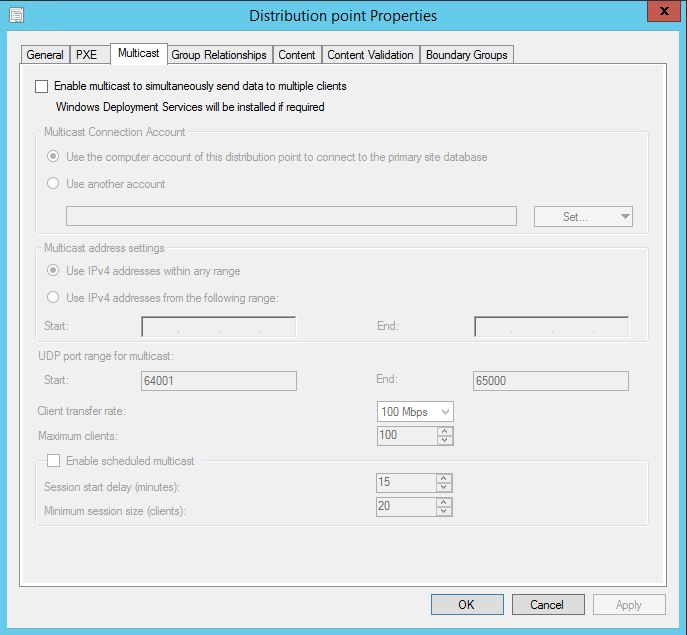
4) Place a check in the box next to "Enable Multicast to simultaneously send data to multiple clients"
When it comes to Multicasting there are two options available for sessions, first is "Autocast" and the second is "Scheduled". The difference between these two types of Multicasting is that when using "Autocast" you can add a machine at any time and it will join the session and start imaging. When using "Scheduled" the devices added to the session will hold until the "Minimum" session size (clients) is reached, once that is done the session will start the imaging process for the devices.
"Autocast" is enabled by the action of enabling Multicast on the Distribution Point by default, but to enable "Scheduled" sessions you would need to check the "Enable scheduled multicast" box on the properties dialog.
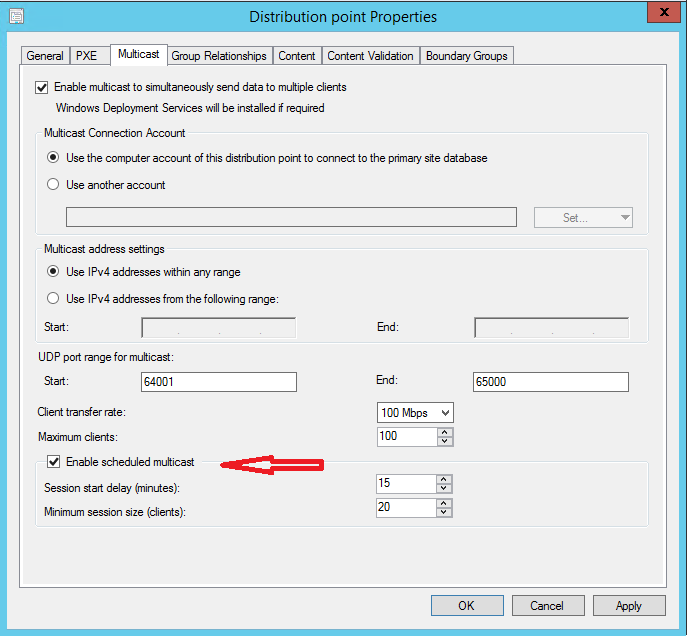
So lets break down a little more the difference between "Autocast" and "Scheduled" multicast session types before you go making that choice on which type you want to use, note you can change types any time you wish as well.
"Autocast"
In this configuration the multicast session starts as soon as the first machine powers up and requests the image. As additional machines are also booted up for imaging they will 'join' the current multicast session already in progress and consume the remainder of the stream. When the stream ends it will start again and the systems that joined late will consume the parts they missed. While autocasting isn't as efficient as scheduled multicast it is still significantly more efficient that standard OSD image delivery.
"Scheduled"
Scheduled multicast allows for more control of the multicast session. Here you choose either a time delay before starting the multicast session or a minimum number of clients that must join the session before it starts. The multicast session will start whenever either of the two requirements are met. The idea here is to allow the administrator time to get all of the systems started and ready and then all systems can load the image simultaneously - providing the best usage of network resources. Scheduled multicast is enabled by selecting the 'enable scheduled multicast' check box.
Now that you have an understanding of the two different types of Multicast sessions, let take a look at the other settings on the Multicast properties dialog, those are "Multicast Connection Account", Multicast address settings" and "UDP port range for multicast".
Multicast Connection Account:
As you may guess this comes down to the account used to connect to the primary site database, during the creation of a new session or joining of a existing session, by a device via WinPE. This really comes down to your preference on if you wish to use the Computer Account for the Distribution Point that Multicast is enabled on or an Active Directory Domain Account. If you choose to use an Active Directory Domain Account you will want to assure the account has the rights to connect to the primary site database.

Multicast address settings:
This comes down to if you wish to allow the IPv4 IP address ranges to use any IP range in the environment or if you wish to restrict it limiting the field per say to only a specific range of IP Addresses. This is something you may want to talk out with your network administrator, DHCP administrator to determine this setting for your environment.

UDP port range for multicast:
This section allows you to configure the UDP port range, please note the default is "Start" 64001 to "End" 65000, the UDP port range is the range that your Multicast session will use for the UDP protocol communication. If you change this range, please assure the ports you change to are not blocked in your environment by working with your Security Admin and your Network Admin.

Now if you also notice under the UDP port range for Multicast, there are additional settings, "Client transfer rate" and "Maximum Clients", these settings can play an important role in the success or failure of a Multicast session. I would strongly recommend that when you are first configuring and testing Multicast in your environment that you start with the default on these two settings and then adjust during testing to find your stable "Maximum clients" setting and your stable "Client transfer rate". Setting the "Client transfer rate" too high or even too low in your environment can result in fragmented packages, failed sessions or even sessions that time out. If you find that after adjusting these, you are still getting some unstable results, one common solution is the refer to this KB article which is a Server 2008 R2 fix but still applies true in Sever 2012. You can find this article here: https://support.microsoft.com/en-us/kb/2582106
Now that we have covered the Multicast properties on the Distribution Point and configured the Multicast components, what else do we need to do? The next action would be to enable the packages you wish to support Multicast during OSD, please note these package types fall under the category of 'Operating System Images", "Operating System Installers, "Drivers", "Legacy Packages". To configure these package types you would perform the following for each package you wish to allow the Multicast support.
1) Locate the package in the ConfigMgr 2012 Console
2) Right click the selected package, and select properties
3) In the package properties, select the Distribution Settings tab
4) Place a check mark in the "Allow this package to be transferred via multicast (WinPE only)" box
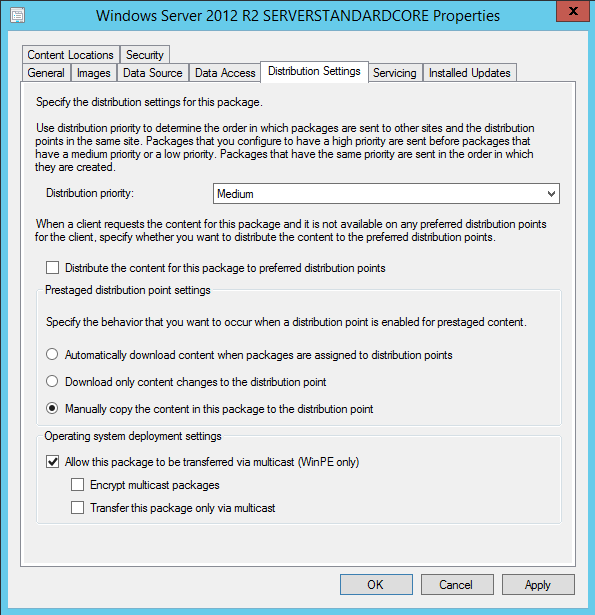
Note there are two sub-options under the "Allow this package to be transferred via multicast" section, they are "Encrypt multicast packages" and "Transfer this package only via multicast", lets look at these.
Encrypt multicast packages:
Specify whether the image is encrypted before it is sent to the distribution point. Use this option if the package contains sensitive information. If the image is not encrypted, the contents of the package will be visible in clear text on the network and might be read by an unauthorized user.
Transfer this package only via multicast:
Specify whether you want the distribution point to deploy the image only during a Multicast session. Please note that if your Multicast session fails to create an you have this check box marked, your image process will fail as the package will not be accessible during Unicast which is the standard OSD deployment model and also what Multicast falls back to if it fails to create the session.
Now that we have the Distribution Point configured with the Multicast enabled and set, the packages configured to support Multicast, there is one last item to look at and you will be ready to roll with your first Multicast test! So the final ingredient for Multicast in ConfigMgr 2012 environment is to assure the Task Sequence itself is configured to support Multicast. We do this with east by assuring the Task Sequence is configured for "Download content locally when needed by running task sequence", see steps below.
1) Open the ConfigMgr 2012 Console
2) Navigate to Software Library \ Operating Systems \ Task Sequences
3) Select the Task Sequence you plan to use for deploying image via Multicast
4) In the Task Sequence results at the bottom of the console window, select the Deployments tab
5) Right click the deployment you wish to configure, select Properties
6) In the Deployment Properties, select the "Distribution Points" tab
7) Set the Deployment options to "Download content locally when needed by running task sequence" and then click Apply and then OK

That's it - we are now ready to go for delivering images via multicast, however what logs could you use to monitor the progress of a Multicast deployment? I am glad you asked, ok well in my mind you asked, so lets take a moment to look at the logs as the last part to this article so you have a start to finish understanding.
Client Side of the house:
SMSTS.log: This is the standard go to log for troubleshooting Operating System Deployments, when you are using Multicast, this does not change. Its a very valuable log and will contain information regarding the request to create or join the Multicast session.
Server Side of the house:
MCSMSI.log and MCSSetup.log: Records details about multicast server role installation, this is a great set of logs, if you are troubleshooting the health of your Distribution Point with Multicast enabled. This would provide you details on the installation of the Multicast Point itself and indicate if any issues occurred during the installation.
MCSPerf.log: Records details about multicast performance counters, if you are seeing issues in your multicast sessions, this log will help you verify if there are any performance issues you should be concerned with.
MCSMGR.log: Records the SMS_MULTICAST_SERVICE_POINT component thread and will let you know if the component is healthy or having issues.
MCSIsapi.log: Records the HEALTHCHECK for the multicast component and the processing of requests from devices for Multicast session really important log!
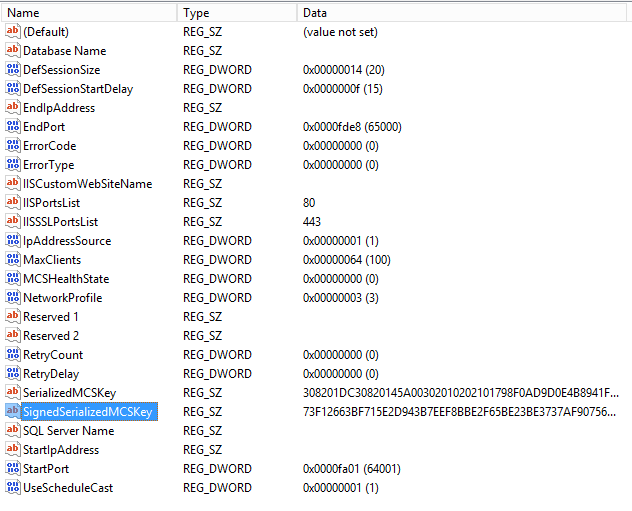
Server Side Registry Key:
The following registry key is important to assure a healthy Multicast setup, if the key is empty, you will not be able to create multicast sessions. This key should be configured only a few moments after the initial installation (enabled) of the Multicast Distribution Point.
Registry Key Path: HKEY_LOCAL_MACHINE\SOFTWARE\Microsoft\SMS\MCS
Registry Key: SignedSerializedMCSKey
A healthy Multicast Enabled Distribution Point Registry entry should look like this:
Disclaimer: The information on this site is provided "AS IS" with no warranties, confers no rights, and is not supported by the authors or Microsoft Corporation. Use of any included script samples are subject to the terms specified in the Terms of Use
Main System Center blog: https://blogs.technet.com/b/systemcenter/
Configuration Manager Support Team blog: https://blogs.technet.com/configurationmgr/
Data Protection Manager Team blog: https://blogs.technet.com/dpm/
Orchestrator Team blog: https://blogs.technet.com/b/orchestrator/
Operations Manager Team blog: https://blogs.technet.com/momteam/
Service Manager Team blog: https://blogs.technet.com/b/servicemanager
Virtual Machine Manager Team blog: https://blogs.technet.com/scvmm
Microsoft Intune: https://blogs.technet.com/b/microsoftintune/
WSUS Support Team blog: https://blogs.technet.com/sus/
RMS blog: https://blogs.technet.com/b/rms/
App-V Team blog: https://blogs.technet.com/appv/
MED-V Team blog: https://blogs.technet.com/medv/
Server App-V Team blog: https://blogs.technet.com/b/serverappv
Forefront Endpoint Protection blog: https://blogs.technet.com/b/clientsecurity/
Forefront Identity Manager blog: https://blogs.msdn.com/b/ms-identity-support/
Forefront TMG blog: https://blogs.technet.com/b/isablog/
Forefront UAG blog: https://blogs.technet.com/b/edgeaccessblog/
Application Proxy blog: https://blogs.technet.com/b/applicationproxyblog/
The Surface Team blog: https://blogs.technet.com/b/surface/
Have a question about content? Join us on Yammer