NFC-based Android Enterprise device enrollment with Microsoft Intune
I am pleased to have Chris Baldwin from Microsoft as a guest blogger this month. Chris is a Principal PM for Android on the Intune Engineering team. Chris has been working in Android space for the past couple years and leads delivery of Android Enterprise features.
NFC-based Android Enterprise device enrollment with Microsoft Intune – By Chris Baldwin, Principal PM, Microsoft Corporation
For corp-owned Android Enterprise devices (technically referred to as devices in "device owner" mode) there are a number of streamlined enrollment methods available. Depending on your Android version it's possible to enroll devices with a QR code, by manually entering a short enrollment string, through Google's Android zero-touch enrollment service (basically, Android's answer to Apple's Device Enrollment Program). It's also possible to use NFC to perform enrollment, which makes provisioning devices as easy as tapping them on a specially formatted NFC tag. This blog will explain how you can use a couple inexpensive and readily available tools to program your own NFC tags to use for Intune device enrollment.
Android Enterprise for BYOD and corp-owned devices
There are two core ways to manage Android Enterprise devices depending on whether the device belongs personally to the end user of the device (BYOD) or if the device is corp-liable, an asset owned by your organization. Those modes are:
-
- Work profile – in this mode of management the end user self-initiates enrollment with a device they own. The enrollment process creates a new, MDM-managed work profile on the device that sits alongside the user's personal profile. The work profile is managed by the IT admin and the personal profile is not. This provides both privacy assurances to end users because their personal profile remains unmanaged, and data protection assurances to the IT admin because the work content is containerized and manageable.
- Device owner – in this mode the device is fully managed (it is analogous to supervised mode on an iOS device). Device owner mode is unique in that there are two main deployment scenarios that can be configured when devices are in this mode: Dedicated devices, which are userless, heavily-locked down kiosk-style devices ideal for task worker usage, and Fully Managed devices which are associated with and user's AAD account and are intended for core productivity usage (calling, messaging, Outlook, Office apps, and so on). Enrollment of device owner devices is also unique in that the device must be fully factory reset to be enrolled.
As of the writing of this blog, Intune supports work profile mode and the Dedicated (kiosk) device owner deployment scenario. Fully Managed support is currently being built and we expect it to be in public preview by the end of 2018, with general production support available in Q2 of 2019.
Why use NFC?
There are a couple reasons why using NFC-based enrollment might be useful for your scenario. First, it's the only device owner enrollment mechanism that is supported on Android version 5.1. If you are using 6.0 and up there are additional options. Second, it's very easy to use. You can program your NFC enrollment tag with Wi-Fi connection information, so you don't need to perform any steps to enroll the device beyond tapping it. As a reminder, NFC enrollment is available on device owner devices only, and won't work for work profiles.
What you'll need
For NFC-based enrollment, you'll need two items:
-
- Blank NFC tags. I used NTAG216 NFC tags, however you may use any tags that you'd like. One thing to remember is NFC cards come with varying amounts of capacity in bytes. You'll want to be sure that you buy ones with enough byte capacity to store all the NFC data necessary for enrollment. The amount of capacity you'll need varies depending on how many options you put into your NFC data, but at minimum you'll need 561 bytes. More will be required if you add Wi-Fi connection options. The NTAG216 tags I used have a usable capacity of 888 bytes.
- Once you have the blank tags, you'll need something to imprint/write the correct data onto the tags. You may use any NFC tool that you choose as long as it's capable of writing NFC tags with an arbitrary mimetype. I demonstrate the process later in this post using the NFC Tools PRO app from the Play Store.
Steps to follow
Guidelines
- The NFC data that will be written to the NFC tags needs to be of a very specific format and will contain a lot of boilerplate data.
- There is a portion of the tag data that you can copy and paste directly from this post because it will be identical for every Intune enrollment.
- There is also part of the tag data that must be changed to match the enrollment token generated in your Intune tenant.
- Finally, there are optional NFC data parts that you can choose to use if you want to use the tag to automatically turn on Wi-Fi during the NFC provisioning process.
Step 1: Format your NFC data
Tag data that must be copy-pasted as-is
The following NFC data lines must be entered precisely as they appear here. These lines tell the device where to download the MDM agent from and ensure that it is installed properly:
android.app.extra.PROVISIONING_DEVICE_ADMIN_PACKAGE_DOWNLOAD_LOCATION=https\://play.google.com/managed/downloadManagingApp?identifier\=setup
android.app.extra.PROVISIONING_DEVICE_ADMIN_SIGNATURE_CHECKSUM=I5YvS0O5hXY46mb01BlRjq4oJJGs2kuUcHvVkAPEXlg
android.app.extra.PROVISIONING_DEVICE_ADMIN_COMPONENT_NAME=com.google.android.apps.work.clouddpc/.receivers.CloudDeviceAdminReceiver
Tag data you must change for your tenant
The line below must be copied precisely as it appears, except you must change the highlighted text to match the enrollment token you want to use for the device enrollment. This should match the token text that is displayed in the Intune admin console. This is what will associate your NFC enrollment with your Intune tenant.
android.app.extra.PROVISIONING_ADMIN_EXTRAS_BUNDLE=com.google.android.apps.work.clouddpc.EXTRA_ENROLLMENT_TOKEN\=NMEFNXHOVYMEMSSLBRSR
Optional tags you can use for Wi-Fi connections
Optionally, you can use these lines to tell the device to automatically connect to a W-Fi network that it'll use to perform enrollment. For example, these are the lines I used to connect to an open authentication network in my office called "MSFTGUEST":
android.app.extra.PROVISIONING_WIFI_SSID="MSFTGUEST"
android.app.extra.PROVISIONING_WIFI_SECURITY_TYPE=NONE
android.app.extra.PROVISIONING_WIFI_PASSWORD=
Note: I have observed that the PROVISIONING_WIFI_PASSWORD line must be included even if there is no password required for the network. It seems like a quirk that shouldn't be necessary, however I have seen devices fail provisioning without it. The valid options for security type are NONE, WPA, and WEP.
Step 2: Configure the app with the tag data
As a reminder, I'm using the NFC Tools PRO app to demonstrate the enrollment process, however you may use your tool of choice for writing NFC data.
- Under the Write tab, select Add a record
- Scroll to the bottom and select Data: Add custom record
- In the content-type field enter "application" in the first text box and then "com.android.managedprovisioning" in the second (without the quotes)
Take the all the tags above and put together to look like the following and past it into the data section of the app:
android.app.extra.PROVISIONING_DEVICE_ADMIN_PACKAGE_DOWNLOAD_LOCATION=https\://play.google.com/managed/downloadManagingApp?identifier\=setup
android.app.extra.PROVISIONING_DEVICE_ADMIN_SIGNATURE_CHECKSUM=I5YvS0O5hXY46mb01BlRjq4oJJGs2kuUcHvVkAPEXlg
android.app.extra.PROVISIONING_DEVICE_ADMIN_COMPONENT_NAME=com.google.android.apps.work.clouddpc/.receivers.CloudDeviceAdminReceiver
android.app.extra.PROVISIONING_ADMIN_EXTRAS_BUNDLE=com.google.android.apps.work.clouddpc.EXTRA_ENROLLMENT_TOKEN\=LSKDINVIGHNCTXNZQDIS
android.app.extra.PROVISIONING_WIFI_SSID="MSFTGUEST"
android.app.extra.PROVISIONING_WIFI_SECURITY_TYPE=NONE
android.app.extra.PROVISIONING_WIFI_PASSWORD=
- In the Data: field enter the big NFC data blob that you formatted in the step above. It should look close to this:
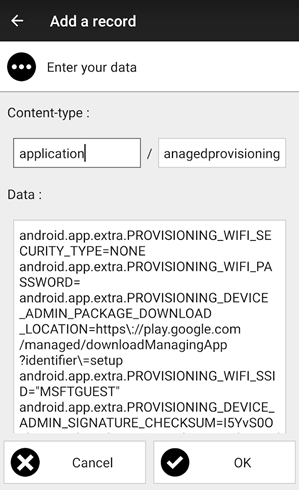
- Tap OK
Step 3: Write your NFC data to the tags
- Tap Write
- Bump your device against your blank NFC tag
Step 4: Enroll devices!
Now that you have your properly formatted and programmed NFC tag from Step 3, the only thing left to do is to enroll devices. You can do this on any Android 5.1 or above device:
- Factory reset the device (this is a necessary step for any device owner provisioning)
- Once the device is reset and is on the initial welcome screen, bump the device against your NFC tag
- Tap OK
From this point on, the device will enroll into Intune using the enrollment token your specified in your NFC data. You can use the same NFC tag again and again to quickly bulk provision a large number of devices. If needed, you may reprogram the tags with different enrollment tokens as well.
Conclusion
NFC is one of the lesser known enrollment techniques for Android Enterprise, however it can also be one of the most powerful because of how easy it is to kick off device enrollment once you get the tags properly programmed. I hope you found this useful!