Windows Azure Media Services and Web Sites
Have you ever wanted to publish videos or training material without having to deploy a new server or purchase a solution? With Windows Azure Media Services you can!
First let’s briefly learn about what Windows Azure Media Services is:
Media Services offer the flexibility, scalability and reliability of a cloud platform to handle high quality media experiences for a global audience. Media Services includes cloud-based versions of many existing technologies from the Microsoft Media Platform and our media partners, including ingest, encoding, format conversion, content protection and both on-demand and live streaming capabilities. Whether enhancing existing solutions or creating new workflows, you can easily combine and manage Media Services to create custom workflows that fit every need.
Source: https://www.windowsazure.com/en-us/services/media-services/
Now you may be thinking, “I’m not a developer or this seems to complex”, fortunately it’s not. Let’s simplify the scenario. Say a group within your organization would like to post and share video content with internal and/or external audiences. You have options of course; host internally, use an appliance of some sort, or use a public service to store and access video content. You also may have concerns; maybe you’re concerned about bandwidth and/or storage consumption. I’m here to say Windows Azure Media Service can help.
Windows Azure Media Services offers a simplistic method of uploading and accessing media content with scalability to meet your organization’s needs.
Let’s walk through how to upload and access media content in Windows Azure Media Services:
1. Navigate to https://manage.windowsazure.com/ and either log into your account or sign up for a trial account.
2. Once you’re logged into Windows Azure you’ll see a variety of options on the left hand navigation. Go ahead and select MEDIA SERVICES from the list:

3. Select +NEW at the bottom left hand corner:

4. Select QUICK CREATE:

5. Type in a NAME, select a REGION where you want the content stored, and a STORAGE ACCOUNT (or opt to create a new one), then select checkmark at the bottom to complete the task:

6. Once the media service is created click on the instance name you specified to access the service:

You’ll see there are a variety of options Windows Azure Media Services offers however for remainder of this walk through I’m going to focus on uploading content and accessing it from a URL.
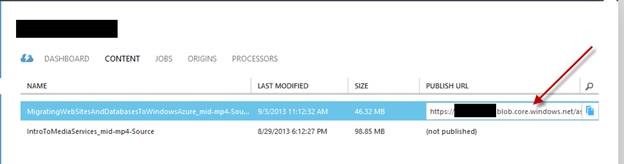
7. Select CONTENT:

8. Select the UPLOAD option at the bottom of the page:

9. Select a location from where to upload the file from and provide a name:
Note: A large list of supported formats may be found here: https://msdn.microsoft.com/en-us/library/azure/dn535852.aspx

Looking to bulk upload content? Visit my previous blog about Working with Windows Azure Storage: https://blogs.technet.com/b/cbernier/archive/2013/08/22/working-with-azure-storage.aspx
10. I’m going to upload an MP4 file the I downloaded previously from Channel 9 and select the check box to complete:

Once the file is uploaded you’ll find that it’s no published. This allows you to prepare and publish files when necessary rather than being published on upload.
11. At the bottom of the page select PUBLISH and select YES to confirm.

12. Before we go further, at the bottom of the page there are a number of options you may be curious to know more about. Let’s briefly walk through them:

UPLOAD – Option to upload content.
SYNC METADATA – This synchronizes the asset file size with the actual file size in storage and refreshes the value on the Content page.
ENCODE – This option allows you to select the type of encoding for content.
PLAY – Play currently selected content.
UNPUBLISH – Opposite of publish J… seriously though, select this option to remove the published URL.
DELETE –select this option to remove content.

Let’s continue with the publishing process…
13. Let’s publish the file previously uploaded by selecting PUBLISH at the bottom of the page and selecting YES.
14. Now that the content is published I’m able to access it from a URL or by pressing PLAY at the bottom of the page:

15. The direct URL may be found under the PUBLISH URL column:

Congratulations, you’ve published content to Windows Azure Media Services!
Would you like to go a step farther and embed content into a Windows Azure Web Site? If so read on…
AZURE WEB SITES and EMBEDDED VIDEO CONTENT
If you’re like me, you’ll want a fast and easy (preferably free) method to edit web pages and sites. Visual Studio will accommodate most of your needs however if you want a scaled down tool I recommend WebMatrix.
WebMatrix is a FREE, lightweight, cloud connected web development tool and may be downloaded from https://www.microsoft.com/web/webmatrix/.
Using WebMarix I created a simple webpage and embedded the video content I previously uploaded to Windows Azure Media Services. Here’s how I did it:
After downloading and installing WebMatrix I logged in using my Windows Azure credentials and was able to view my website:

I double clicked on the site and added the HTML 5 Boilerplate template. This automatically created a new web site in Windows Azure.
I modified the index.html page and added the following code within the <body> section of the html code ( which I found here on w3schools.com ):
<body>
<div style='text-align:center'>
<button onclick="playPause()">Play/Pause</button>
<button onclick="makeBig()">Big</button>
<button onclick="makeSmall()">Small</button>
<button onclick="makeNormal()">Normal</button>
<br>
<video id="video1" width="420">
<source src="https://MY-AZURE-STORAGE.blob.core.windows.net/asset-b1ebfc63-4e1f-4c76-b2dd-b040113aa493/MigratingWebSitesAndDatabasesToWindowsAzure_mid.mp4?sv=2012-02-12&st=2013-09-03T17%3A17%3A20Z&se=2015-09-03T17%3A17%3A20Z&sr=c&si=efc57c3c-a025-41cd-a8b1-908231c7aed2&sig=xyiIxmqNdF%2Bo1x7eq89xCUgXkenZLEEpq%2B%2Bo715dT0U%3D" type="video/mp4">
Your browser does not support HTML5 video.
</video>
</div>
<script>
var myVideo=document.getElementById("video1");
function playPause()
{
if (myVideo.paused)
myVideo.play();
else
myVideo.pause();
}
function makeBig()
{
myVideo.width=560;
}
function makeSmall()
{
myVideo.width=320;
}
function makeNormal()
{
myVideo.width=420;
}
</script>
</body>
Note: the URL next to <source src=” is the URL from the content I published earlier:
Once you’ve pasted the code you can test the site before publishing (uses my Windows 8 local IIS instance to test):

When you’re comfortable with the page and content you’ll need to publish the site by using the publishing options:

Once the publishing is complete navigate to the published site URL:

Congratulations, you’ve embedded the Windows Azure Media content previously uploaded to a simple HTML 5 Windows Azure Web Site!