Cloud4Good: Setting up Infrastructure as code on behalf of Missing Children Society of Canada
Hello Folks,
I don’t normally write posts about specific references to customers. It’s normally something like “I was working with a customer when…” but this time I wanted to highlight some learnings regarding a specific project we took on with the Missing Children Society of Canada.
We recently had a Hackfest with them, the City of Calgary and the Calgary Police Services, where we developed an Azure Function to help in the event of a child being in distress. This was a great experience to bring tech to support a worthwhile cause.
My involvement on this project was to support the dev team and to ensure the infrastructure was in place. To do so, we adopted a DevOps practice. Infrastructure as Code.
In this day and age, faster delivery of applications is challenging for both infrastructure and operations (i.e., Ops) professionals and application development and delivery (i.e., Dev) teams. Both are under pressure to increase speed without compromising quality. Looking at the infrastructure as a piece of code allowed us to be able to deploy in multiple environments (dev, test, and prod) without having to rebuild each environment every time we moved from one to the other.
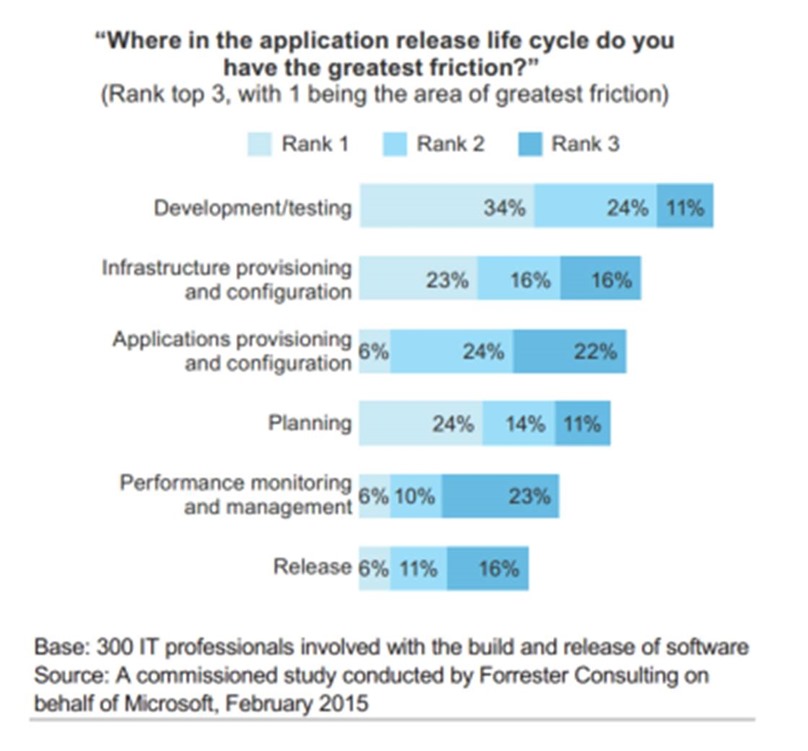
This greatly enhanced our ability to deliver quality applications by allowing testing of our code and a standardized carbon-copy provisioning of the infrastructure across all the environments. Those two points are the ones that introduce the most friction according to a Forrester survey. (you can get a copy of the report here)
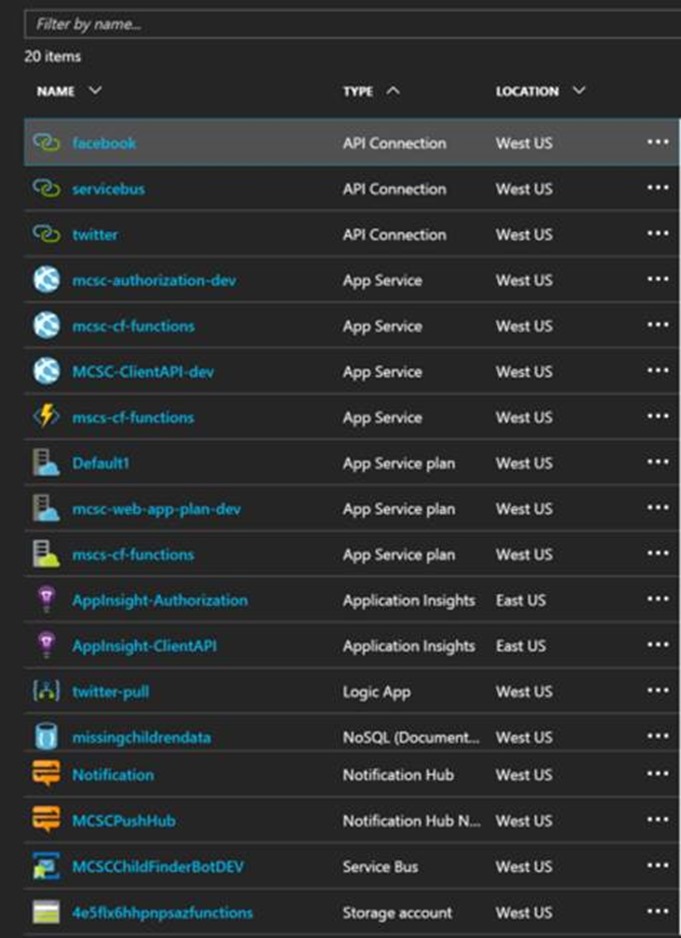
We started by meeting as a group to identify the pieces of infrastructure that would be needed in the solution. Following that we identified the process for taking the code from the Devs to the desired environment. So… We ended up with the following required infrastructure that we deployed using ARM templates
- Service Bus
- Azure Functions
- Azure Web App
- DocumentDB database
Build Management
To be able to manage the versioning of our IaC scripts and Azure Resource Manager Templates, we put everything in a Github repo. (You can access it here).
Once we had the overall process and we all knew what parts we needed to work on. I started to work on the IaC.
1. Before I created any code to be checked in to a source control Repo
2. in our case we used Github and created a public repo where we would all put our code.
3. We create a team project in Visual Studio Team Services (VSTS)
4. In the VSTS project we created a connection to the GitHub repo using a personal access token
5. Sign in to GitHub and make sure you have permission to read the repository.
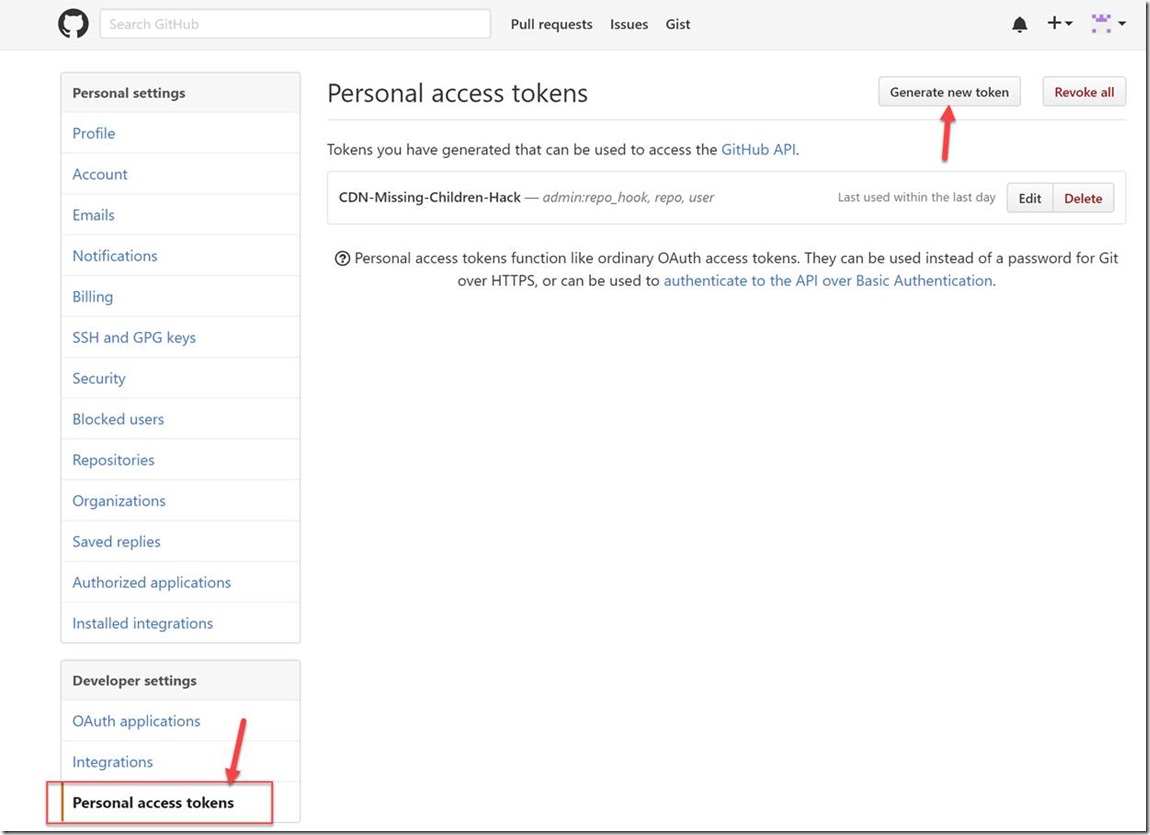
6. In GitHub, create an access token.
7. Select the repo, user, and admin:repo_hook scopes.
8. Copy the token to your clipboard.
9. Sign on to Team Services and create a build definition.
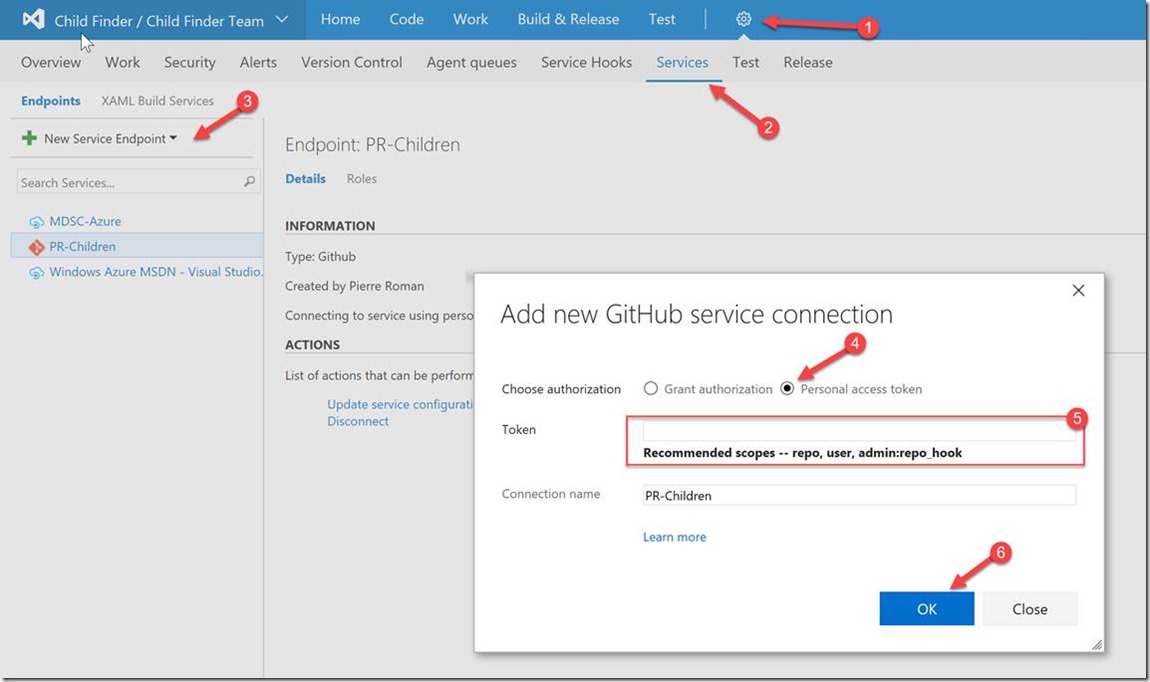
10. On the Repository tab, next to the Connection drop-down, click the Manage link. The Services tab opens as a new tab in your browser.
11. Click New Service Endpoint and choose GitHub.
12. In the Add New GitHub Service Connection dialog box, select Personal access token.
13. Paste the token and give the connection a name.
14. On the Repository tab, select the Connection you created.
15. Select the Repository that contains the code you want to build.
We used VSTS to manage the builds. For the infrastructure templates the Build process was limited to publishing the templates from Github after a commit of the code to the Build server in order for them to be processed by the release management.
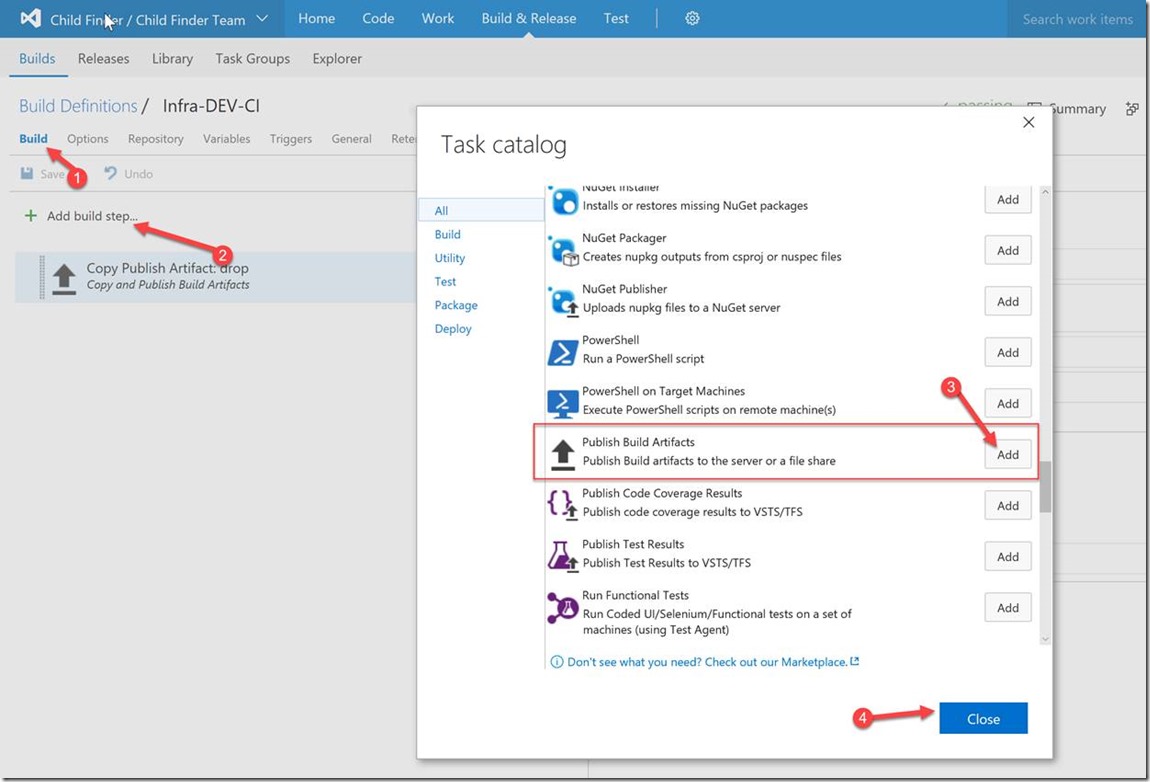
16. In the Build Tab, click Add a Build step. And select Publish Build Artifacts
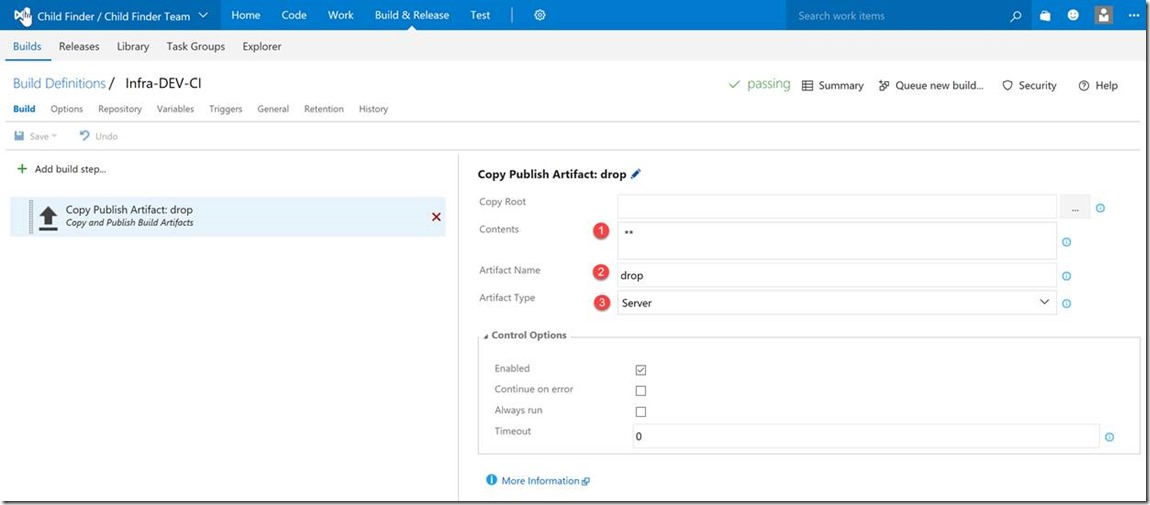
17. In the Copy Publish Artifact: Drop configuration pane, we left the copy root field empty, entered ** (1) in the Contents field to instruct the process to select everything in that repo branch and copy it to a folder called Drop (2) on the Server (3).
That’s it the infrastructure ARM template build process is ready.
Release Management
The release management of the code is the next step.
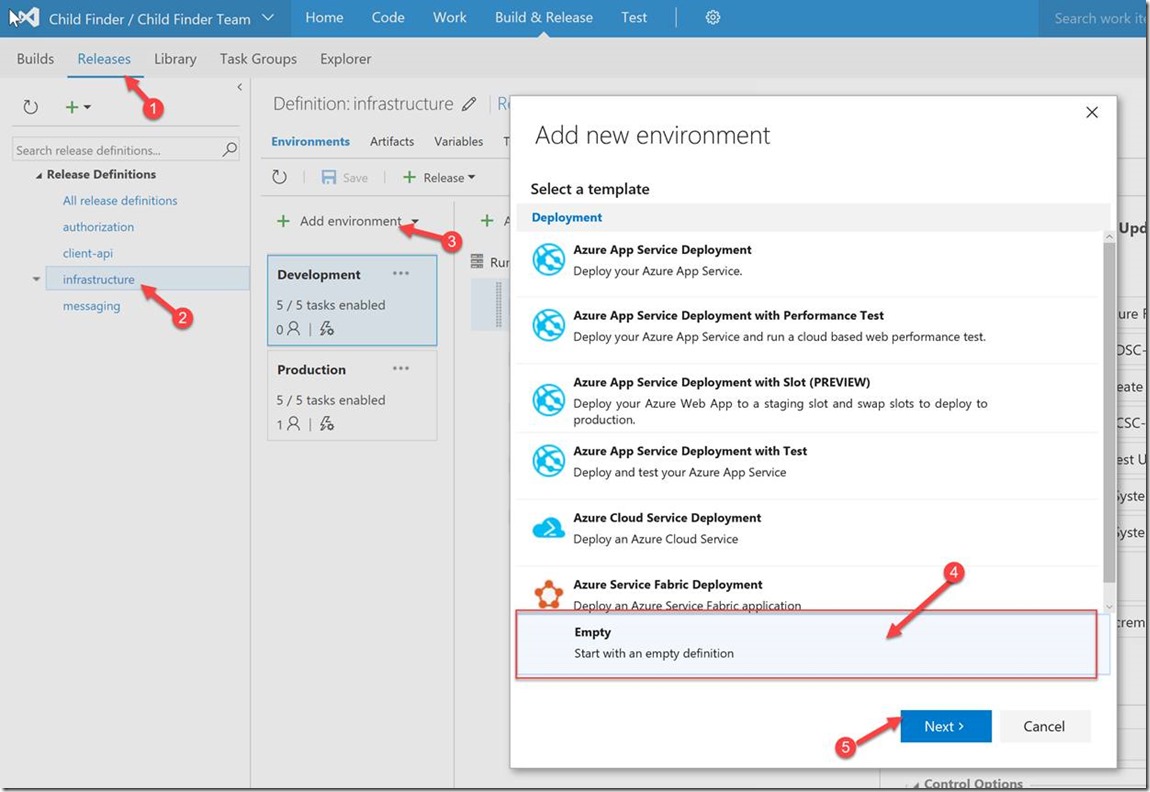
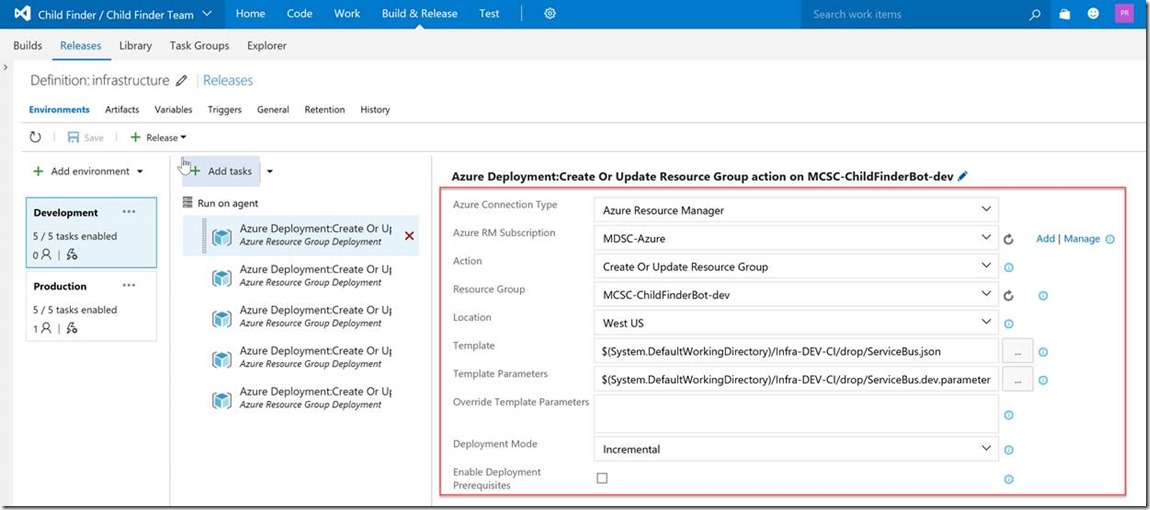
1. In the Release Tab (1) I created a new Release definition (2) and added a new environment. (3) we selected an empty deployment template.
2. I selected “Automatically Approve” in the next page and clicked Create.
I first created the entire development environment and tested it to ensure the infrastructure would deploy properly. Once the final state of the release was achieved, I created the Production environment by cloning the Development environment and changed the variable and target resource groups.
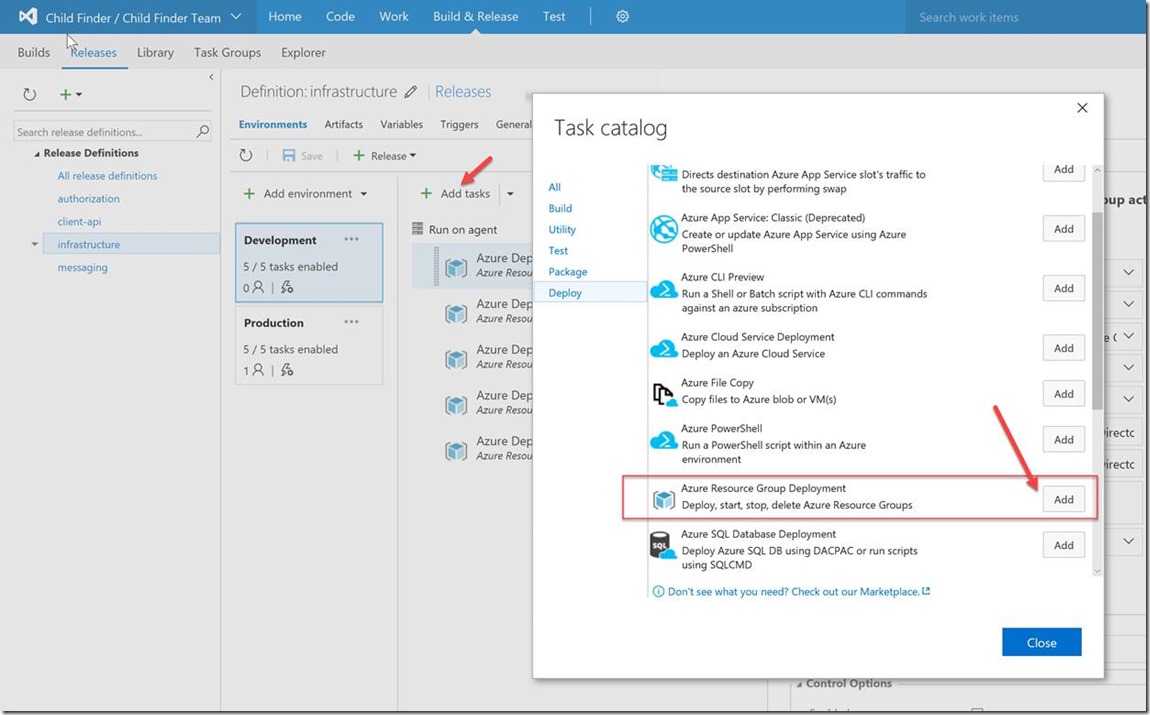
3. in the empty environment, I clicked Add task. And from the Task catalog I selected the Azure Resource Group Deployment task
4. Once the task is added I entered the following info in the task configuration tab.
Azure Connection Type: Azure resource Manage. (based on if you are using the classic Azure model or the ARM model)
Azure RM Subscription: I selected the target subscription (you will have to click the “Add” link at the end and setup the initial connection)
Action: Create Or Update Resource Group. (select the appropriate action)
Location: Enter the Azure location you want to deploy to. In our case we selected West US.
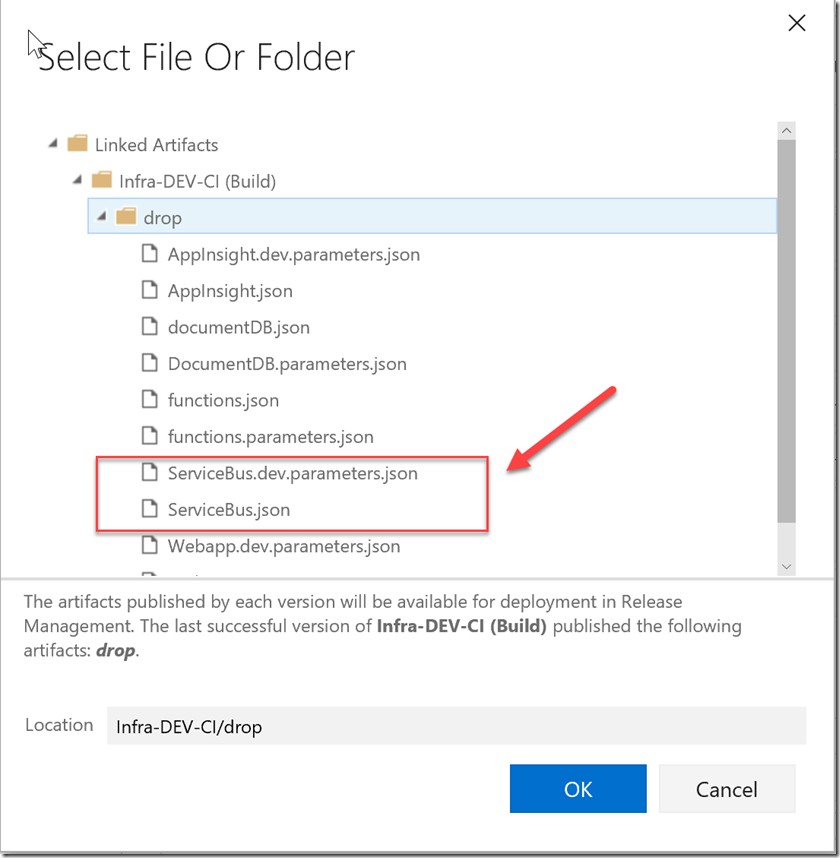
Template: This is where you select the ARM template you want to deploy. By clicking the “…” you will be able to browse the build server and select the JSON template among all the ones that were copies there by the Build process.
Template Parameters: This is where you select the ARM parameter file used with the template you want to deploy. Here is my template for the Service Bus deployment
 {
    "$schema": "https://schema.management.azure.com/schemas/2015-01-01/deploymentTemplate.json#",
    "contentVersion": "1.0.0.0",
    "parameters": {
        "serviceBusNamespaceName": {
            "type": "string",
        },
        "serviceBusQueueName1": {
            "type": "string",
            "defaultValue": "ToStore",
        },
        "serviceBusQueueName2": {
            "type": "string",
            "defaultValue": "ToFilter",
        },
        "serviceBusQueueName3": {
            "type": "string",
            "defaultValue": "ToAugment",
        },
    },
    "variables": {
        "sbVersion": "2015-08-01"
    },
    "resources": [
        {
            "apiVersion": "[variables('sbVersion')]",
            "name": "[parameters('serviceBusNamespaceName')]",
            "type": "Microsoft.ServiceBus/namespaces",
            "location": "[resourceGroup().location]",
            "properties": {},
            "resources": [
                {
                    "apiVersion": "[variables('sbVersion')]",
                    "name": "[parameters('serviceBusQueueName1')]",
                    "type": "Queues",
                    "dependsOn": [
                        "[concat('Microsoft.ServiceBus/namespaces/', parameters('serviceBusNamespaceName'))]"
                    ],
                    "properties": {},
                    "resources": []
                },
                {
                    "apiVersion": "[variables('sbVersion')]",
                    "name": "[parameters('serviceBusQueueName2')]",
                    "type": "Queues",
                    "dependsOn": [
                        "[concat('Microsoft.ServiceBus/namespaces/', parameters('serviceBusNamespaceName'))]"
                    ],
                    "properties": {},
                    "resources": []
                },
                {
                    "apiVersion": "[variables('sbVersion')]",
                    "name": "[parameters('serviceBusQueueName3')]",
                    "type": "Queues",
                    "dependsOn": [
                        "[concat('Microsoft.ServiceBus/namespaces/', parameters('serviceBusNamespaceName'))]"
                    ],
                    "properties": {},
                    "resources": []
                }
            ]
        }
    ],
    "outputs": {}
}
Override Template Parameters: this is where you would enter parameters to override the ones in the parameter file. We are using that field in the other environments. For example, the Servicebus.json template uses the ServiceBus.dev.parameters.json for the deployment in the MCSC-ChildFinderBot-dev Resource Group.
The parameters in that file are:
 {
  "$schema": "https://schema.management.azure.com/schemas/2015-01-01/deploymentParameters.json#",
  "contentVersion": "1.0.0.0",
    "parameters":
   {
       "serviceBusNamespaceName":
      {
           "value": "MCSCChildFinderBotDEV"
        },
      "serviceBusQueueName1":
     {
           "value": "ToStore",
     },
      "serviceBusQueueName2":
     {
           "value": "ToFilter",
        },
      "serviceBusQueueName3":
     {
           "value": "ToAugment",
       },
  }
}
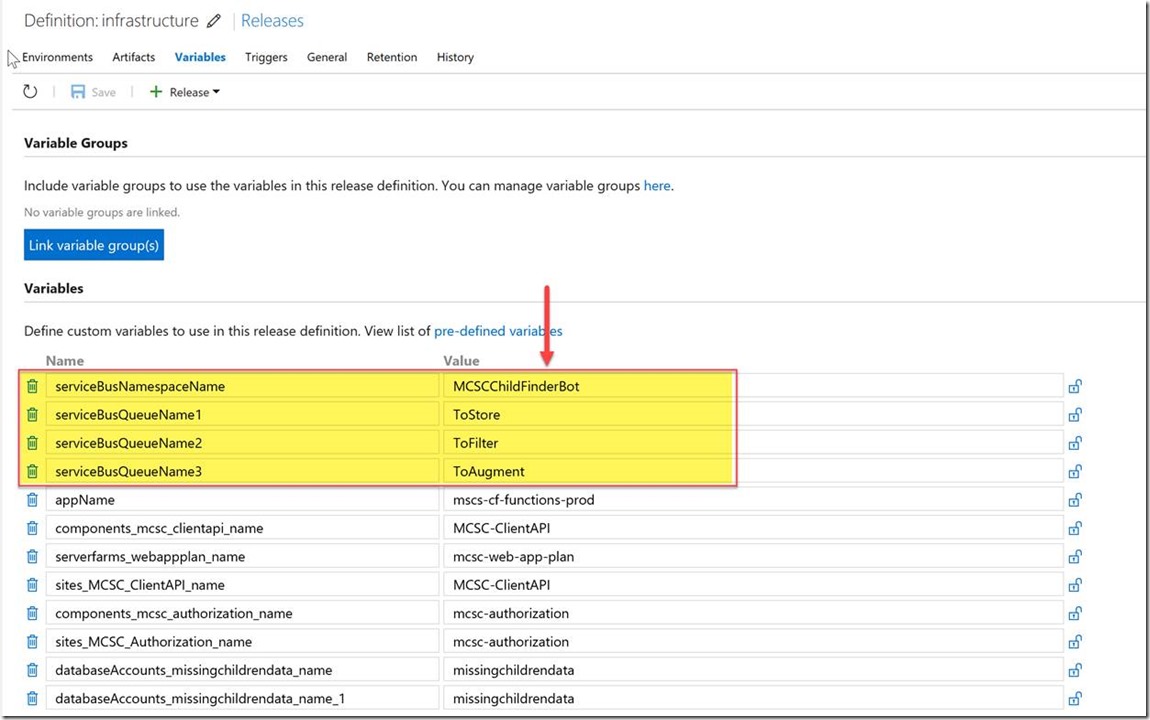
But in the production environment I used the Override Template Parameters filed to change the values of the JSON variables with variables from the Release Environment Variable.
Override Template Parameters = -serviceBusNamespaceName $(serviceBusNamespaceName) -serviceBusQueueName1 $(serviceBusQueueName1) -serviceBusQueueName2 $(serviceBusQueueName2) -serviceBusQueueName3 $(serviceBusQueueName3)
That is super cools because you don’t have to write a set of parameter files per Environment you can just write one and overwrite as needed.
Don’t forget to click the save icon to commit your changes.
I created 1 task per section of the environment I wanted to deploy automatically.
| Service Bus | ServiceBus.jsonServiceBus.dev.parameters.json |
| Azure Functions | functions.jsonfunctions.parameters.json |
| Azure Web App | Webapp.jsonWebapp.dev.parameters.json |
| DocumentDB database | documentDB.jsonDocumentDB.parameters.json |
| App Insight | AppInsight.jsonAppInsight.dev.parameters.json |
There are so many benefits to this DevOps practice. Reliability, speed, uniformity, repeatability…. A few years ago when the industry started to gravitate to the DevOps practices I admit I was a sceptic. But no more…. I’m a believer now…
All code created has been stored on GitHub and has been made available to the public and can be accessed here: https://github.com/CDN-Missing-Children-Hack
Take a look at the video below about Missing Children Society of Canada.
Cheers!
Pierre Roman
@pierreroman

