Step-By-Step: Deploying Nano Server Found in Windows Server 2016 TP5
Microsoft recently made available Windows Server 2016 Technical Preview 5. This newly released update includes a new offering of Nano Server which greatly improves the creation process. PowerShell in TP5 also covers way more scenarios than previously covered. Much is detailed in the following video:
However, specific to PowerShell, updates to Nano Server TP5 include:
- New roles like boot from WIM have now been included
- Reverse Proxy is now a built in feature as is set by default
- Host and Guest scenarios are now treated separately
- Secure Start-up is supported
- Nano Server now holds two separate SKUs: Standard & Datacenter
- Shielded VM is now supported however only with the Datacenter SKU
This post will walk through steps to create both a Nano Server image Deployment folder and a Nano Server VHD or WIM file.
Step 1: Creating the Nano Server Deployment Folder
Creating the Nano Server image Deployment folder requires mounting of the Server 2016 TP5 Media. In this example, the ISO file has been mounted and assigned Drive Letter E.
Launch Windows PowerShell in elevated or Administrator mode to be able to manage the WIM file
Copy the Nano Server folder located in the local drive via the following command:Copy-Item -Path E:\NanoServer\ -Destination C:\NanoServer\ -RecurseNOTE: Remember the media in this step-by-step was mounted to drive E. This command copy the required bits and drop it in Drive C: to build the required image. Any drive including an external USB device can be used in this scenario.
Next import the new for TP5 NanoServerImageCreator module via the following command:Set-Location –Path C:\NanoServer
Import-Module .\NanoServerImageGenerator\NanoServerImageGenerator.psd1Once copied access is now available to three new Cmdlets viewed by typing the following command:Get-Command –module NanoServerImageGenerator
Populate the local NanoServer folder with files needed to generate a bootable image by using the following command:New-NanoServerImage -MediaPath E:\ -BasePath .\Base -AdministratorPassword $Password -DeploymentType Guest -Edition Standard -TargetPath C:\VM\NanoTest.vhdNOTE: This is identical to the normal image generation process with one exception, the parameter –MediaPath need to be provided as it points to the mounted ISO or DVD of Server 2016 TP5.For this particular machine we will assume:· Target filename of C:\VM\NanoTest.vhd· No Roles
· A Nano Server which will be hosted in Hyper-V (Guest)
· Server SKU of Standard
· Password of P@ssw0rd
This process will take about 2 minutes to complete (or longer depending on the system being created), copies the required files over and creates a single Nano Server in a VHD file called NanoTest.VHD. Dismount the DVD / ISO file for Server 2016 TP5 once the process is completed to create additional Nano Servers.
Step 2: Creating a Nano Server VHD
Next we need to understand the various parameters offered up by the New-NanoserverImage Cmdlet when creating images. Here is a simple script that can be used to build a VHD file which can be attached to a Virtual Machine.
# Host or Guest
$Type=’Host’
# Standard or Datacenter
$Edition=’Standard’
# Location of boot media and temporary files
$Base=’.\Base’
# Name of Nanoserver
$Computername=’TestNano’
# Folder for Completed file
$TargetFolder=’C:\VM\’
# Media type VHD or WIM
$TargetType’VHD’
# A little PowerShell to Build it all together
$TargetPath=$TargetFolder+$Computername+’.’+$TargetType
# Maximum size if building a VHD file
$MaxVHDSize=20GB
# Administrator Password
$Password=’P@ssw0rd’
$SecurePassword=(ConvertTo-Securestring –asplaintext –force $Password)
# The magic to tie it all together
New-NanoServerImage -DeploymentType $Type<br>-Edition $Edition
-BasePath $Base <br>-TargetPath $TargetPath
-MaxSize $MaxVHDSize <br>-Storage -Defender
-ComputerName $Computername <br>-AdministratorPassword $SecurePassword </strong> <p>*or if you prefer you can read the Cmdlet like this without the Backticks ()
New-NanoServerImage -DeploymentType $Type -Edition $Edition -BasePath $Base -TargetPath $TargetPath -MaxSize $MaxVHDSize -Storage -Defender -ComputerName $Computername -AdministratorPassword $SecurePassword
Included in TP5 is another way to use the Show-Command Cmdlet to utilize the free GUI interface to build out that line in PowerShell:
Show-Command New-NanoServerImage
This will enable the following GUI interface which options are provided enabling the Cmdlet build out the results.
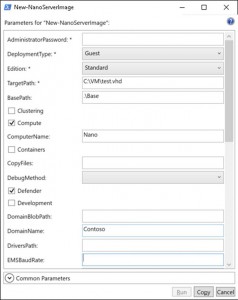
At this point you can click Copy to reserve the Cmdlet and its parameters to your clipboard.