Step-By-Step: deploying Nano Server using WDS
Hello Folks,
As i mentioned in the TechNet Flash Newsletter early in December, I am really exited when a new version of Windows Server comes out. It’s the geek in me that can’t wait to see what new capabilities will make my life easier. I’m on vacation for the holidays so i decided to rebuild my home lab using Windows Server 2016 Technical Preview 4.
The first machine in the lab is the one that will mostly remain unchanged . Until the next release that is. it’s a DC, running DHCP, DNS, WDS and some storage where the images for testing will be installed. In order to run through some scenarios, i want to setup an Hyper-V cluster using the other 5 machines i have in the lab. Then i though, hmmm… Nano servers with the Hyper-V role would be perfect. so let’s look at how i setup WDS to deploy the Nano servers on some bare-metal machines.
There are a few ways to deploy Nano Server to a physical machine:
Dual-boot a Nano Server vhd or vhdx
PxE-boot a bare-metal machine and install Nano Server from WDS using a vhd or vhdx
PxE-boot a bare-metal machine and install Nano Server from WDS using a wim file
Booting a bare-metal machine into WinPE and deploying Nano Server using a .wim file
But before we get to building the actual deployment we need to install all the pre-requisite.
- Prepare the Nano Server Image
- Active Directory Domain Services (AD DS)
- DHCP Role
- WDS Role
Prepare the Nano Server Image
1- Copy NanoServerImageGenerator.psm1 and Convert-WindowsImage.ps1from the \NanoServer folder in the Windows Server Technical Preview ISO to a folder on your hard drive.
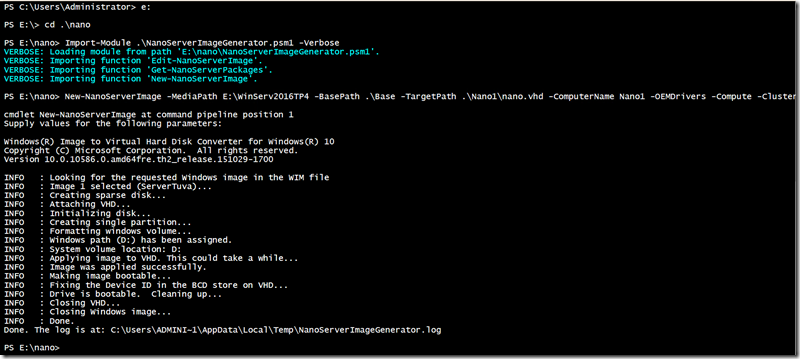
2- Start Windows PowerShell as an administrator, change directory to the folder where you've placed these scripts and then import the NanoServerImageGenerator script with
Import-Module NanoServerImageGenerator.psm1 -Verbose
3- Create a VHD that sets a computer name and includes the Hyper-V guest drivers by running the following command which will prompt you for an administrator password for the new VHD:
New-NanoServerImage -MediaPath E:\WinServ2016TP4 -BasePath .\Base –TargetPath .\Nano1\nano.vhd -ComputerName nano1 -OEMDrivers -Compute -Clustering
- E:\WinServ2016TP4 is the path to the Technical Preview ISO.
- -BasePath specifies a folder that will be created to copy the Nano Server WIM and packages to.
- -TargetPath specifies the full path, including the filename and extension, where the resulting VHD or VHDX will be created.
- Computer_name is the computer name you provide for the Nano Server virtual machine you are creating.
- -OEMDrivers -Compute –Clustering are packages we use to add server roles and features to the VHD image
The following table lists the roles and features you can use. in our case above, we want to include the drivers, the Hyper-V role and the Failover Clustering feature.
Role or feature |
Option |
Hyper-V role |
-Compute |
Failover Clustering |
-Clustering |
Hyper-V guest drivers for hosting Nano Server as a virtual machine |
-GuestDrivers |
Basic drivers for a variety of network adapters and storage controllers. This is the same set of drivers included in a Server Core installation of Windows Server 2016 Technical Preview. |
-OEMDrivers |
File Server role and other storage components |
-Storage |
Windows Defender Antimalware, including a default signature file |
-Defender |
Reverse forwarders for application compatibility, for example common application frameworks such as Ruby, Node.js, etc. |
-ReverseForwarders |
DNS Server role |
-Packages Microsoft-NanoServer-DNS-Package |
Desired State Configuration (DSC) |
-Packages Microsoft-NanoServer-DSC-Package |
Internet Information Server (IIS) |
-Packages Microsoft-NanoServer-IIS-Package |
Host support for Windows Containers |
-Containers |
System Center Virtual Machine Manager agent |
-Packages Microsoft-Windows-Server-SCVMM-Package -Packages Microsoft-Windows-Server-SCVMM-Compute-Package |
Network Performance Diagnostics Service (NPDS) |
-Packages Microsoft-NanoServer-NPDS-Package |
Data Center Bridging |
-Packages Microsoft-NanoServer-DCB-Package |
4- Create an Unattend.xml to join the server to the domain by first harvesting the data blob from another computer running Windows Server 2016 TP4 that is already in your domain using this command:
djoin.exe /provision /domain <domain-name> /machine <machine-name> /savefile .\odjblob
Open the file “odjblob” in notepad and copy its contents, and then paste the contents into the <AccountData> section of the Unattend.xml file (there is a sample here.) Put this Unattend.xml file into the same folder where your VHD was created., and then use the following commands to mount the VHD and apply the settings in the offlineServicing section:
DISM /Mount-Image /ImageFile:nano.vhd /index:1 /mountdir:mountdir
copy .\unattend.xml .\mountdir\windows\panther
dism /Unmount-Image /MountDir:mountdir /Commit
The first time you boot Nano Server from this VHD, the other settings will be applied.
As i mentioned above I setup the rest of the prerequisite on a single machine that will be managing my lab. I assume i don't have to tell you how to install AD, DHCP and DNS.
Setup WDS
1- Configure Windows Deployment Service from the Tools menu in Server Manager.
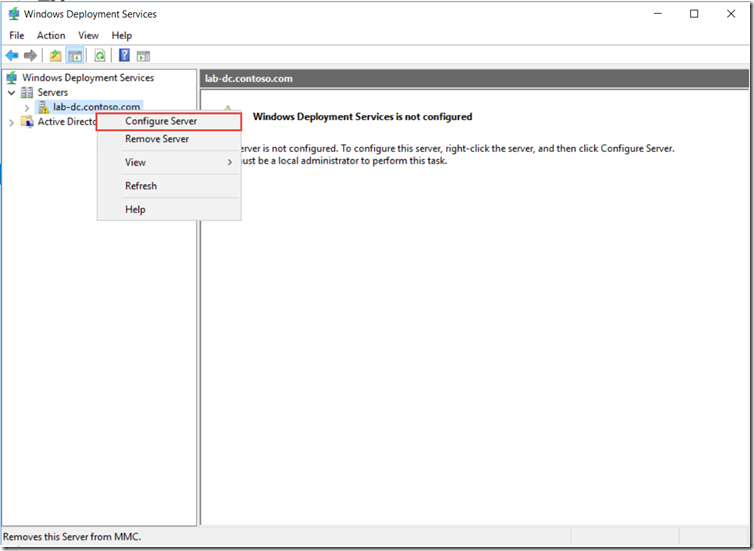
2- Right Click your DC in the Windows Deployment Services console and select Configure Server
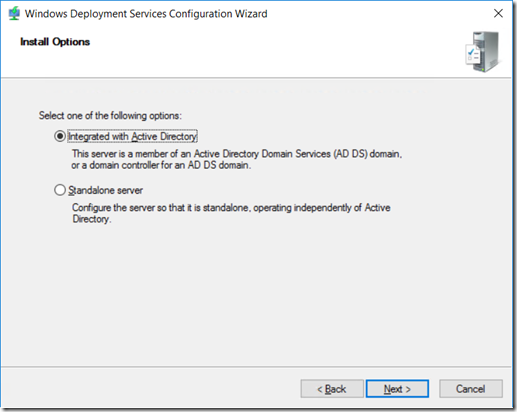
3- in the Windows Deployment Services Configuration Wizard, click Next in the Before You Begin page. and select “Integrated with Active Directory” in the Install Options page.
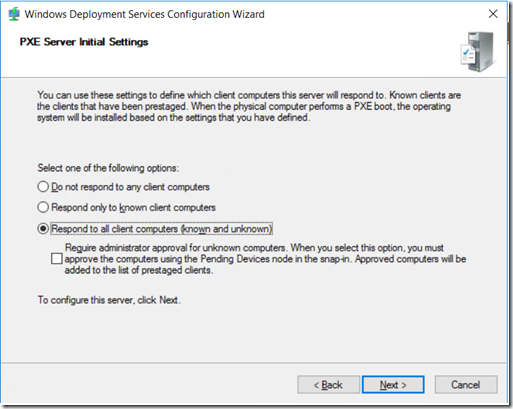
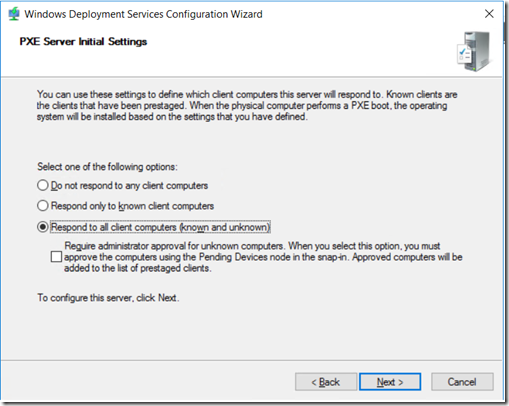
4- Select the default in the Remote Installation Folder Location and the Proxy DHCP Server pages. In the PxE Server initial Settings select “Respond to all client computers (known and unknown)”
5- Once the server is configured, Right-click on “Boot Images” and select “Add Boot Image”. Select boot.wim from the “Sources” folder on your media disk or ISO file. and select the defaults for the rest of the wizard.
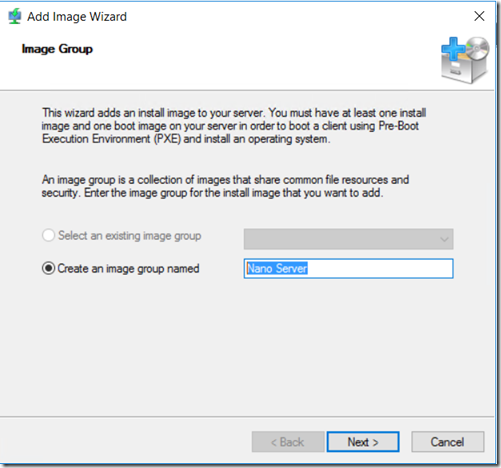
6- Right-click on “Install Images” and select “Add Install Image”. In the image group page Create an image group named “Nano Server”
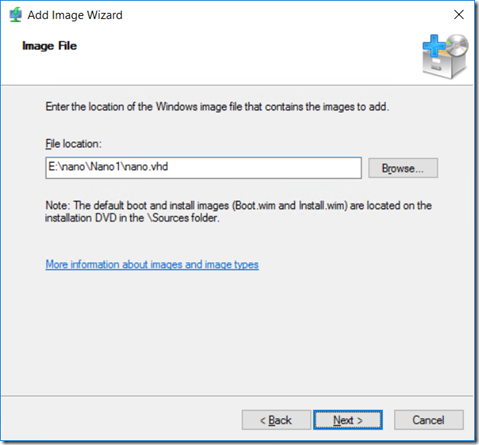
7- In the Image File page, select the Nano Server VHD you’ve prepared.
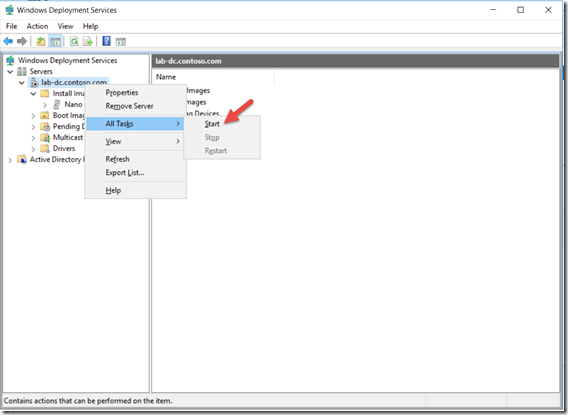
Make sure that the WDS service is started in the GUI (as indicated by a “Play” icon next to the server name).
and that’s it. you can now PXE boot any machine in your lab and install that image of your Nano server with Hyper-V and Failover clustering enabled. Next week we’ll setup the cluster itself. In the mean time, check out A Deep Dive into Nano Server on Microsoft Virtual Academy to further prepare yourself for Nano Server utilization.
Cheers!
Pierre Roman
@pierreroman
