Step-By-Step: Enabling A Secondary AD FS 3.0 Server in Azure for Office365 Single Sign-On

Now that the first AD FS server is setup and federated with Office365, additional servers can be introduced into the AD FS farm. The process itself can be repeated on one or many more servers depending on user base load balanced against the number of servers needed in the AD FS farm to support it.
Goals
1. Build the Azure virtual machine
2. Install the AD FS 3.0 role
3. Add the secondary AD FS 3.0 server to the AD FS Farm
Assumptions:
- Azure account is setup
- Directory Sync is activated, setup and running
- Valid SSL certificate is available (with private key)
- VPN connection setup from Azure to your on-premise network
- Primary AD FS server is setup (see previous post in this series)
Setting up the Virtual Machine in Windows Azure
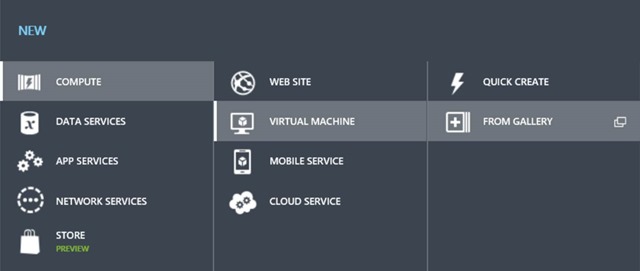
Click New -> Compute -> Virtual Machine -> From Gallery
Select Windows Server 2012 R2 Datacenter
Click Next

Enter the Virtual Machine Name
Select the Tier
Select the Size
Click Next

Choose the Cloud Service that the first AD FS Server is installed in (setup earlier in the BLOG series)
Verify Subnet
Choose the Availability Set that was created when we provisioned the first AD FS server
Click Next

Click Next
Wait for the Virtual Machine to be provisioned and then continue

Connect to the Virtual Machine over RDP
Add the Virtual Machine to the Domain
Installing the AD FS 3.0 Role on the Virtual Machine and Importing the SSL Certificate
Please reference this BLOG post on how to install the AD FS 3.0 Role on the virtual machine and then import the SSL certificate
Setting up the Primary AD FS 3.0 Server in Windows Azure for Office365 Single Sign-On
Adding the Secondary AD FS 3.0 Server to the AD FS Farm
Open Server Manger
Select AD FS
Click More… where it says Configuration required for Active Directory Federation Servers at…

Click Configure the federation service… action on the Post-Deployment Configuration

Select Add a federation server to a federation server farm
Click Next

Enter credentials for a user that has domain administrator permissions. This is used to complete the install, it’s not used as the AD FS service account
Click Next

Specify the Primary Federation Server
Click Next

Select the SSL certificate that was imported earlier (the same certificate that was installed on the primary AD FS server)
Note: Since I am using a multi-name certificate, the name of the certificate does not match my AD FS farm name. In production I always recommend that you use a single name certificate to keep things simple. If that’s the case then the certificate name should match the AD FS farm name e.g. sts.domain.com
Click Next

Select the AD FS service account (the same account that was used in the setup of the primary AD FS server in the farm)
Enter the password
Click Next

Click Next

When the pre-requisites are completed
Click Configure

Success

We now have a two node AD FS server farm setup in Windows Azure. Keep in mind that you have to continue to the next post to setup load balancing for the servers. This too will help greatly with regards to the number of devices users can now use to access their organization's Office 365 resource. Be sure to view Expanding Office 365 with Enterprise Mobility Suite on Microsoft Virtual Academy as a great next step.