Step-By-Step: Creating a File Share in Azure
Hello Folks,
Last week I wrote about using Microsoft Azure to create an offsite copy of a fileset in Azure. Well it got me thinking that we had not looked at all the storage options in Azure. I suggest looking at following MVA modules as primer for storage in Azure.
- Microsoft Azure IaaS Deep Dive Jump Start
- Windows Azure Storage - Design and Implementation Jump Start
Today I wanted to take a look at Azure File storage (which by the way is still in preview mode).
File storage in Azure offers shared storage for applications and virtual machines in Azure. The access to the share uses SMB 2.1 protocol. basically, apps and VM can access date using a mounted file share, and on-premise applications can access file data in a share via the File storage API. The common uses of File storage in Azure include:
- Migrating on-premise applications that rely on file shares to run on Azure virtual machines or cloud services, without expensive rewrites
- Storing shared application settings, for example in configuration files
- Storing diagnostic data such as logs, metrics, and crash dumps in a shared location
- Storing tools and utilities needed for developing or administering Azure virtual machines or cloud services
let look at how we create a file share. First, like I said before Azure File storage is currently in preview. So you will need to request access to the preview, navigate to the Microsoft Azure Preview page, and request access to Azure Files. Once your request is approved, you'll be notified that you can access the File storage preview. You can then create a storage account for accessing File storage.
File storage is currently available only for new storage accounts. So to use Azure storage, you'll need a new storage account.
Create news Storage Account
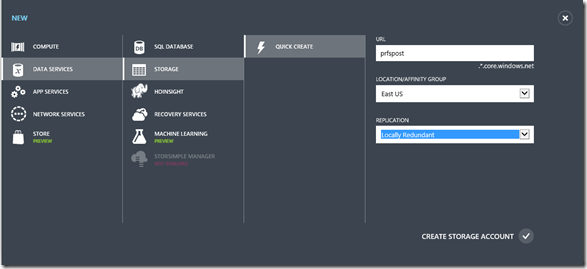
1- after login into the Azure Management Portal, At the bottom of the navigation pane, click NEW. then Click DATA SERVICES, then STORAGE, and then click QUICK CREATE.
Fill in the info for your new storage account. In my case I gave it the “prfspost” name in the region the closest to me and made it locally redundant. for more information on the redundancy options see here.
and when you’re done click Create Storage Account
Create File Share
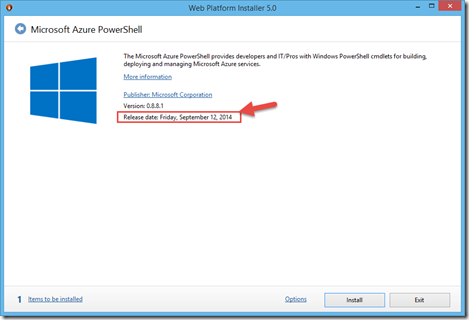
2- to create the file share you need to use PowerShell, so you need to ensure that you have installed the PowerShell cmdlets for Azure Storage.The PowerShell cmdlets for the File service are available only in the latest Azure PowerShell module, version 0.8.5 and later. It's recommended that you download and install or upgrade to the latest Azure PowerShell module. I had to download and update my copy since a new version was released on Sept 12th 2014.
Once the PowerShell module has been updated I can use the following commands to create the file share.
# create a context for account and key
$FSContext=New-AzureStorageContext prfspost <storage Access Key>
# create a new share
$FS = New-AzureStorageShare sampleshare -Context $FSContext
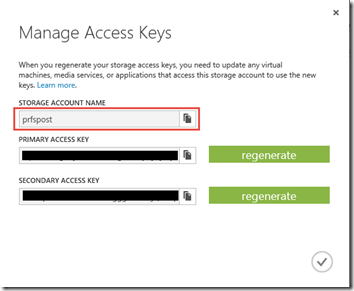
when you create the context you get the account name and keys from the “manage key Access” in the action bar at the bottom. (I blocked out my keys….)
After running the last commands to create the file share, we now will create a directory and a file.
# create a directory in the share
New-AzureStorageDirectory -Share $FS -Path sampledir
we get the following results
Mount the share from an Azure virtual machine
Before mounting to the file share, we will set the storage account credentials on the virtual machine. This allows Windows to automatically reconnect to the file share when the virtual machine reboots. To persist your account credentials, execute the cmdkey command from within the PowerShell window on the virtual machine.
cmdkey /add:prfspost.file.core.windows.net /user:prfspost /pass: <storage Access Key>
Once this is done, you can use a standard “Net Use” command to connect to the share. Use the storage account name and the share name we created earlier.
net use z: \\prfspost.file.core.windows.net\sampleshare
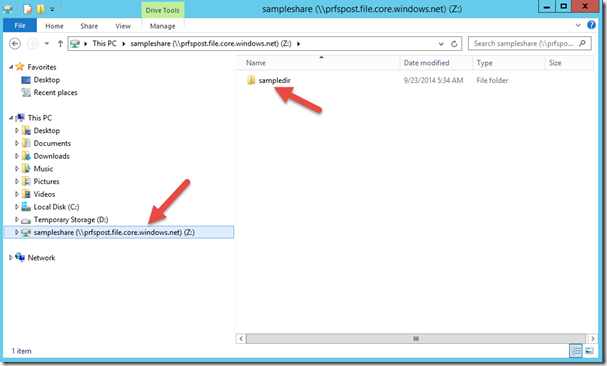
That’s it! you can now browse the share from the VM. as you can see below, we see in our share the directory we created earlier.
I hope this answered a few questions. It made me think of a few scenarios I want to explore….. But that’s for another day.
Feel free to send us comments and let us know what scenarios you want us to explore for you.
Cheers!
Pierre Roman, MCITP , ITIL | IT Pro AdvisorTwitter | Facebook | LinkedIn


