Step-By-Step: Assigning VMs with Static IP addresses in a Virtual Network
Hello Folks,
in order to follow along you should be familiar with IaaS. The easiest way to do that is to listen to the Windows Azure for IT Pros Jump Start on Microsoft Virtual Academy.
Over the last few weeks we published a lot of information regarding Microsoft Azure. I’ve actually concentrated on the networking side of things because after many conversations with ITPros it was clear that guidance on extending your own datacenter to the cloud was the first step needed.
So with that in mind I wrote several articles on connecting your local network with a (or many) virtual networks in the cloud.
- Step-By-Step: Move a VM to a different Vnet on Azure
- Step-by-Step: Multi-Site Azure VPN
- Step-by-Step: Configure VNet to VNet Connectivity in Azure
How ever last week while I was in Redmond someone pointing out that I had left off an very important topic. How do I assign a static IP address to a Virtual Machine running in one of my Virtual Networks on Azure.
Well… Say no more . Here is how it’d done.
Before we get to the steps. There are a few things you need to know about IP addresses on Azure.
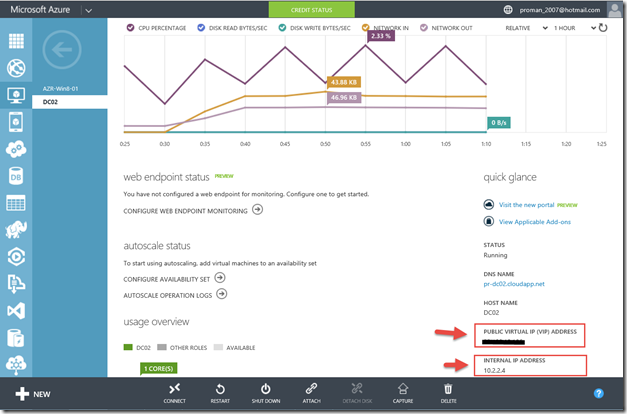
as you can see in the screen capture below. There are 2 IP address for every VM.
The VIP (Virtual IP address): The public IP address pointing to the cloud service where the VM deployed to.
and The DIP (an internal IP assigned by Windows Azure with DHCP): The IP address assigned to the VM for communicating within the Windows Azure virtual Network.
In this articles we will set the INTERNAL address to a static one. This could be done because the server is a DNS server, because you have services or LOB apps that connect to the server in question using a IP address instead of a FQDN. whatever your reason. the process is the same.
Step 1: Verify that a specific IP address is available
For sake of argument I want to set my DC02 machine to 10.2.2.10. as you can see above it is currently set to 10.2.2.4.
To see if 10.2.2.10 is available use the following command in your Microsoft Azure PowerShell console.
Test-AzureStaticVNetIP –VNetName vNet1 –IPAddress 10.2.2.10
If you get a “IsAvailable : True” as the result, you’re good to proceed to step 2.
Step 2: Specify a static internal IP for a existing VM
Still in your Microsoft Azure PowerShell console, type the following command, and then press ENTER. (the command is on one line). Please note that the Machine will need to restarted to start using the new IP address.
Get-AzureVM -Name DC02 –ServiceName PR-DC02 | Set-AzureStaticVNetIP –IPAddress 10.2.2.10 | Update-AzureVM
and the result of the command is:
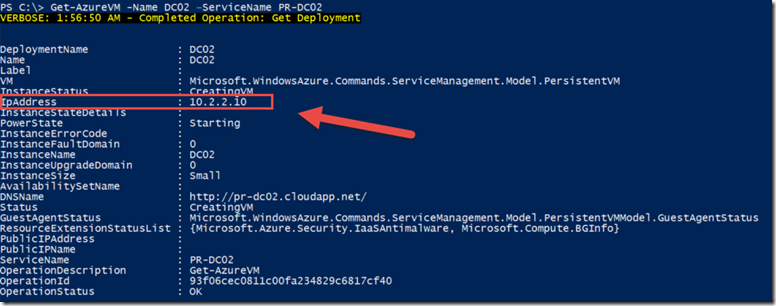
Once you get the “OperationStatus = Succeeded” . if you want to verify that the VM has really been set to the new address, type the following command, and then press ENTER.
Get-AzureVM -Name DC02 –ServiceName PR-DC02
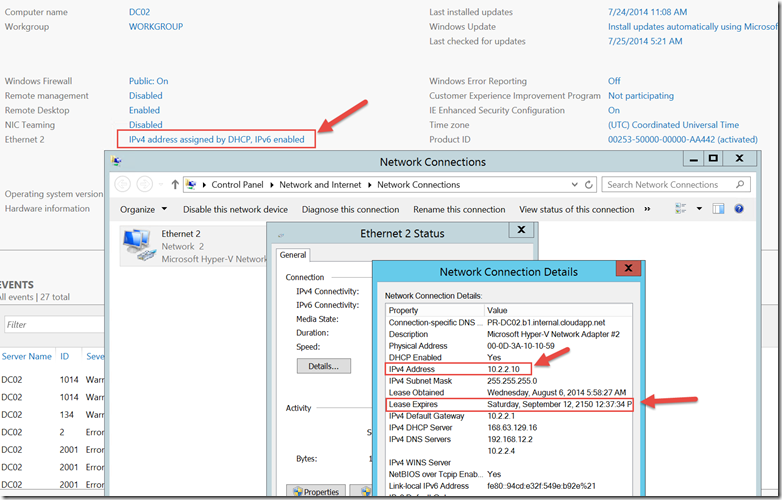
Once my Machine restarted I opened a Remote Desktop Session and verified the settings.
You will notice that the address still shows up as “IPv4 address assigned by DHCP” , and that the address you specified IS the one being assigned (10.2.2.10). But notice the Lease Expires field…
The way azure deals with static IP addresses is to create a reservation for 135 years… it’s pretty safe that it’s going to exceed the life of that machine.
I hope this helps. Feel free to send us comments and let us know what scenarios you want us to explore for you.
Cheers!
Pierre Roman, MCITP , ITIL | IT Pro AdvisorTwitter | Facebook | LinkedIn


