Hyper-V: Clustering & Resiliency. Step 5: Shared Storage and Clustering
Hello Folks,
Here we are with Step 5 of our “From The Ground Up” series. In this episode we’ll create the shared storage that our Hyper-V cluster will utilize to store the virtual machine. And start the clustering configuration.
If you feel like doing it and getting your hands on Hyper-V and SCVMM you can download Windows Server 2012 R2 and Hyper-V Server 2012 R2, setup your own lab and try it for yourself. And I am listing MVA modules that are relevant to this topic. Go ahead, review these modules…
- Infrastructure Provisioning and Management with System Center 2012 R2
- Windows Server 2012 Jump Start: Preparing for the Datacenter Evolution
- Introduction to Hyper-V Jump Start
- Windows Server 2012 R2 Virtualization
- Server Virtualization with Windows Server Hyper-V and System Center
In Windows Server 2008 R2 and earlier, running virtual machines on a cluster required that the VMs be placed on shared storage. Shared storage in that scenario meant a SAN, either iSCSI or FC. With Windows Server 2012 and 2012 R2, Failover Clustering now supports the VMs being placed on a file share, accessible using the SMB 3.0 protocol, over the network.
This provides administrators with considerably more flexibility when deploying their infrastructure, and also allows for a simpler deployment and management experience. We have defined our Storage, (Hyper-V: Clustering & Resiliency. Step 1: Storage), we defined our virtual networking (Hyper-V: Clustering & Resiliency. Step 2: Networking, Hyper-V: Clustering & Resiliency. Step 3: Networking Part 2, Hyper-V: Clustering & Resiliency. Step 3: Networking Part 3) and created our logical switches (Hyper-V: Clustering & Resiliency. Step 4: Logical Switches) in previous weeks. Today, we will create this shared storage and build our cluster.
Create Shared Storage over SMB
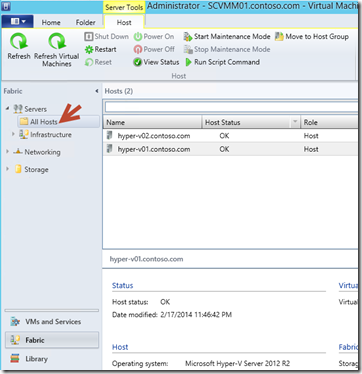
1. In the Virtual Machine Manager Console. Select the Fabric workspace, expand Servers, and click All Hosts.
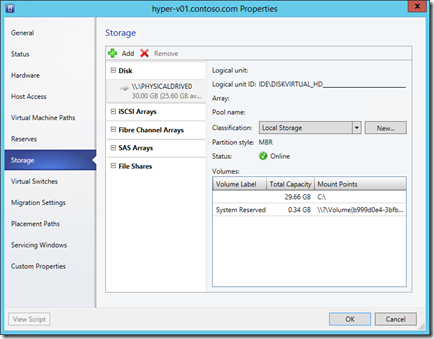
2. In the main detail pane, right-click HYPER-V01, select Properties, and click the Storage tab.
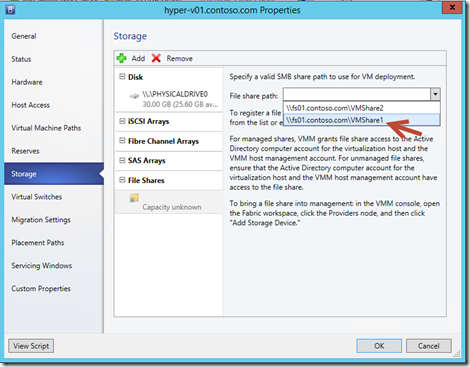
3. Click Add, and select Add File Share, and from the File share path dropdown, select \\FS01.contoso.com\VMShare1 .
4. Repeat the last step and select \\FS01.contoso.com\VMShare2 from the dropdown list. And click OK.
5. Repeat steps 2 to 4 for HYPER-V02.
Build a Hyper-V Cluster
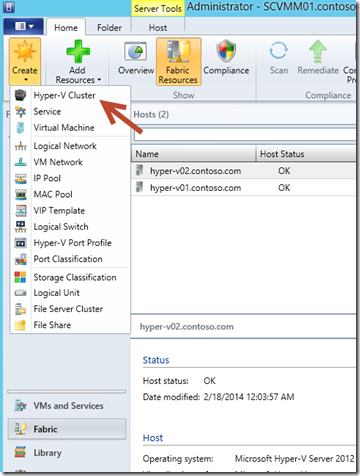
1. In the Virtual Machine Manager Console, select the Fabric workspace, select the Home tab above the ribbon, click Create, and select Hyper-V Cluster.
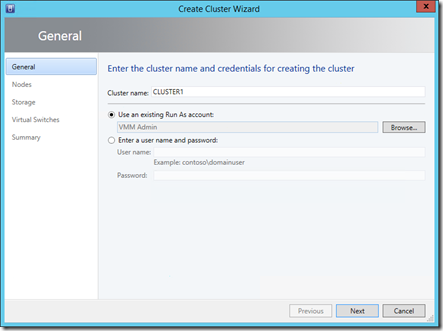
2. In the Create Cluster Wizard, on the General page, type CLUSTER1 in the Name field. Next to Use an existing Run As account, click Browse, select VMM Admin, and then click OK and click Next.
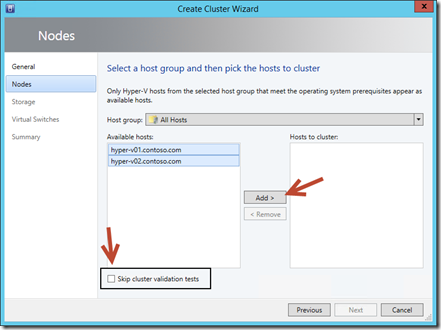
3. On the Nodes page, multi-select HYPER-V01 and HYPER-V02, click Add, and then click Next. NOTE: Ensure to Skip cluster Validation test
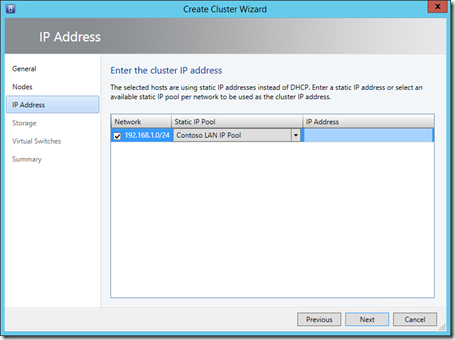
4. On the IP Address page, check the box next to 192.168.1.0/24, select Contoso LAN IP Pool from
the Static IP Pool dropdown. VMM will automatically allocate an IP address to the Cluster from
that pool of IP Addresses. Click Next.
5. On the Storage page, click Next. A SAN does not need to be selected as this cluster will use the
storage on the File Server.
6. On the Networks page, click Next. The Virtual Switches and Logical Switches for these hosts were
already created.
7. On the Summary page, click Finish. (please note… This could take a while.)
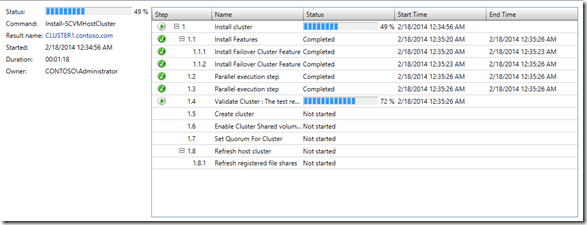
The clustering feature will be installed and configure as per the info provided in the wizard for both HYPER-V01 and HYPER-V02. You can observe the running job in the Jobs window. Maximize the Jobs window. In the results pane at the bottom, select the Validate Cluster job, and click the Details tab. Observe the job through to completion.
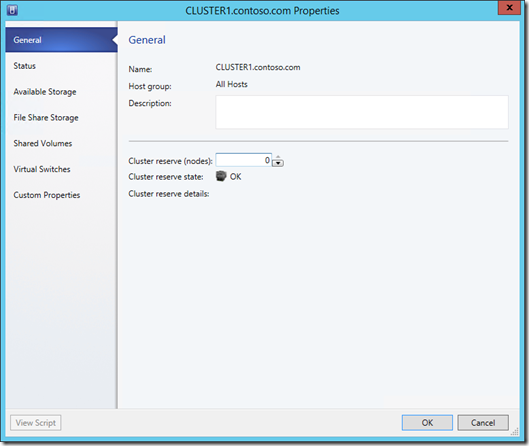
8. In the Fabric workspace, expand All Hosts, right-click CLUSTER1, select Properties, on the General tab, type 0 in the Cluster reserve (nodes) field.
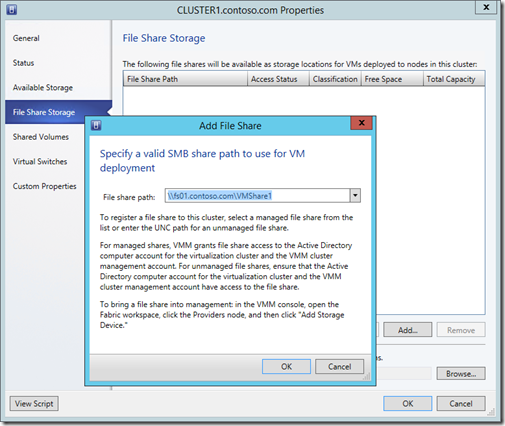
9. From the CLUSTER1.contoso.com Properties click the File Share Storage tab, in the detail pane, click Add. From the File share path dropdown, select
\\FS01.contoso.com\VMShare1, and then click OK.
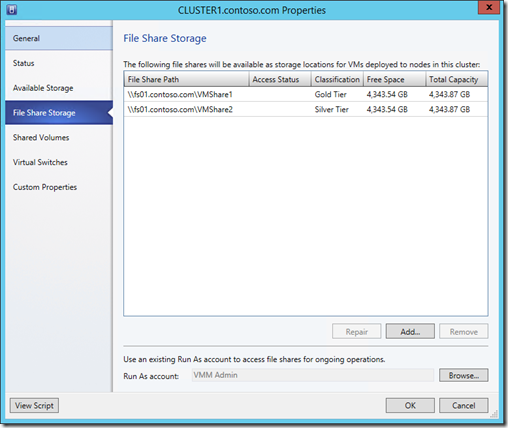
10. In the detail pane, click Add again . From the File share path dropdown, select \\FS01.contoso.com\VMShare2, and then click OK.
11. Click the Virtual Switches tab. Note that the standard and logical switches that were created
earlier are attached to this node. Click OK to close the CLUSTER1 Properties.
Our cluster is created!! but not quite fully functional
We still have some work to do with it. In the next article, we will complete the cluster configuration by assign Shared Storage using iSCSI for our Cluster Shared Volume, we will optimize our cluster and setup Cluster Patching.
until next time,
Cheers!
Pierre Roman | Technology Evangelist
Twitter | Facebook | LinkedIn
