Hyper-V: Clustering & Resiliency. Step 2: Networking
Hello Folks,
This is the 3nd post in our Hyper-V 2012 R2 from the ground up series. Last week we covered setting Host Configuration using SCVMM 2012 R2 and Clustering & Resiliency – Storage.
Today we keep going down the rabbit hole to see how deep it goes. Step 2 in our “from the ground up” series is Networking. As usual, I recommend you download Windows Server 2012 R2 and Hyper-V Server 2012 R2, setup your own lab and try it for yourself. I ‘m a big believer in getting my hand in the pot to learn.
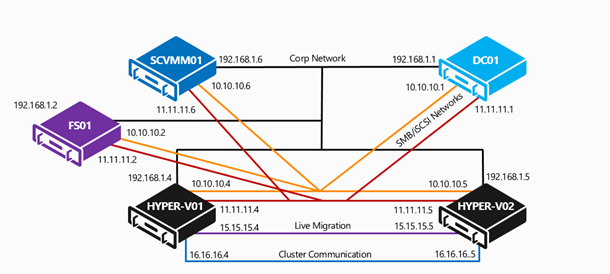
In our lab we have 5 machines describes as below
Machine |
|
 |
|
 |
|
 |
|
 |
|
 |
|
Our machine are setup in a network configuration that include the following segments:
- Corporate Network for management and Client access
- Corp
- SMB networks for file share storage access along with iSCSI connectivity
- Storage 1
- Storage 2
- Dedicated live migration networks
- Live Migration
- Dedicated network for Cluster Communication
- Heartbeat
So first, let configure our NIC teams on the Hyper-V hosts
Configure Hyper-v hosts NIC Teams.
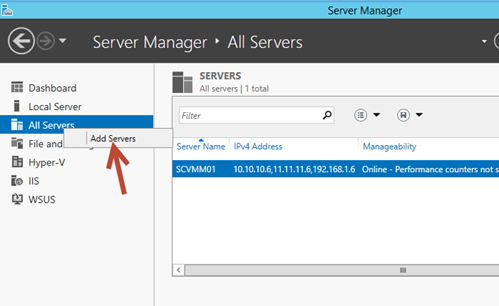
1. From SCVMM01 open Server Manager, Right-click All Servers, and click Add Servers. In the Add Servers window, click Find Now, Select HYPER-V01 and HYPER-V02, click the right arrow, and then click OK.
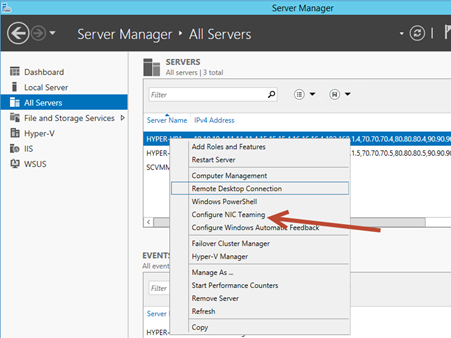
2. In Server Manager under All Servers, right-click HYPER-V01 and click Configure NIC Teaming to start the NIC
Teaming work pane.
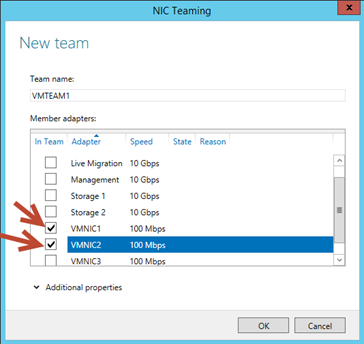
3. In the Teams pane, select Tasks, then New Team and in the NIC Teaming window, type VMTEAM1 in the Team name field and select VMNIC1 and VMNIC2 in the Member adapters box and click OK.
4. Repeat steps 2 and 3 for HYPER-V02.
Now we have our teams setup on both Hyper-V hosts, lets create virtual switches. The Hyper-V Virtual Switch is a software-based layer-2 network switch that is available in Hyper-V Manager. The switch includes programmatically managed and extensible capabilities to connect virtual machines to both virtual networks and the physical network. In addition, Hyper-V Virtual Switch provides policy enforcement for security, isolation, and service levels.
The Hyper-V Virtual Switch in Windows Server 2012 introduces several new features and enhanced capabilities for tenant isolation, traffic shaping, protection against malicious virtual machines, and simplified troubleshooting.
With built-in support for Network Device Interface Specification (NDIS) filter drivers and Windows Filtering Platform (WFP) callout drivers, the Hyper-V Virtual Switch enables independent software vendors (ISVs) to create extensible plug-ins (known as Virtual Switch Extensions) that can provide enhanced networking and security capabilities. Virtual Switch Extensions that you add to the Hyper-V Virtual Switch are listed in the Virtual Switch Manager feature of Hyper-V Manager.
Creating a Virtual Switch
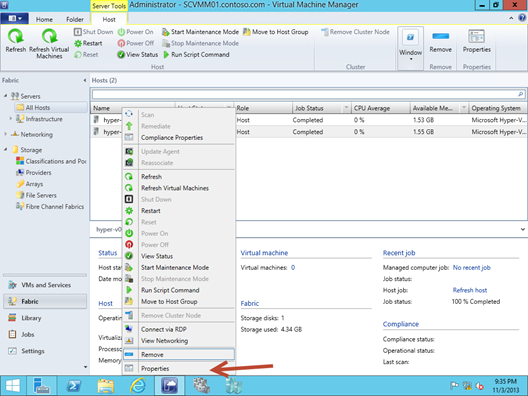
1. Open the Virtual Machine Manager Console. Select the Fabric workspace, expand Servers, and click All Hosts. In the main detail pane, right-click HYPER-V01, and select Properties.
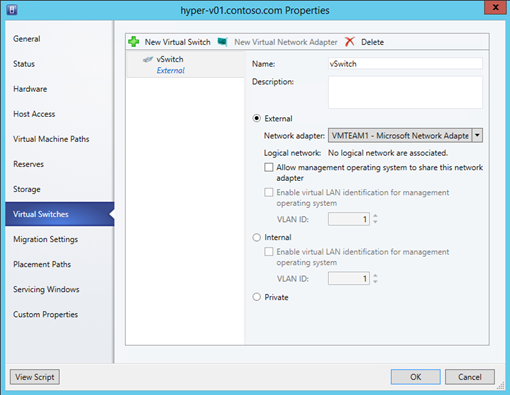
2. Click the Virtual Switches tab, click New Virtual Switch, and select New Standard Switch. In the Name field, type vSwitch1. Select the External radio button, and, from the Network adapter dropdown, select VMTEAM1 – Microsoft Network Adapter Multiplexor Driver. This will bind the vSwitch to this physical adapter. Click OK.
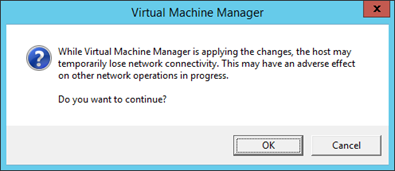
3. In warning dialog, click OK to dismiss the warning.
4. Repeat steps 1 to 3 for Hyper-V02 with the same switch name (vSwitch1) and network adapter
(VMTEAM1)
Note: It is important to match the case for this vSwitch, so type the name exactly.
This will create the same switch on both Hyper-v hosts. therefore enabling the easy migration of virtual machines from one host to the other.
Next Thursday we will continue our Network configuration by setting up a Logical Network and completing the Virtual network by tying all the piece together. we will be that much closer to be able to create our Highly Available Hyper-V cluster.
Won’t you join me?
Cheers!
Pierre Roman | Technology Evangelist
Twitter | Facebook | LinkedIn
