Microsoft Assessment and Planning Toolkit Best Practices
With Windows 8.1 less than three weeks from GA, and Windows XP less than 200 days from end of support (#EndOfDaysXP on Twitter), I thought it would be a good time to write about the Microsoft Assessment and Planning Toolkit again, but only in the context of Windows 8 Readiness and maintaining a software and hardware inventory of the machines within your organization.
I used to work for a man who said that if you cannot measure it, you cannot manage it. These are words I have lived by ever since.
The problem is it gets difficult to keep track of what you have in your IT environment, especially in environments where users are allowed to install their own software. Don’t forget that software extends far beyond the major packages like Microsoft Office, it also includes things like readers and players. Many driver packages will also install their own software, whether you realize it or not.
So how do you keep track? The simple solution is to use a tool like the Microsoft Assessment and Planning Toolkit. The MAP Toolkit is a Microsoft Solution Accelerator that will take an inventory of all of your machines. Of course it does a lot more than that, like planning for virtualization and private/public clouds, but if you simply want to know what software you have installed, run the toolkit.
Downloading and Installing
The MAP Toolkit is a free tool from Microsoft, and can be downloaded from www.microsoft.com/solutionaccelerators . The current iteration is MAP 8.5, and it is a 74 MB download.
Before you install it, you will need to have the .NET Framework 4.0, plus the 4.0.2 update. If you are installing on Windows 8.1 it is there, but if you are on Windows 7 then you will need to download them. The links are on the MAP Toolkit download page under System Requirements.
The installation is a PhD (Press here, Dummy!) installer… just keep pressing next. Oh, you either opt in or out of the CEIP, and you do have to agree to the license terms.
The installer will install Microsoft SQL Server Express LocalDB if you do not have SQL Server installed (most of us do not have it on our laptops).
Getting Started
Before you begin you have to either create an inventory database, or use an existing one. Let’s assume you don’t have one already, and name your database. I usually name it after the company where I am consulting, as you can run the tool for multiple companies on the same machine.
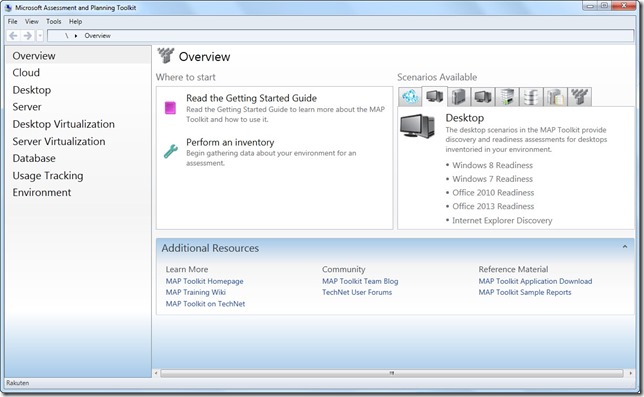
In the MAP Toolkit 8.5 there are eight scenarios you can choose from:
- Cloud
- Desktop
- Server
- Desktop Virtualization
- Server Virtualization
- Database
- Usage Tracking
- Environment
For the sake of this article we are going to stick with the second (Desktop) option, although you can experiment with the others as you wish. In the navigation bar select the third tab (Desktop).
In order to do anything we need to collect the inventory. In the Desktop screen at the top click Collect inventory data.
Because Microsoft realizes that there are a few non-Windows based computers out there, you can select both Windows computers and Linux/UNIX computers in the Inventory Scenarios window and click next. (Note: If you are only doing Windows it will use WMI; if you are doing Linux as well it uses SSH.)
In the Discovery Methods window you have to determine which method you will use to discover computers. The default is to use Active Directory. You can also use other Windows networking protocols, SCCM, Scan an IP range, Manually enter computer names and credentials, or import computer names from a file. Select your option then click Next.
On the next screen you have to enter the domain name, plus credentials. This is the first of two places where you will be asked; for this time it is only to scan the Active Directory for the next step. If you are not a domain admin then this is where you have to go ask someone who is for their assistance. Once the information is entered click Next.
On the Active Directory Options screen you can determine whether you want to scan the entire domain (including sub-domains), or only a segment. In a large organization the second option is probably smarter. Once done click Next.
On the All Computer Credentials screen you need to create accounts that will actually be able to scan the computers themselves. You may want to create multiple users (one for Active Directory, one for Linux, for example) for different types of systems. Also if there are systems in different OUs and Domain Admin does not have access, you can create multiple accounts.
In the Credentials Order screen you can select which credentials to try first. If you have thousands of AD computers and only a few Linux machines it makes sense that WMI is first; once a credential authenticates the tool will not try to use others.
On the Connection Properties screen you can change the TCP port that SSH uses to authenticate; by default it is Port 22.
On the Summary screen you can review your choices, then click Finish! Your inventory is ready to run.
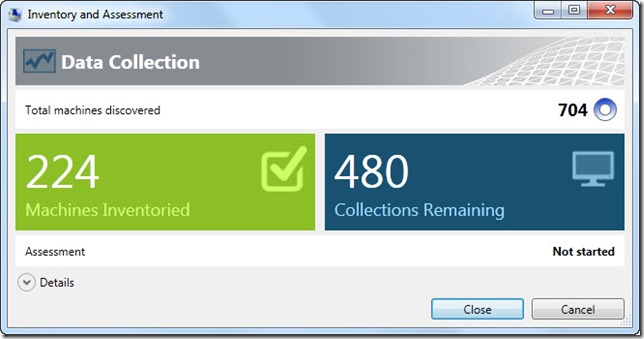
The Inventory and Assessment window will begin detecting machines on the network. Depending on the number of machines it can take quite some time, so be patient. These numbers will continue counting up (Machines Inventoried) and down (Collections Remaining) until they are all counted.
Getting to and using the data
Once the data is all collected you will get a screen with five different scenarios pertaining to the desktop:
- Windows 8 Readiness
- Windows 7 Readiness
- Office 2010 Readiness
- Office 2013 Readiness
- Internet Explorer Discovery
These boxes should display what percentage (and how many) of your devices are ready for each. However you can drill down and get more information, which is where the inventory component comes into play. Simply click on the Windows 8 Readiness box and the screen will display the Details page. It will also (in the upper right corner) allow you to Generate Windows 8 Readiness Report & Proposal. Click on that button and the MAP Toolkit will create two files for you: A Word document that you can customize with your logo and name to give to the client or to your boss, and an Excel spreadsheet with a detailed inventory of all of your hardware and software. These files will be located in the %username%\My Documents\MAP\CustomerName directory.
If you are going to use these files for upgrade readiness, then you will appreciate that the 3rd tab along the bottom of the spreadsheet has three very helpful columns: Reasons Not Meeting, After Hardware Upgrades, and Reasons Not Upgradeable. You won’t be left wondering what is wrong with your systems, you will know why they can’t be upgraded (and what must be done to mitigate that). I found this very helpful when I was deploying Windows 7 to my son’s school several years ago; rather than replacing 25 computers I replaced 25 video cards and memory chips, and the deployment went smoothly after that.
The complete list of information provided by this spreadsheet is as follows:
Summary
- Windows 8 Readiness
- Before Hardware Upgrades
- After Hardware Upgrades
Assessment Values - Settings
- CPU (GHz)
- Memory (MB)
- Free Disk (GB)
- Flag Not Ready Video
Client Assessment
- Computer Name
- Current Windows 8 Category
- Reasons Not Meeting
- After Hardware Upgrades
- Reasons Not Upgradeable
- Notes
- WMI Status
- IP Address
- Subnet Mask
- Current Operating System
- Service Pack Level
After Upgrades
- Computer Name
- IP Address
- CPU
- Memory
- Hard Disk Free Space
- Video Controller
Device Summary
- Device Model
- Manufacturer
- Number of Computer with
Device Details
- Computer Name
- Device Model
- Manufacturer
Discovered Applications
- Application
- Software Version
- Number of Installed Copies
- The Word Document will also be a tremendous help… not because it contains more data than the spreadsheet, but because it explains it in terms than any CxO will understand, with charts and graphs and summaries, without having to review all of the raw data. The document is written well enough to present proudly, and can be modified with your corporate logo and your name on it easily.
Conclusion
- The MAP Toolkit is a useful tool for collecting inventory data, as well as for analyzing upgrade readiness, without needing any costly management tools (although it works very well in conjunction with System Center 2012 R2). Aside from saving you tremendous amounts of time in the collection of data, it also provides handy spreadsheets and documents so that you can use the data most efficiently. I have long said that it is one of the best free products on the market, and I stand by that assessment.
- In this article we covered only a fraction of what the tool can do. See what you can do with it for Server virtualization and more!

