Step-By-Step: Deploying Active Directory to Azure
Hello Folks,
IT Pros are always expected to support the company applications and to ensure that these applications are always up. One way to increase up-time is to move the application to the cloud, and avoid all the potential hardware failure you may have to deal with. Let Microsoft Azure worry about the infrastructure and you worry about the VM and the application running on it.
However, when running an corporate application in the cloud, you need to figure out your authentication scheme. if you use your on premise AD to authenticate, what happens if your internet connection goes down? If the whole building has a power outage? Your application keeps running, but no one can authenticate. Extending your AD to Azure makes sense. Treat your cloud network just like you would treat another site, put a DC on it.
To test this:
- Sign up for a FREE Trial of Microsoft Azure
- Download Windows Server 2012 or Windows Server 2012 R2 Preview
- Setup your own lab environment.
And review the following Microsoft Virtual Academy modules.
- Introduction To Microsoft Azure Training
- Introduction to Private, Hybrid and Public Cloud
- Microsoft Azure Security Overview
- Microsoft Azure for IT Pros Jump Start
Before, we get to that, let talk about the differences between Microsoft Azure Active Directory and Windows Server Active Directory on Microsoft Azure VMs.
Microsoft Azure Active Directory (Microsoft Azure AD) is a service that provides identity management and access control capabilities for your cloud applications. It provides a cloud-based identity provider that easily integrates with your on-premises AD deployments and full support of third party identity providers. And you can add Multi-Factor Authentication to your Microsoft Azure AD for additional security. However, it is NOT a full Windows Server Active Directory. It’s more like Active Directory Lightweight Directory Services and will not provide a Disaster Recovery option for your AD environment. Get more details about Azure AD here: https://www.windowsazure.com/en-us/home/features/identity/
If you want the same AD as the one you’re running on premise, you can deploy a Windows Server 2012 in a VM in Azure IaaS and make that VM a DC. like I said earlier, treat your cloud network just like you would treat another site, put a DC on it the same way you would put a DC in a branch office or in a remote Datacenter.
First , link your networks with a site to site VPN.
1- Log in to the Microsoft Azure Management Portal.
In the lower left-hand corner of the screen, click New. In the navigation pane, click Networks Services, and then click Virtual Network. Click Custom Create to begin the configuration wizard.
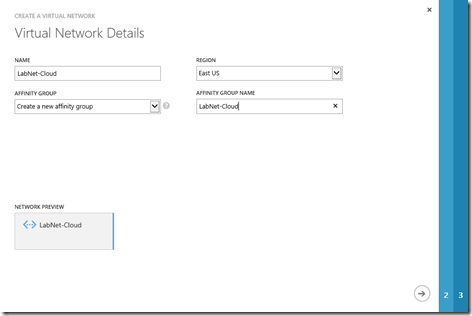
2- On the Virtual Network Details page, enter the following information, and then click the next arrow on the lower right.
- Name
- Region
- Affinity Group
- Affinity Group Name
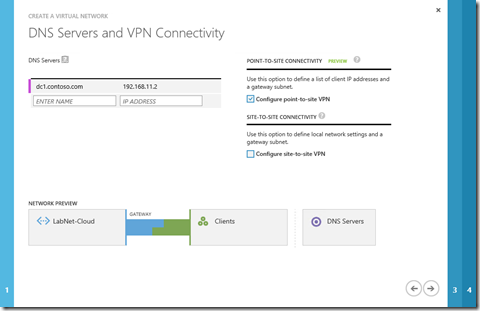
3- On the DNS Servers and VPN Connectivity page, enter the following information
- DNS Servers
- Configure Point-To-Site VPN (select checkbox)
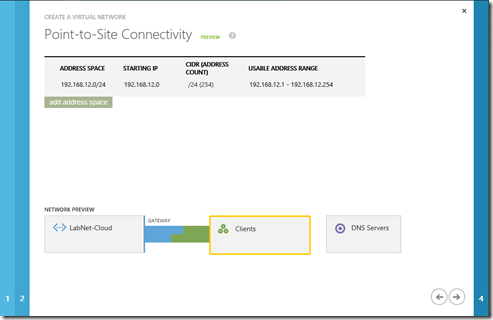
4- On the Point-To-Site Connectivity page, enter the following information and then click the next arrow.
- Address Space, including Starting IP and CIDR (Address Count)
- Add address space, if required for your network design.
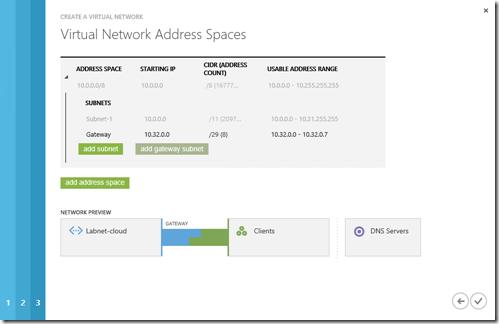
5- On the Virtual Network Address Spaces page, enter the following information and then click the checkmark on the lower right to configure your network.
- Address Space, including Starting IP and Count.
- Add subnet, including Starting IP and Count. Only if required for your network design.
- Add gateway subnet, including Starting IP and Count. Required for this configuration
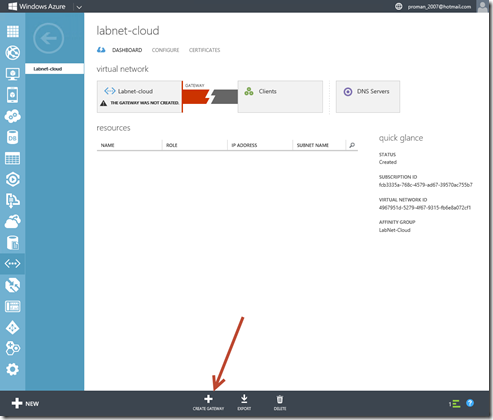
6- After clicking the checkmark, your virtual network will begin to create. When your virtual network has been created, you will see Created listed under Status on the networks page in the Management Portal. Once your virtual network has been created, you’ll need to Create a dynamic routing gateway. In the Management Portal, on the Networks page, click the virtual network that you just created, and navigate to the Dashboard page.
Click Create Gateway, located at the bottom of the Dashboard page.
A message will appear asking Do you want to create a gateway for virtual network ‘Labnet-cloud’. Click Yes to begin creating the gateway.
7- Generate a self-signed root certificate to authenticate VPN clients for point-to-site VPNs. You must generate a self-signed root certificate along with client certificates chained to the self-signed root certificate. You can then install the client certificates on every client computer that requires connectivity.
I installed the Windows SDK on my server in order to generate the certificates using the makecert utility from the SDK.
I first created a self-signed root certificate
makecert -sky exchange -r -n "CN=Labnet" -pe -a sha1 -len 2048 -ss My
And a client certificate
makecert.exe -n "CN=labnet" -pe -sky exchange -m 96 -ss My -in "labnet" -is my -a sha1
Export both of them using the certmgr.msc utility to a local directory. in our case in C:\temp
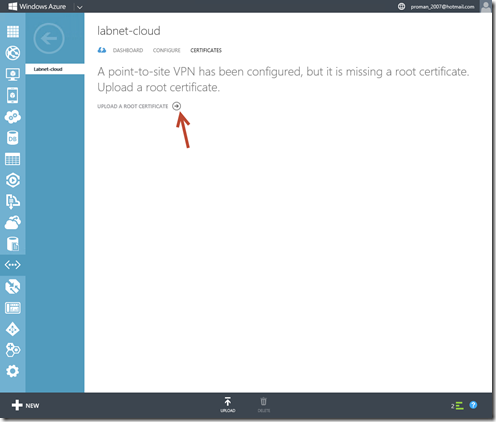
8- Upload the root certificate that you exported to Management Portal. Verify that the certificate is in .cer format and that you are uploading the root certificate and not a chained client certificate. You can upload up to 20 certificates in order to support multiple certificate chains.
In the Management Portal, on the Certificates page for your virtual network, click Upload a root certificate.
On the Upload Certificate page, browse for the labnet-root.cer certificate, and then click the checkmark.
9- Install the client certificate
A client certificate must be installed on every computer that you want to connect to the virtual network. On the client computer, double-click the .pfx file in order to install it. Enter the password when requested. Do not modify the installation location. Once the client certificate has been installed, you can start the VPN client configuration.
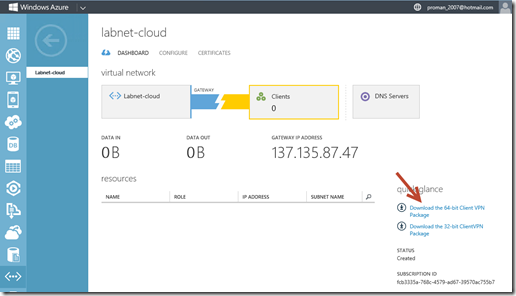
10 – Install the VPN package. by downloading the appropriate VPN client and installing it.
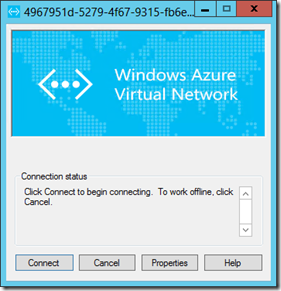
11- Once installed you can start the vpn client on your server.
Once connected the “IPCONFIG /All” command will show something like this:
12- The hard part is done, now all you need is to configure your AD Sites with a new site and create a Windows Server VM I created one from the Gallery
Configure the DNS to point at the on premise DNS server, in our case DC1.Contoso.com at 192.168.11.2
Join the Server to the Domain
Promote the Server to a Domain Controller
That’s it you are done and your AD has been extended to your Azure network. (not too long was it???)
I hope this helps.
As always, I highly encourage you to set it up for yourself. And start reaping the benefits.
You can get the preview of Windows Server 2012 R2 here. It is available to TechNet and MSDN subscribers and general availability has been announced for October 18th.
Also, to continue your learning, check out those MVA Modules:
- Introduction To Microsoft Azure Training
- Microsoft Azure for IT Pros Jump Start
- Microsoft Azure Security Overview
Cheers!
Pierre Roman | Technology Evangelist
Twitter | Facebook | LinkedIn

