Step-By-Step: Creating IP address Scopes with IPAM
On August 15th, I wrote a post on Step-By-Step: Setup Windows Server 2012 IPAM in your environment. It was meant as the first step in a series of post on managing your IP addresses and building a resilient Network Infrastructure using Windows Server 2012.
One of our readers called me on it. I did say I would write about it the following week…. My bad….
But I’m back and tackling all the capabilities of IPAM. One at a time.
- Create a new DHCP scope using IPAM?
- How do we use IPAM to Evaluate IP Address Service Health?
- How do you monitor the scopes with IPAM?
Today let’s look at how we create new DHCP scopes using IPAM
As you may remember, in the last post we installed The IPAM feature, configured the provisioning method, configured the Server discovery, created IPAM Provisioning GPOs, choose and configured our managed server and finally retrieved the data from that managed server.
Our Lab environment has 3 machines.
- DC
- Domain controller
- DHCP Server
- Server1
- IPAM Server
- SRV_DHCP_Client
- DHCP Client
- 4 virtual Nics
Now let’s logon to our Server1 machine as administrator.
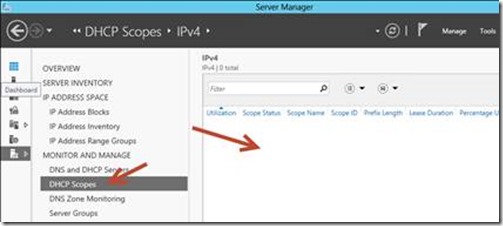
1. In Server Manager, in the IPAM section click DHCP Scopes. You’ll notice that there are no active scopes currently setup in this environment.
2. In the DNS and DHCP Servers section and Right-Click the record for DC.contoso.com for the DHCP role and select Create DHCP Scope
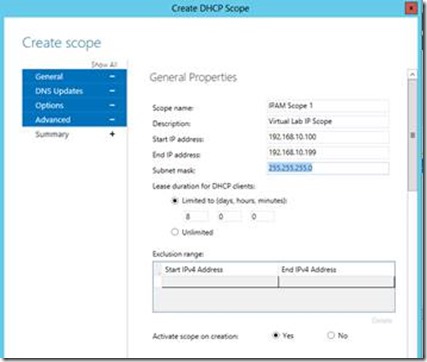
3. Fill in the info as per your scope information.
4. In our case
4.1. Scope Name: IPAM Scope 1.
4.2. Description: Virtual Lab IP Scope
4.3. Start IP Address: 192.168.10.100.
4.4. End IP Address: 192.168.10.199.
4.5. Subnet Mask: 255.255.255.0.
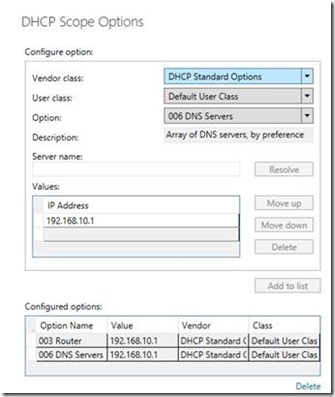
5. In DHCP Scope Options section, in Option
5.1. Select 003 Router and in IP Address, type 192.168.10.1, and then click Add to list.
5.2. Select 006 DNS Servers and in IP Address, type 192.168.10.1, and then click Add to list.
6. Click OK
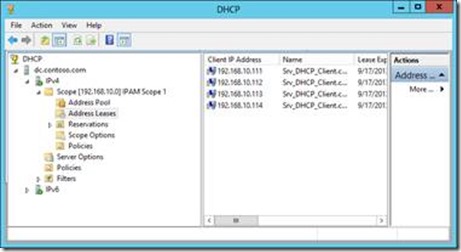
7. Logon to the DC and validate that the scope is created.
As you can see by the screenshot above the scope has already assigned an address to our Srv_DHCP_Client machine and we are done.
Thursday I will cover how we use IPAM to Evaluate the IP Address Service Health and how we monitor the scopes with IPAM.
As usual, in the meantime, I highly encourage you to set it up for yourself. And start reaping the benefits.
You can get the preview of Windows Server 2012 R2 here. General availability has been announced for October 18th.
Also, to continue your learning, check out those MVA Modules:
Windows Server 2012 Training: Networking
Cheers!
Pierre Roman | Technology Evangelist
Twitter | Facebook | LinkedIn


