Step-By-Step: Creating a SQL Server 2012 AlwaysOn Availability Group

One of the most talked about (and now frequently requested) feature in SQL Server 2012 is AlwaysOn Availability Groups. It brings SQL Server high availability and disaster recovery to a whole new level by allowing multiple copies of the database be highly available and potentially using them for read-only workloads and offloading management tasks such as backups. AlwaysOn Availability Groups allow you to fail over a group of databases as a single entity, unlike database mirroring where you can only do so one database at a time. This is very useful for applications that access multiple databases in a single SQL Server instance like SharePoint Server 2013. In fact, very recently, one of my customers had requested to configure SQL Server 2012 AlwaysOn Availability Groups for their SharePoint 2013 farm. I am also seeing more and more SharePoint 2013 farms leveraging on the SQL Server 2012 AlwaysOn Availability Groups for both high availability and disaster recovery.
This step-by-step has been created to help you get started in creating a SQL Server 2012 AlwaysOn Availability Group for your mission-critical databases.
Prerequisites
- Windows Server Failover Cluster (WSFC) . AlwaysOn Availability Groups rely on the Windows Server Failover Cluster for failure detection and management of the Availability Group replicas. This is where a lot of customers get confused because of their previous knowledge of Microsoft Cluster Services (MSCS.) In previous versions of Windows Server, you need shared storage to create a failover cluster for the quorum disk. Windows Server 2008 and higher provided the option to use a file share witness as a quorum configuration. Therefore, you DO NOT need shared storage to create a Windows Server Failover Cluster for AlwaysOn Availability Groups. This, of course, does not change the requirement if you intend to use a SQL Server Failover Clustered Instance (FCI) as a replica in your Availability Group. For this step-by-step, we will only be working with standalone SQL Server 2012 default instances.
- Download SQL Server 2012 Enterprise Edition . AlwaysOn Availability Group is an Enterprise Edition feature. Before deciding to implement this feature, take stock of your SQL Server licenses to make sure you have enough to get you covered. If you intend to use the other replicas for read-only workloads or offloading your backups, you would need licenses for those SQL Server instances as well. This is also another one of those items that customers get confused with because in previous versions of SQL Server, database mirroring can be configured with Standard Edition.
- Same SQL Server collation for all replicas. I usually don’t recommend running databases with different collation requirements in the same SQL Server instance due to potential issues caused by applications using temporary tables. This is one of the reasons for keeping the database collation the same for a single instance (SharePoint 2013 also requires a specific collation for the content databases.) If you want to configure AlwaysOn Availability Groups for your databases, they should all be running the same collation on all of the SQL Server instances acting as replicas.
- Two to Five SQL Server Instances acting as replicas. SQL Server instances that will be used as a standby for high availability and/or disaster recovery are called replicas. Unlike database mirroring where you can only have one extra copy of the database, AlwaysOn Availability Groups allow you to have up to five copies of the database running on five replicas – three of which can be configured for synchronous-commit mode and two in asynchronous-commit mode.
Windows Failover Cluster Feature Installation
Since AlwaysOn Availability Groups require a Windows Server Failover Cluster, we first need to add the Windows Failover Cluster Feature to all the machines running the SQL Server instances that we will configure as replicas. For the operating system, we will be using Windows Server 2012. To add the Failover Clustering feature:
- Open the Server Manager console and select Add roles and features. This will launch the Add Roles Features Wizard
- Click Next until you reach the Select Features dialog box. Select the Failover Clustering checkbox. When prompted with the Add features that are required for Failover Clustering dialog box, click Add Features. Click Next.
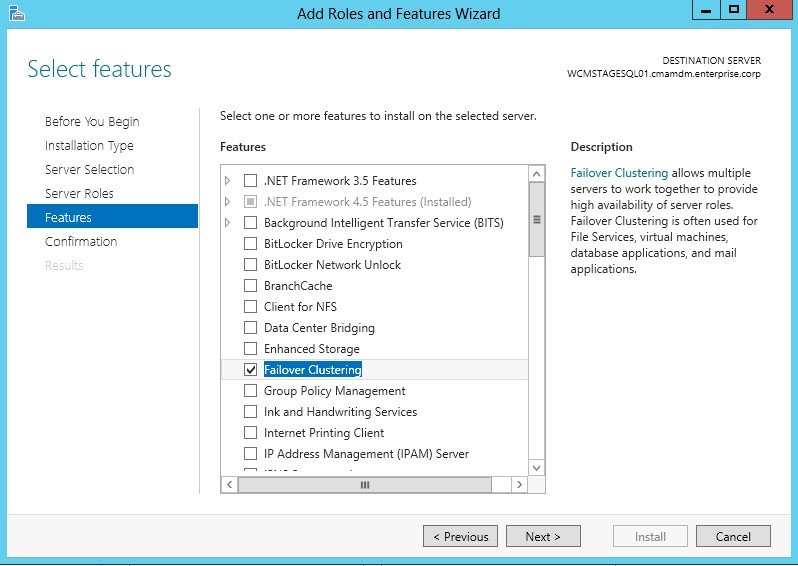
- Click Install to install the Failover Clustering feature.
Windows Failover Clustering Configuration for SQL Server 2012 AlwaysOn Availability Groups
Prior to configuring the Windows Server Failover Cluster, it is assumed that you have the appropriate rights in Active Directory. For a complete listing of the different Active Directory permissions to create a Windows Server Failover Cluster, see Failover Cluster Step-by-Step Guide: Configuring Accounts in Active Directory. To configure Windows Failover Clustering,
Launch Failover Cluster Manager from within the Server Manager console.
Within Failover Cluster Manager, click the Validate Configuration… link.
In the Validate a Configuration Wizard dialog box, click Next.
In the Select Servers or a Cluster dialog box, add the server hostnames of the SQL Server instances that you want to configure as replicas in your Availability Group. Click Next.
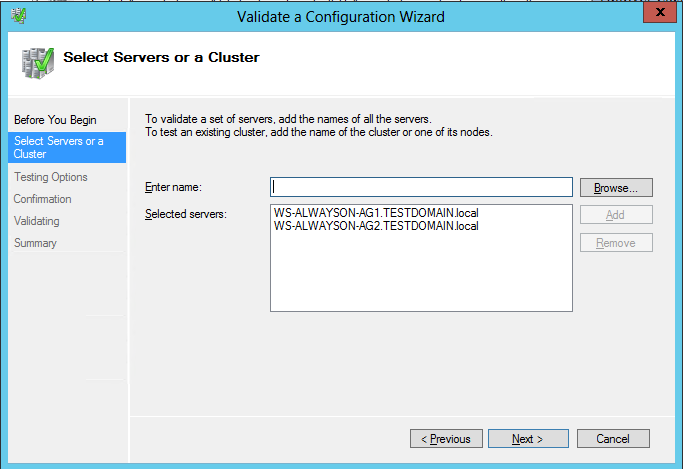
In the Testing Options dialog box, make sure that the option Run all tests (recommended) is selected. Click Next.
In the Confirmation dialog box, click Next.
In the Summary dialog box, click Finish to create the Windows Failover Cluster.
NOTE: The Failover Cluster Validation Wizard is expected to return several Warning messages, especially if you will not be using shared storage. As we mentioned earlier, there is no need to use shared storage to create the Windows Server Failover Cluster that we will use for our Availability Group. Just be aware of these Warning messages as we will configure a file share witness for our cluster quorum configuration. However, if you see any Error messages, you need to fix those first prior to creating the Windows Server Failover Cluster.
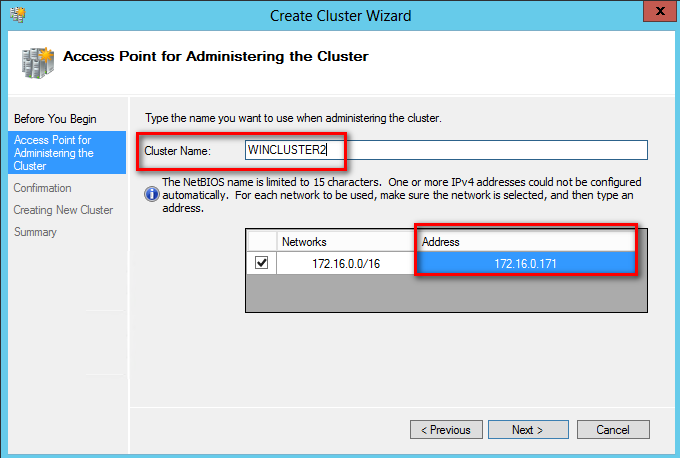
In the Access Point for Administering the Cluster dialog box, enter the virtual server name and virtual IP address of your Windows Server Failover Cluster.
In the Confirmation dialog box, click Next. This will create the Windows Failover Cluster using the servers as nodes of the cluster, add DNS and Active Directory entries for the cluster hostname.
In the Summary dialog box, verify that the configuration is successful.
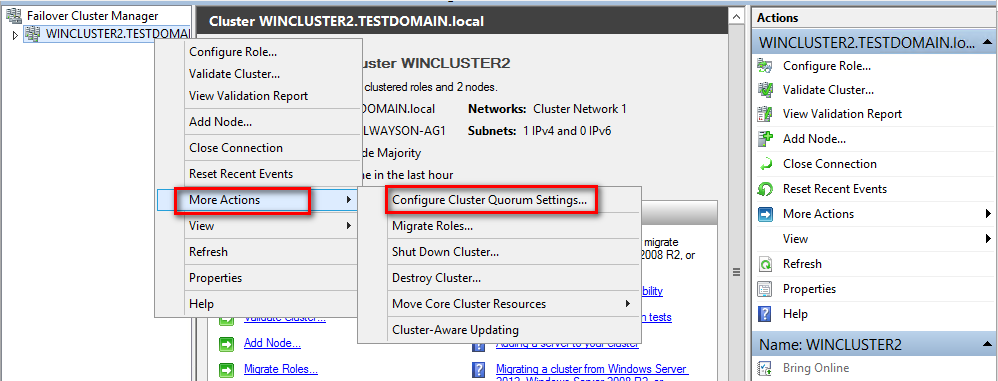
To configure the cluster quorum configuration to use a file share, right-click on the cluster name, select More Actions and click Configure Cluster Quorum Settings… We will be configuring a file share witness for our cluster quorum setting. By default, the wizard will configure the cluster to use Node Majority.
Click Next.
In the Select Quorum Configuration page, select the Add or change the quorum witness option. Click Next.
In the Select Quorum Witness page, select the Configure a file share witness (recommended for special configuration) option. Click Next.
In the Configure File Share Witness page, type path of the file share that you want to use in the File Share Path: text box. Click Next.
In the Confirmation page, click Next.
In the Summary page, click Finish.
Enable SQL Server 2012 AlwaysOn Availability Groups Feature
Once the Windows Server Failover Cluster has been created, we can now proceed with enabling the AlwaysOn Availability Groups feature in SQL Server 2012. This needs to be done on all of the SQL Server instances that you will configure as replicas in your Availability Group. To enable the SQL Server 2012 AlwaysOn Availability Groups feature,
Open SQL Server Configuration Manager. Double-clickthe SQLServer (MSSQLSERVER) service to open the Properties dialog box.

In the Properties dialog box, select the AlwaysOn High Availability tab. Check the Enable AlwaysOn Availability Groups check box. This will prompt you to restart the SQL Server service. Click OK.
Restart the SQL Server service.
Create and Configure SQL Server 2012 AlwaysOn Availability Groups
Availability Groups can be created on existing databases or even a temporary one in preparation for application installation. If you intend to create an Availability Group for a new SharePoint 2013 farm, you will need to create a temporary database. This is so that the SharePoint 2013 farm will use the AlwaysOn Availability Group when creating the farm configuration and the admin content databases. After the SharePoint 2013 farm has been created, this database can be removed from the Availability Group configuration and deleted from the instance.
To create and configure a SQL Server 2012 AlwaysOn Availability Group,
Open SQL Server Management Studio. Connect to the SQL Server instance
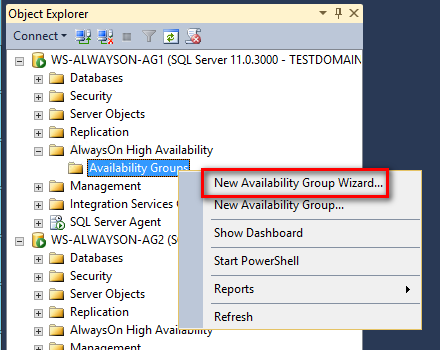
In Object Exporer, expand the AlwaysOn High Availability folder. Right-click on the Availability Groups folder and select the New Availability Group Wizard… option. This will launch the New Availability Group Wizard.
In the Introduction page, click Next.
In the Specify Availability Group Name page, enter the name of the Availability Group in the Availability group name: field. Click Next.
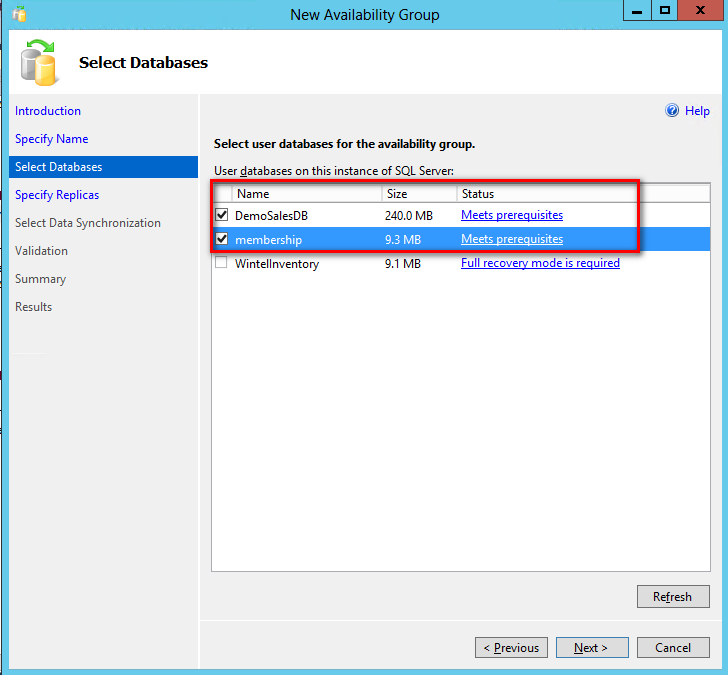
In the Select Databases page, select the checkbox beside the database that you want to include in your Availability Group. The databases have to be in Full recovery model prior to joining them in the Availability group. Click Next.
In the Specify Replicas page, under the Replicas tab, click the Add Replicas button and connect to the other SQL Server instances that you joined as nodes in your Windows Server Failover Cluster. Configure the following options
- Automatic Failover (Up to 2) : Checked
- Synchronous Commit (Up to 3) : Checked
- Readable Secondary: No
In the Endpoints tab, verify that the port number value is 5022.
In the Listener tab, select the Create an availability group listener option. Enter the following details.
- Listener DNS name: Name that you will use in your application connection string
- Port: 1433
Click the Add… button to provide an IP address. In the Add IP Address dialog box, enter your preferred virtual IP address in the IPv4 Address field. Click OK. Click Next.
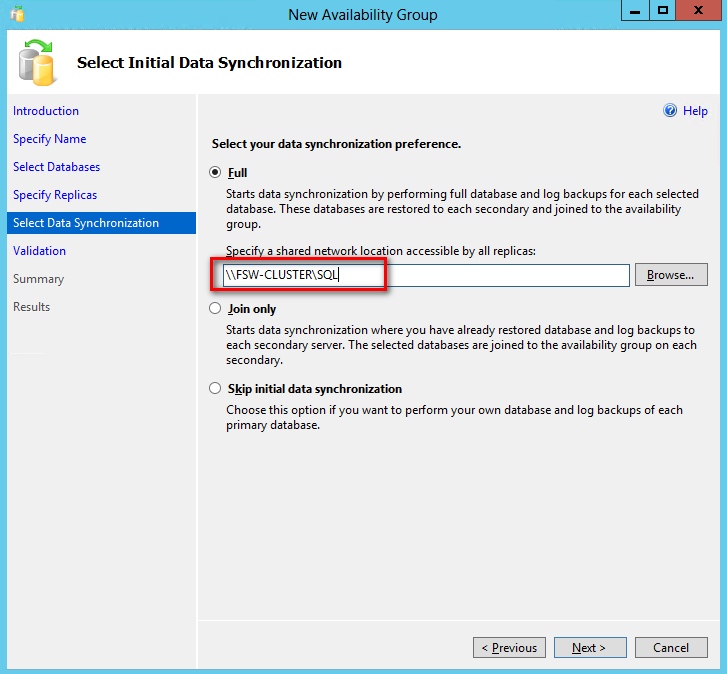
In the Select Initial Data Synchronization page, select the Full option. Provide a shared folder that is accessible the replicas and that the SQL Server service account used by both replicas has Write permissions to. This is just a temporary file share to store the database backups that will be used to initialize the databases in an Availability group. If you are dealing with large databases, it is recommended that you manually initialize the databases prior to configuring them as your network bandwidth may not be able to accommodate the size of the database backups. Click Next.
In the Validation page, verify that all validation checks return successful results. Click Next.
In the Summary page, verify all configuration settings and click Finish. This will create and configure the AlwaysOn Availability Group and join the databases.
In the Results page, verify that all tasks have been completed successfully.
Congratulations! You have just created a SQL Server 2012 AlwaysOn Availability Groups. You can now use the Availability Groups listener name in your application connection string. Keep in mind that you need to manually add new databases in the Availability Group even though your application has already been using the listener name. So, be sure to monitor the replicas in your Availability Groups to be alerted when new databases are created.