Step-By-Step: Windows Server 2012 Migration Tools Preparation
Hello folks,
On July 9th I posted a article on enabling DHCP High Availability with Windows Server 2012 R2. Following that article STL_Cards_Fan contacted me through the blog and was wondering about the migration process to get DHCP from Windows Server 2008 R2 to Windows Server 2012. We’ve been planning to get to different migration scenarios.
To that end this post will cover installing the Windows Server Migration Tools. It’s the first step, in preparing your environment to migrate server roles, features, operating system settings, and other data and shares to computers that are running Windows Server 2012.
To try this in your own lab, Download Windows Server 2012 R2 from here. As always you can use the info in this post to setup your lab. (It was originally written for 2012 but the same steps work for 2012 R2)
There are 4 overall steps in getting your environment ready.
1. Installing Windows Server Migration Tools on destination servers that run Windows Server 2012 R2 Preview or Windows Server 2012.
2. Creating deployment folders on migration destination servers, for copying to source servers.
3. Copying deployment folders from destination servers to source servers.
4. Registering Windows Server Migration Tools on source servers.
Installing Windows Server Migration Tools
There are 2 way of installing these tools on your Windows Server 2012 server.
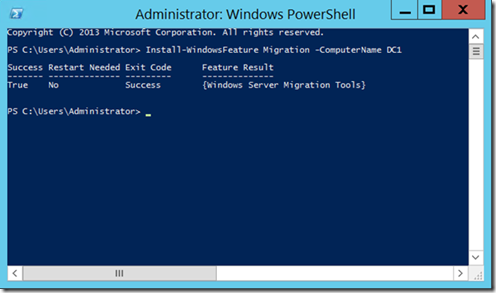
1- Use PowerShell by opening a Windows PowerShell command window as administrator.
Type the following command (we are installing the files on our LAB DC called DC1
Install-WindowsFeature Migration –ComputerName DC1
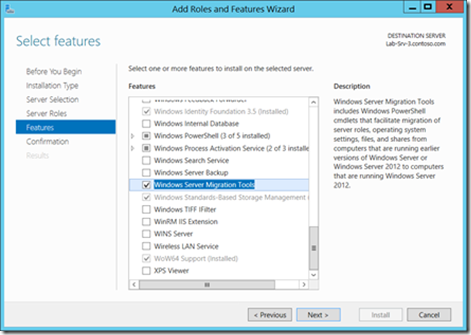
2- Use the “Add Roles and Features Wizard” to add the Windows Server Migration Tools to your destination machine
Creating deployment folders
Once you have installed the Tools you need to prepare a deployment share that you will use to install the tools on your source servers.
Source servers can be the following:
- Windows Server 2003 with Service Pack 2
- Windows Server 2003 R2
- Windows Server 2008 (full installation option)
- Windows Server 2008 R2 (full install and Core installation)
- Windows Server 2012 (full install and Core installation)
- Windows Server 2012 R2 Preview (full install and Core installation)
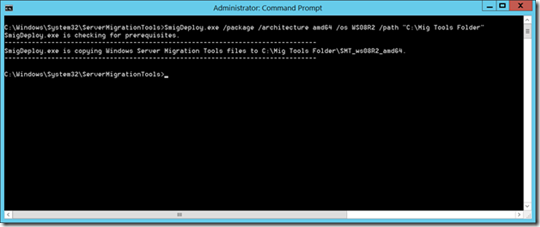
1- Open a Command Prompt window with elevated user rights. In Windows Server 2012 Type cmd on the Start screen, right-click the Command Prompt tile, and then click Run as administrator.
At the command prompt, change to the directory in which the smigdeploy.exe tool is located. The default location is “C:\Windows\System32\ServerMigrationTools”
Based on the source server you want to prep for you would issue the following command:
· Windows Server 2012
SmigDeploy.exe /package /architecture amd64 /os WS12 /path <deployment folder path>
· Windows Server 2008 R2
SmigDeploy.exe /package /architecture amd64 /os WS08R2 /path <deployment folder path>
· Windows Server 2008
SmigDeploy.exe /package /architecture amd64 /os WS08 /path <deployment folder path>
· Windows Server 2008 32bit
SmigDeploy.exe /package /architecture X86 /os WS08 /path <deployment folder path>
· Windows Server 2003 64bit
SmigDeploy.exe /package /architecture amd64 /os WS03 /path <deployment folder path>
· Windows Server 2003 32bit
SmigDeploy.exe /package /architecture X86 /os WS03 /path <deployment folder path>
In our case we’re planning to use a 64 bit Windows 2008 R2 source server.
We end up with a directory called “C:\Mig Tools Folder\SMT_ws08R2_amd64”.
2- Share “C:\Mig Tools Folder” so that is accessible from the other machines.
Copying deployment folders to source servers
1- On our Windows 2008 R2 machine, I created a directory on the local C: drive called “C:\Mig Tools Folder” to be consistent
2- Copy the content of \\DC1\Mig Tools Folder to the “c:\mig tools folder” we just created.
Registering Windows Server Migration Tools on source servers
Before being able to use the Migration Tools you must register them with the source server operating system. Before you start that procedure, verify the following.
· Microsoft .NET Framework 2.0 is installed on computers that are running Windows Server 2003.
· Windows PowerShell 1.0 or a later version is installed on source computers
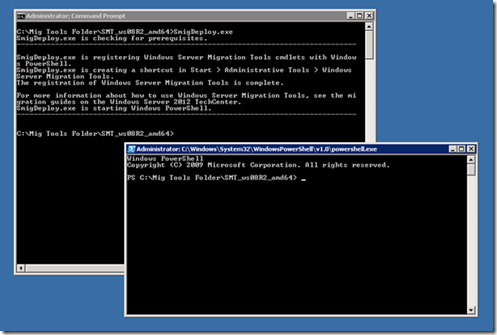
1- On our source computer (in our case W2K8R2-1) open a command window with elevated privileges,
2- Change to “C:\Mig Tools Folder\SMT_ws08R2_amd64” and type “SMIGDEPLOY.EXE”
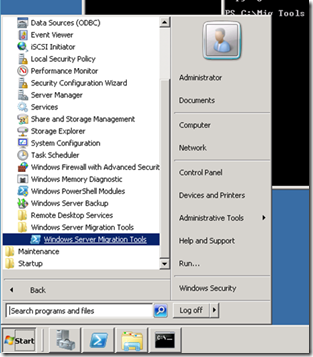
The registration process also created the start menu option on our source machine
That’s it. We are ready to go. Our next steps will be to start transferring our workloads, roles, settings… to our target Windows Server 2012 environment.
For more information on this subject you can refer to the TechNet page.
And as always I encourage you to get the preview of Windows Server 2012 R2 here and try it for yourself.
Cheers!
Pierre Roman, MCITP, ITIL | Technology Evangelist
Twitter | Facebook | LinkedIn
