Step-by-Step: Domain Controller Cloning
Last week I posted an article that highlighted the new features supporting the virtualization of Active Directory in Windows Server 2012. As promised in that article we will now look at the process of cloning a Domain Controller.
To follow along:
- Download the evaluation of Windows Servers 2012
- Use the info in this post to setup your own lab
Scenarios that benefit from virtual domain controller cloning
- Rapid deployment of additional domain controllers in a new domain
- Quickly restore business continuity during disaster recovery by restoring AD capacity via rapid deployment of domain controllers using cloning
- Optimize private cloud deployments by leveraging elastic provisioning of domain controllers to accommodate increased scale requirements
- Rapid provisioning of test environments enabling deployment and testing of new features and capabilities before production rollout
- Quickly meet increased capacity needs in branch offices by cloning existing domain controllers in branch offices
The following requirements are imposed to successfully clone a Virtual Domain Controller:
- You must be a member of the Domain Admins group
- When running PowerShell commands ensure that you are in elevated mode. (Run as administrator)
- A Windows Server 2012 server with the Hyper-V server role installed (In our Case VMHost10A).
- A second Windows Server 2012 server with the Hyper-V server role installed (In our Case VMHost10B).
- An existing Windows Server 2012 DC that hosts the PDC emulator role. Use the following command to validate that the PDC emulator is hosted on a 2012 server.
| Get-ADComputer (Get-ADDomainController –Discover –Service "PrimaryDC").name –Property operatingsystemversion | fl |
- A deployed Windows Server 2012 guest virtualized domain controller (in our case ITCAMP-DC2) that is in the same domain as the Windows Server 2012 domain controller hosting the PDC emulator role (ITCAMP-DC1). This will be the source domain controller used for cloning. The guest virtual domain controller will be hosted on a Windows Server 2012 Hyper-V server (VMHost10A).
- Forest Functional Level to be Windows Server 2003 or higher
- Schema version should be set to 56.
- Make sure to eject any media (any virtual floppy drive (VFD) or any ISO mounted as DVDs)
Now that we have everything set. Let’s clone ourselves a DC….
Step 1: Grant the source virtualized domain controller the permission to be cloned
We need to grant the source domain controller (ITCAMP-DC2) the permission to be cloned by adding it to the Cloneable Domain Controllers group using Active Directory Administrative Center or the following PowerShell command.
| Add-ADGroupMember –Identity "CN=Cloneable Domain Controllers,CN=Users, DC=ITCAMP,DC=Local" –Member "CN=ITCAMP-DC2,OU=Domain Controllers,DC=ITCAMP,DC=Local" |
Step 2: Run Get-ADDCCloningExcludedApplicationList cmdlet
Here we need to run the Get-ADDCCloningExcludedApplicationList cmdlet on the ITCAMP-DC2 to identify any programs or services that are not evaluated for cloning. Review the output and ensure that you do not have any application, roles or Services that need to be removed. for example:
The following server roles are not supported for cloning:
- Dynamic Host Configuration Protocol (DHCP)
- Active Directory Certificate Services (AD CS)
- Active Directory Lightweight Directory Services (AD LDS)
You need to run the Get-ADDCCloningExcludedApplicationList cmdlet before the New-ADDCCloneConfigFile cmdlet because if the New-ADDCCloneConfigFile cmdlet detects an excluded application, it will not create a DCCloneConfig.xml file.
Step 3: Run New-ADDCCloneConfigFile
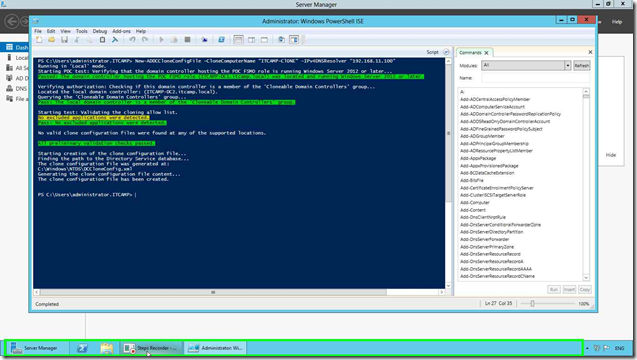
Next we must run New-ADDCCloneConfigFile on ITCamp-DC2 and optionally specify configuration settings for the clone domain controller, such as the name, the IP address, and DNS resolver.
To create a clone domain controller named ITCamp-Clone with dynamic IPv4 settings, type:
|
The output will confirm that all preliminary validation check passed and it will create the clone config file as seen in the screen shot below.
Step 4: Export and then import the virtual machine of the source domain controller
Next we’ll need to export ITCAMP-DC2 and then import it on our other Hyper-V host. This will creates a clone virtualized domain controller in your domain.
1- Shut down ITCAMP-DC2
2- Export it to a folder that the other Hyper-v (VMHOST10B) hosts has access to. In our case we will export it directly in a Export directory on the root of C: on VMHOST10A and then copy it to the Import directory on the root of C: on VMHOST10B.
3- On VMHOST10B, using Hyper-V Manager, import the virtual machine from the folder c:\Import\ITCAMP-DC2. Use the Copy the virtual machine (create new unique ID) option when importing the virtual machine. You can import and create multiple clones by importing it multiple times to different location.
4- On VMHOST10A , restart the source domain controller (ITCAMP-DC2) to bring it back online.
5- On VMHOST10B, start the virtual machine (ITCAMP-Clone) to bring it online as a clone domain controller in the domain.
The cloned domain controller will be a member of the Cloneable Domain Controllers group because it copies the membership from the source domain controller. As a best practice, you should leave the Cloneable Domain Controllers group empty until you are ready to perform cloning operations, and you should remove members after cloning operations are complete.
That’s it! cloning is complete. you can now use that cloned image as you see fit to address the scenarios we discussed in the introduction.
Try it out for yourselves.
Have fun.
Cheers!
Pierre Roman, MCITP, ITIL | Technology Evangelist

