Step-by-Step: Creating Differencing Disks
Yesterday I told you how you can use Differencing Disks in courseware, for lab development, for Virtual Desktop Infrastructure, for software development, and for any number of other uses. They really are a very handy technology once you get to know them. But how do you do that?
Although usually I would show my Hyper-V demos on a Server, for today’s fun I want to remind you that you can still use Hyper-V on a Windows 8 desktop so I am using my Microsoft Surface Pro. I have a virtual machine on this system called Windows 7 which obviously runs my Windows 7 Enterprise image. I am calling this disk Windows 7.vhdx. I want to try to install a piece of software that I am told might corrupt my Windows installation, and I don’t want to have to reinstall. Instead I am going to create a Differencing Disk that will reference the original VHDX file, but will not make any changes to it.
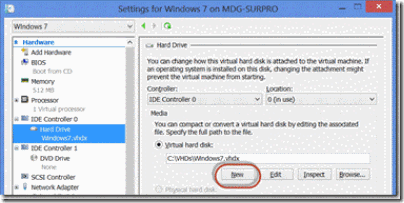
I open the settings for my virtual machine and navigate to the boot Hard Drive.
 1. I select the hard disk (or disks) from the Hardware list.
2. I click New, having noted the name and location of the original disk.
3. I create a new disk, going through the wizard selecting the file type (VHD or VHDX).
4. In the Choose Disk Type screen I select Differencinginstead of either Fixed size or Dynamically expanding.
5. A screen that you might not have seen comes after you name your disk. In the Configure Disk screen browse for the parent disk – the disk that you are ‘replacing’. Click Finish.
**Note: Remember that if your VM has multiple virtual hard disks you may have to perform these steps on each one.
At this point your Parent Disk will no longer be written to by your VM – all of the changes within your virtual machine will be written to the Differencing Disk that you just created. It is useless without the Parent Disk, but the two together work great.
There are a few caveats you should be aware of:
1) Your Differencing Disk is not simply reliant on a disk called… When created it ‘connects’ itself to the Configure VHDX file; if that reference file is changed in any way then your Differencing Disk will no longer work.
2) You can chain Differencing Disks simply by selecting another Differencing Disk as the Configure Disk. When doing so make sure you document it well, because at any point if something gets corrupted along the way you had better know what you did in order to fix it!
3) Notice that you were not asked to select a size of your Differencing Disk; that is because the size was set on the Configure Disk, and that is your limit. Simple, right? Wrong. Remember that a single Configure Disk can be the parent of as many Differencing Disks as you want, and all of those Differencing Disks can add up quick, so make sure you keep an eye on your free space!
There are no limitations on the Configure Disks – they can be either VHD or VHDX, Fixed size or Dynamically expanding. As mentioned, your Configure Disk can even be another Differencing Disk.
Differencing Disks are not new; the steps outlined in this article will work just as well in Windows Server 2008 R2 as they will in Windows Server 2012 or in Windows 8.
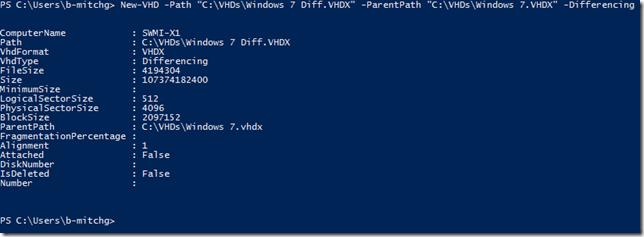
Now here’s the fun part: PowerShell. Yes, you can create your Differencing Disks in PowerShell just the same as in the GUI. The cmdlet is actually pretty simple:
New-VHD –Path “C:\VHDs\Windows 7 Diff.VHDX” –ParentPath “C:\VHDs\Windows 7.VHDX” –Differencing
The outcome should look a little like this:
Notice though that you have a file that is 100GB (maximum file sixe). That is because the base disk is 100GB.
Now that you know how to do it, go play with Hyper-V… and know the Difference!
By the way, even though I did this on Windows 8, you are much better off doing it on Windows Server 2012. Download Windows Server 2012 and System Center 2012.
