Step-By-Step: Enabling BranchCache in Microsoft Windows Server 2012
BranchCache enables remote offices to have centralized access to file-shares over the wide area network at faster speeds and using less bandwidth. Included in Windows Server 2012 and in some editions of Windows 8, BranchCache is part of a collection of solutions known as “wide area files services” or WAFS solutions. These type of solutions can be expensive but are included in the box with Windows Server. Content is stored either on servers that are configured to host the cache or on client computers that are running Windows 8 or Windows 7 when no server is available in the branch office. After a client computer in the branch office requests and receives content from the main office, content is cached at the branch office so that other computers at the same branch office can obtain the content locally rather than downloading the content from the content server over the WAN link. This solution is also optimal for those organization who have satellite offices connected by LTE or other cellular technology who's data rates could be kept at a minimum should data only be downloaded once as opposed to per request.
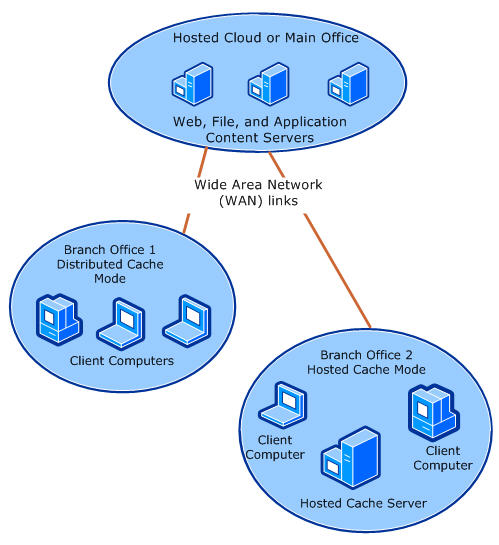
BranchCache has two modes of operation as illustrated below:
- Distributed cache mode: content cache at a branch office is distributed among client computers.
- Hosted cache mode: content cache at a branch office is hosted on one or more server computers called hosted cache servers.
Distributed cache mode is designed for small branch offices that do not contain a local server for use as a hosted cache server. Distributed cache mode allows your organization to benefit from BranchCache without the requirement of additional hardware in branch offices.
Prerequisites
Download and install Windows Server 2012 in your lab to complete this exercise . Alternatively you can complete this lab in a virtual lab setup by downloading and installing Hyper-V Server 2012.
Installing BranchCache
- Install the BranchCache feature on your lab server via the following PowerShell commands:
Install-WindowsFeature BranchCache –IncludeManagementTools
Install-WindowsFeature FS-BranchCache –IncludeManagementTools
Install-WindowsFeature FS-Data-Deduplication -IncludeManagementTools
Restart-Computer
Or the BranchCache feature on your lab server via the Add Roles and Features Wizard found in Server Manager.
Creating A BranchCache Enabled File Share
- In Server Manager, navigate to File and Storage Services
- Under Shares, create a new share using the New Share Wizard
- When in the Configure Share Settings screen, enable both Allow caching of share and Enable BranchCache on the file share and click Next
- Overview your setup and click Create
Deploying a Hosted Cache Server
- On the computer selected to configure as a hosted cache server, run the following PowerShell command to install the BranchCache feature.
- Install-WindowsFeature BranchCache -IncludeManagementTools
- Next configure the domain joined, newly appointed, hosted cache server to register a service connection point in Active Directory for automatic hosted cache server discovery by client computers via running the following PowerShell command
- Enable-BCHostedServer -RegisterSCP
- Verify the configuration is correct on the new hosted cache server running the following PowerShell command
- Get-BCStatus
Configuring the Windows 8 client to use BranchCache
- On the Windows 8 client, run PowerShell and type the following command, then press ENTER.
- Enable-BCHostedClient
- Verify the configuration is correct on the new hosted cache server running the following PowerShell command
- Get-BCStatus
- Repeat on all computers the would benefit from the BranchCache connection
You organization will now be able to capitalize on bandwidth optimization with the enablement of BranchCache.
