Step-By-Step: Extending USB storage into Hyper-V via Windows-To-Go
Those who attended one of the Windows 8 #CANITPRO Camps earlier this year were privy to seeing the setup and enablement of a Windows-To-Go USB key as one of the presented demos. What makes this offering compelling is the fact that one could literally walk up to any computer, plug in your USB key and boot up into your work environment. There is a new option available with the introduction of Windows-To-Go ( WTG ) USB drives to extend the USB storage into VMs via leveraging the firmware present on WTG-certified USB devices with Windows Server 2012 hosts running the Hyper-V role.
Windows-To-Go Certified (WTG) USB Drives include modified firmware representing the USB-connected WTG Drive as a fixed, non-removable, storage device by which to host an OS. Leveraging this modified firmware will allow a WTG-drive to connect to a Windows Server 2012 Hyper-V host and then present it as a “pass-through” disk by “hot-adding” it to the VM Settings of a particular VM.
Getting Started
Acquire a Windows-To-Go Certified USB Drive from one of the tested manufacturers.
Connect the WTG USB Drive to your Windows Server 2012 Hyper-V Host using preferably an available USB 3.0 for best performance.
From the Host operating system, format the WTG USB Drive as you would normally do for any other USB storage device.
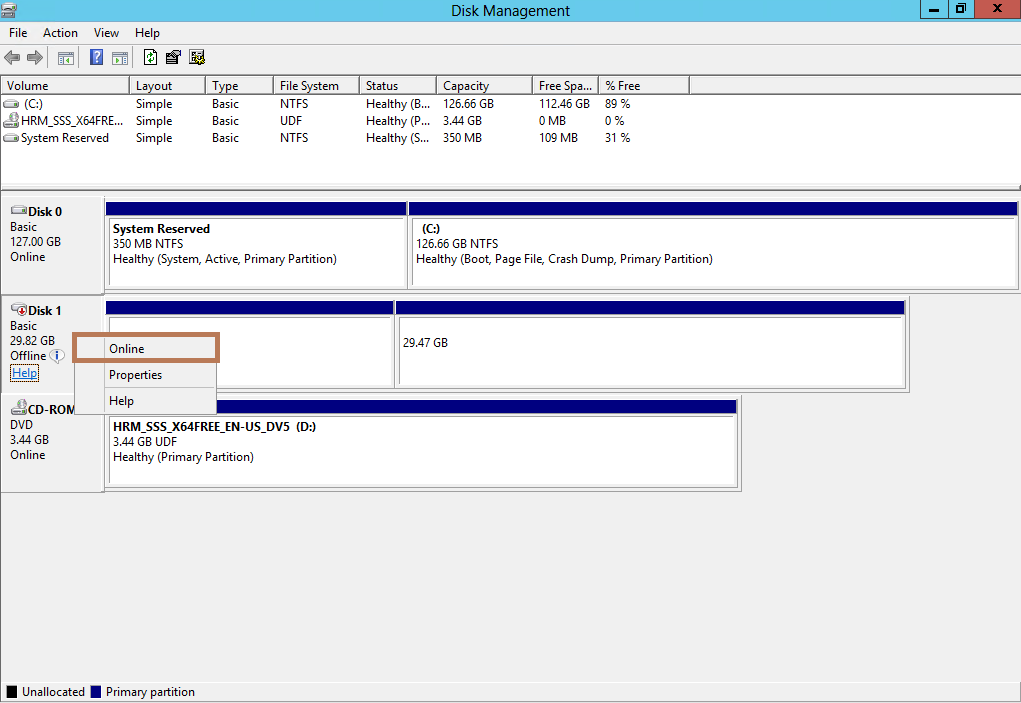
Using the Disk Management MMC Tool from the Host operating system, take the WTG USB Drive offline by right-clicking the Disk and selecting Offline.

Using the Hyper-V Manager from the Host operating system, add a new SCSI hard disk as a pass-through Physical hard disk in the Settings of a VM. You can complete this step even while the VM is actively running, because SCSI hard disks are supported for hot-add and hot-remove operations with VMs.

Using the Disk Management MMC tool at the VM console, right-click on the newly added disk and select Online to bring the WTG Disk online inside the VM.
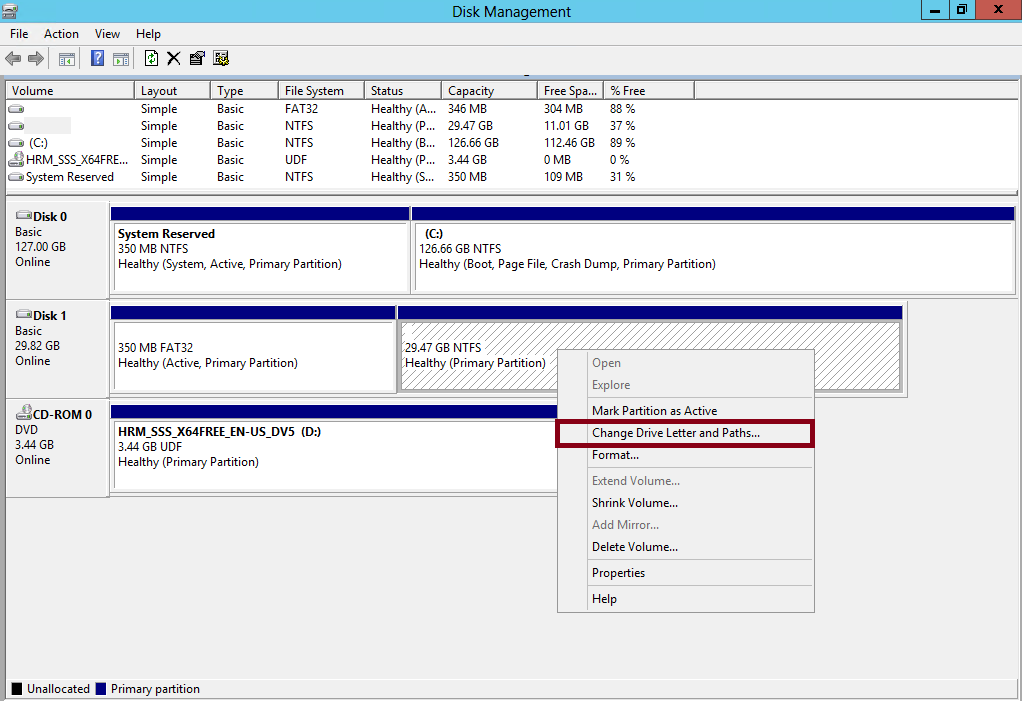
Using the Disk Management MMC tool at the VM console, right-click on the Primary Partition that you previously formatted and select "Change Drive Letter and Paths" to assign a drive letter to the WTG Disk from inside the VM.
Once completed, access to your USB-attached WTG Drive from inside your VM is now available. Reverse the steps to detach and remove the WTG Drive from your VM Settings when you’ve completed working with your USB WTG Drive.
Complete the listed steps in your own lab to get a better understanding of the process. Step-By-Step instructions on building your own Windows Server 2012 Lab are also available should you have yet to build your lab.
Learn more regarding Hyper-V 2012 and have a chance in winning your own lab computer by participating in the free Microsoft offered Virtual Academy. Complete two TechNet evaluations, and take the selected Microsoft Virtual Academy courses for your chance at a $5,000 grand prize or a chance to win an HP EliteBook Revolve and two chances to win 400 Microsoft Points.