Step-By-Step: Deploying Windows 8 with System Center 2012 Service Pack 1

The past weeks have seen Pierre, Mitch and myself drink bigger doses of caffeine than what would be contained in the mug pictured above although Pierre might chime in that the mug looks no bigger than the espresso cups I use for my morning jolt. It has been a labor of love however, as all three of us enjoy getting our hands dirty developing the new #CANITPRO camps containing new content in regards to Windows Server 2012 and System Center 2012 Configuration Manager / Windows 8. More details to follow and dates to be announced soon.
Attendees from the Windows 8 for Enterprise camps delivered earlier this year have recently reached out to me with interest in performing some of the labs delivered as a next step in their learning. This OS deployment process is similar to what many IT Professionals have utilized in past deployments of Windows 7 and prior operating systems. However, System Center 2012 Configuration Manager provides several enhanced features making OS deployment easier. This "Step-By-Step" will showcase the tasks involved in deploying Windows 8 utilizing ConfigMgr 2012 SP1 and will also showcase newly offered features and considerations when deploying. For those who do not have access to a System Center 2012 lab, may I suggest reviewing our previously posted: Step-by-Step: Building a FREE System Center 2012 Configuration Manager SP1 Lab which will provide you the means to complete this and other future exercises.
Step 1 - Installation Prerequisites for OS Deployment
Prior to using the OS Deployment features of ConfigMgr 2012 SP1, the prerequisites below are required..
Windows Assessment and Deployment Kit ( ADK ) for Windows 8
The new Windows ADK replaces the former requirement in the RTM bits for the WAIK toolkit. When installing the ADK on a ConfigMgr 2012 SP1 site system, the following specific components must be installed:- Windows PE 4.0 – the new Windows Preinstallation Environment built from a Windows 8 code-base
- USMT 5.0 – a scriptable tool for migrating user state information
- Windows Deployment Tools – tools for customizing Windows images, such as DISM, Windows SIM and OSCDIMG. Note that the ImageX tool has been deprecated in Windows 8 and has been replaced with DISM.
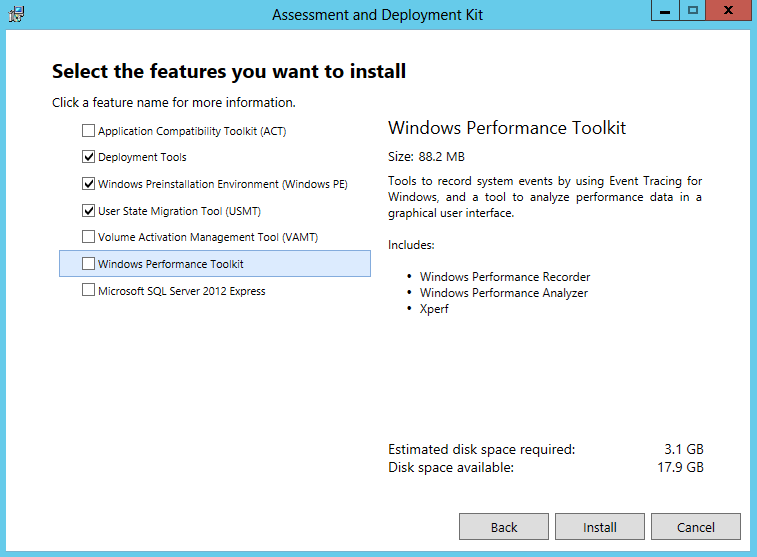
Installing the Windows ADK for Windows 8
- Windows PE 4.0 – the new Windows Preinstallation Environment built from a Windows 8 code-base
Internet Information Services ( IIS )
Like the RTM bits, ConfigMgr 2012 SP1 still relies on IIS for the distribution point, state migration point and management point roles that are leveraged in an OS deployment process. For specific requirements for each role, see Prerequisites for Site System Roles for details
Windows Deployment Services ( WDS ) and
DHCP
WDS and DHCP are still required if you plan to use OS deployments initiated via PXE boot. The only major change introduced by SP1 in this area is that all System Center 2012 site system roles, including distribution points, can now be run on Windows Server 2012. Like Windows Server 2008 and 2008 R2, Windows Server 2012 includes WDS as a native Windows Server Role that System Center will install when enabling a distribution point for PXE support.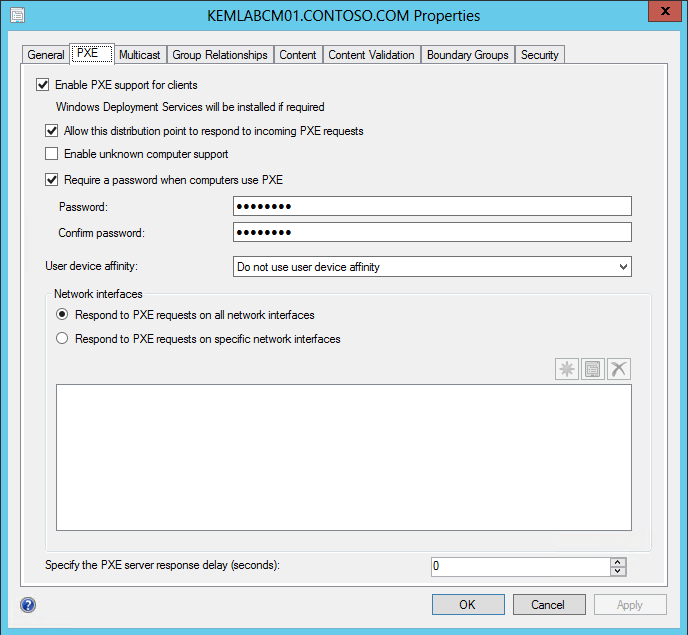
Enabling a Distribution Point for PXE Boot
If you’re planning to use PXE-initiated deployments, see Planning for PXE-Initiated Operating System Deployments for the configuration details.
Step 2 - Preparation of Boot Images
In ConfigMgr 2012 SP1, management of boot images has been streamlined in several ways to reduce the need to manage many custom boot images.
More Native Device Drivers
By leveraging the new Windows PE 4 pre-installation environment for boot images, there’s been a substantial increase in the number of native device drivers included in the Windows PE-based boot images. This should come as welcome news to many IT Pros, because the most common reason for customizing a boot image in the past was adding custom drivers. You should definitely test the new default boot images on your hardware to determine if any additional device drivers are still needed.Easier Customization for Boot Image Properties
The ConfigMgr 2012 SP1 console UI has also been updated to make it easier to customize common boot options, such as increasing the Windows PE Scratch Space.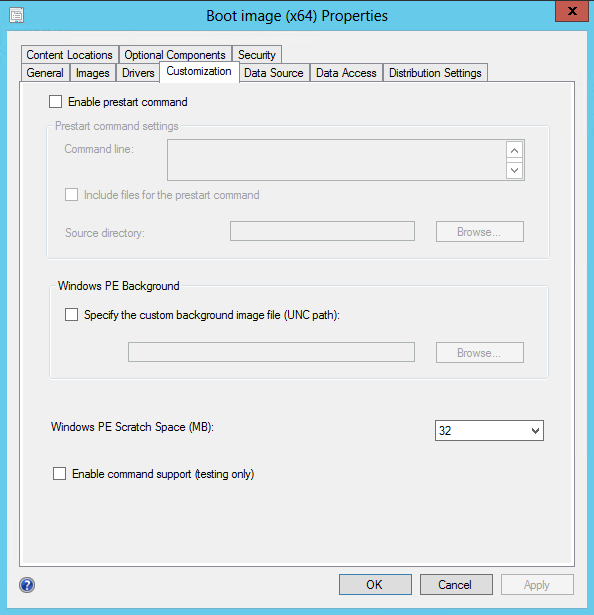
Customizing Boot Image Properties
Easily Add Optional Components
With ConfigMgr 2012 SP1, it’s also easy to add optional components, such as PowerShell support, to a standard Boot Image.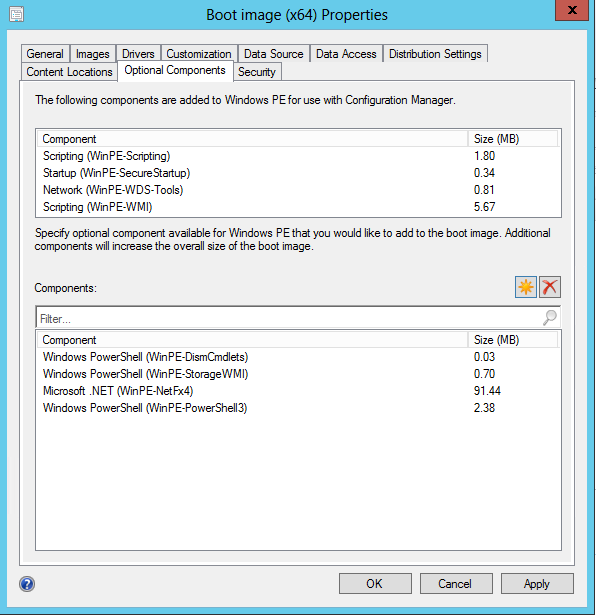
Adding Windows PowerShell Components to a Boot Image
Features Added in SP1
Custom Boot Images
When upgrading from ConfigMgr 2012 RTM to ConfigMgr 2012 SP1, existing custom Boot Image packages will not automatically be upgraded. Post-upgrade, you’ll need to manually recreate custom boot images using the new Windows PE 4 image provided in the ADK as a base.Once you’ve recreated a custom boot image, you can then add it back in to the ConfigMgr console as a boot image package by clicking the Add Boot Image button on the top ribbon bar.
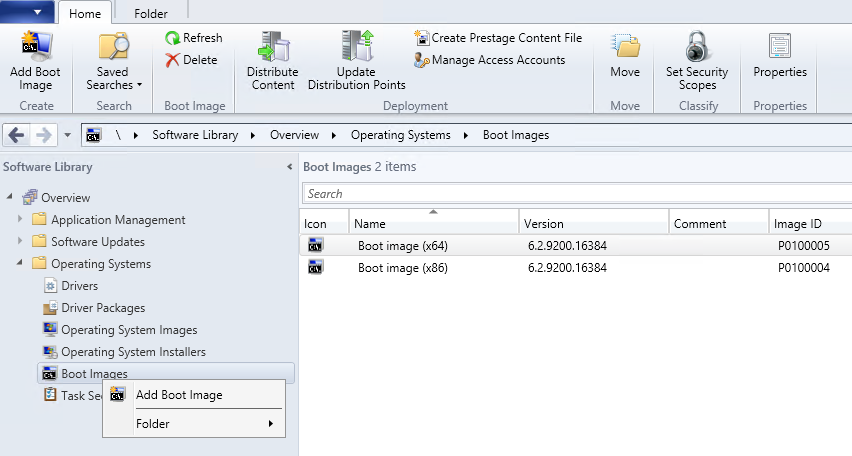
Adding New Boot Image Packages
Remember: With the increased number of drivers supported in the new Windows PE 4 images, you may no longer need to maintain custom boot images.
- CAS Site Hierarchies
Be sure to plan for special considerations if you’ll be performing OS deployments prior to all sites being upgraded to SP1. Sites that have been upgraded to SP1 will need to use the new Boot Images based on Windows PE 4, while sites that are still running RTM bits will need to use the original RTM Boot Images. In an ideal world, you can avoid these special considerations by completing the SP1 upgrade of all sites in the hierarchy during a time period where you won’t be performing OS deployments.
Step 3 – Add the Operating System Image
- To prepare for deploying Windows 8 via an OS deployment task sequence, we’ll need to copy the install.wim install image file from our Windows 8 installation media to a network file share.
- Next, add the copied install.wim image file as an Operating System Image in the ConfigMgr console by clicking the Add Operating System Image button on the top ribbon bar.
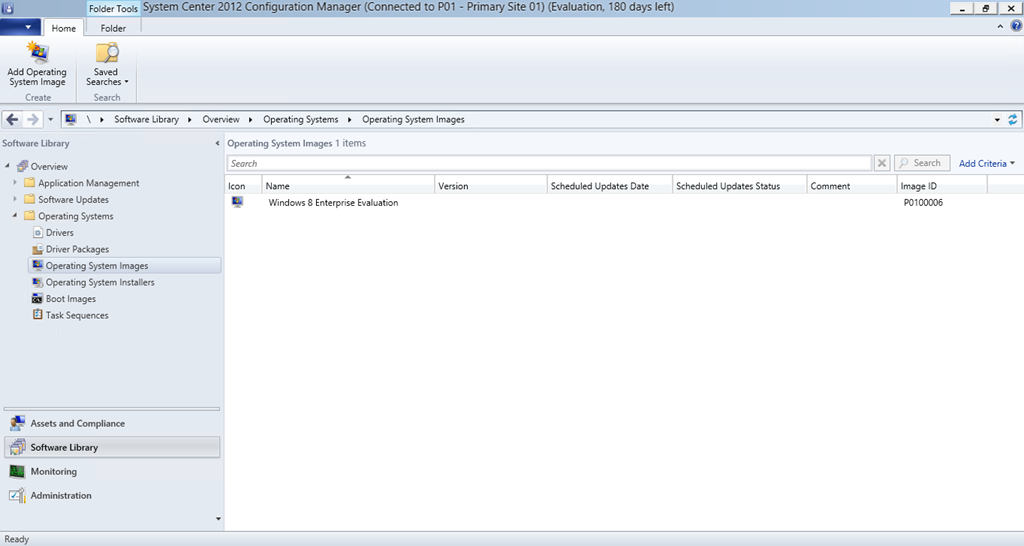
Adding an Operating System Image
Step 4 – Define a Task Sequence to Install an OS Image
You can define a task sequence to install an OS image by clicking the Create Task Sequence button on the ribbon bar of the ConfigMgr 2012 SP1 console.
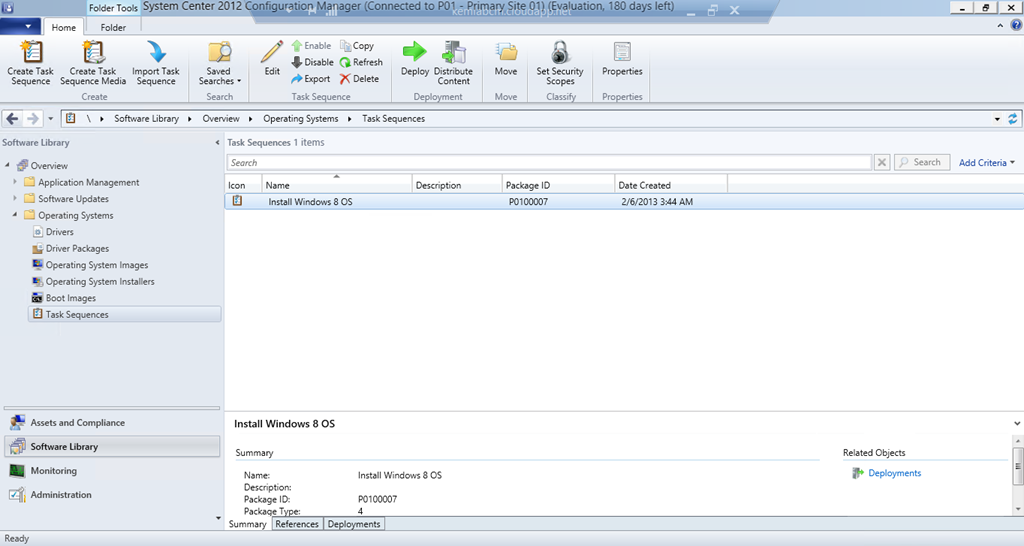
Creating a Task Sequence
After the new Task Sequence is created, you can right-click on the task sequence and select Edit from the pop-up menu to see the following new options available within the task sequence:
Capture User Files and Settings – now provides an option to capture user state via hard links to save time by avoiding file copies
Partition Disk 0 – two separate tasks are now present in the task sequence to support boot partitions for both BIOS and UEFI PCs
Pre-provision BitLocker – this new task now provides the capability to enable BitLocker disk encryption while still booted in Windows PE mode, thus encrypting the disk when the drive is almost completely empty and significantly speeding up the disk encryption process. Note that TPM support will need to be separately enabled on a PC prior to running this task in the task sequence.

New Task Sequence Options for Installing Windows 8
Step 5 – Deploy a Task Sequence
After defining the OS Deployment Task Sequence, this Task Sequence can be deployed by clicking the Deploy button on the top ribbon bar in the ConfigMgr 2012 SP1 Console.
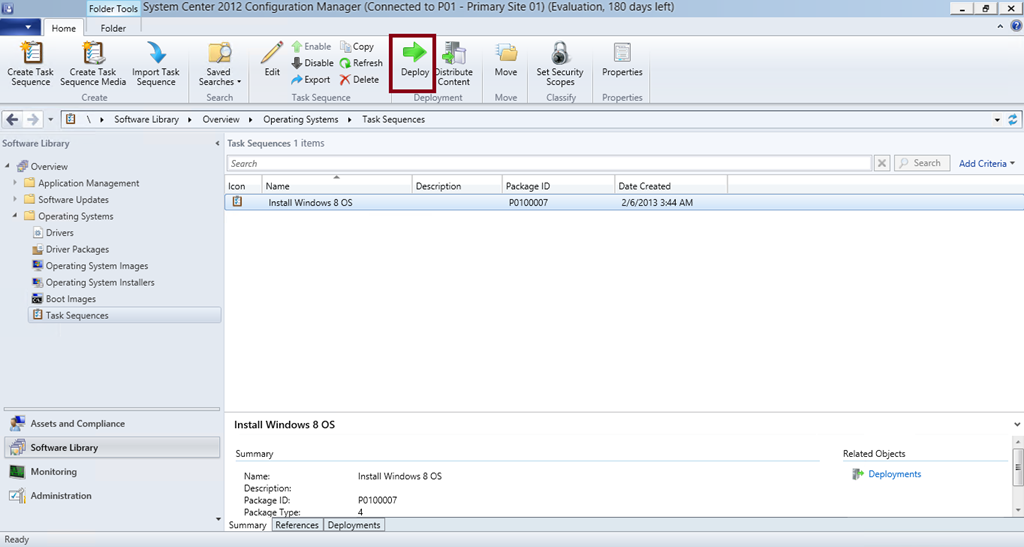
Deploying a Task Sequence
When working through the Deploy Software Wizard, you’ll notice that a new target filtering option has been added to make an OS Deployment available to any of the following:
- Only Configuration Manager Clients
- Configuration Manager Clients, Media and PXE
- Only Media and PXE
- Only Media and PXE ( hidden )
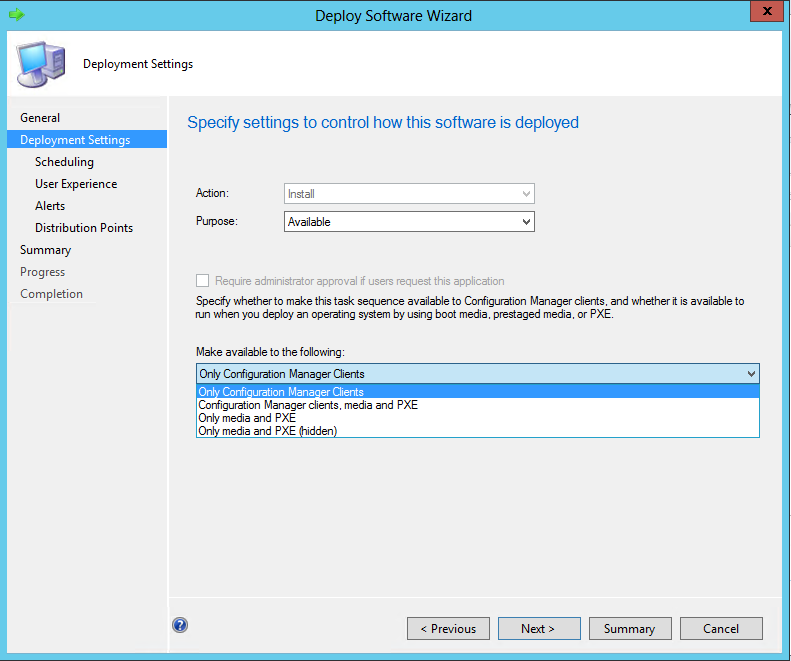
New targeting options in Deploy Software Wizard
The “hidden” option above allows you to deploy the task sequence so that it doesn’t show up in the selection list in the Windows PE boot environment. If using this option, you can specify this deployment by setting a new task sequence variable, SMSTSPreferredAdvertID, to the value of the Advertisement ID for this deployed task sequence as part of a prestart command in your Boot Image Properties. See How to Set an Operating System Task Sequence Variable for more details on creating a script to set a task sequence variable value.