Step-By-Step: Migrating From VMware to Microsoft Hyper-V Server 2012

This week is going to be a great week for Pierre, Mitch and I as activities are underway to create version 2 of the Windows Server 2102 #CANITPRO camp. Details regarding the new camp dates will be available shortly and will be posted predominantly on this blog. As mentioned on a previous post, most of the focus in version 1 camp was heavily centered around Hyper-V. While Version 2 of the camp will cover other great new functionality found in Windows Server 2102, we wanted to ensure material covered in version 1 of the camp was available online as a resource. This also provides us a chance to post resources requested via questions asked at version 1 of the camps themselves. One question repeated at almost all the camps was "How does one migrate their organizations VMware VMs to Microsoft Hyper-V Server 2102?"
Disclaimer: This post has not been written to slight any other virtualization offering
Virtualization is a great way to extend the utilization of hardware one's organization and as you all know there are a great many product offerings available to fulfill that requirement. This post, like any of the other "Step-By-Step" post, are meant to be a resource should the need arise or for conducting labs. Furthermore, my friend, colleague and virtualization expert Mitch Garvis said it best and said it often at every version 1 Windows Server 2012 camp he an I delivered together:
"We are not here to say Microsoft's Hyper-V Server 2012 offering is better than any other virtualization offering available today. Rather, we are here to promote that Hyper-V Server 2012 is as good as the top virtualization solutions in market today and that it is included at no extra cost with Windows Server 2012."
Microsoft Hyper-V Server 2012 is now a true contender in the virtualization space as it brings a great number of new features missed in the previous offering of Hyper-V. While an in-place upgrade option is unavailable due to architectural changes involved in implementing Hyper-V Server 2012, the in network migration process detailed in this "Step-By-Step" post works well and simplifies the process. Those who currently utilize System Center Virtual Machine Manager are aware that System Center provides this functionality and is great for large scale migrations. Further details in regards to this will be covered in a future post.
For those without System Center Virtual Machine Manager, or those wishing to migrate only a few VMs, Microsoft offers a free stand-alone tool to enable the migration of virtual machines from VMware to Hyper-V.
Preparation of the target Hyper-V Server 2012
Set up the same Virtual Networks as the source host in Hyper-V Manager using the "Virtual Switch Manager" host action.
Download the FREE Microsoft Virtual Machine Converter (MVMC) solution accelerator tool
The MVMC tool converts VMware virtual machines created with:
- vCenter Server 5.0
- vCenter Server 4.1
- ESXi Server 5.0
- ESXi/ESX Server 4.1
Run the MSI
Enter a location where you want to install MVMC or use the default location and continue with the installation on the local machine
Note: The account executing the setup must be the local administrator on the machine.
Converting Virtual Machines Using the MVMC GUI
Note: For best performance, it is recommended that the conversion is run on the destination host (this means that MVMC is installed and run from the Hyper-V hypervisor).
Open MVMC, open the Source page, and then enter the details to connect to a VMware vCenter Server, ESX server, or ESXi server
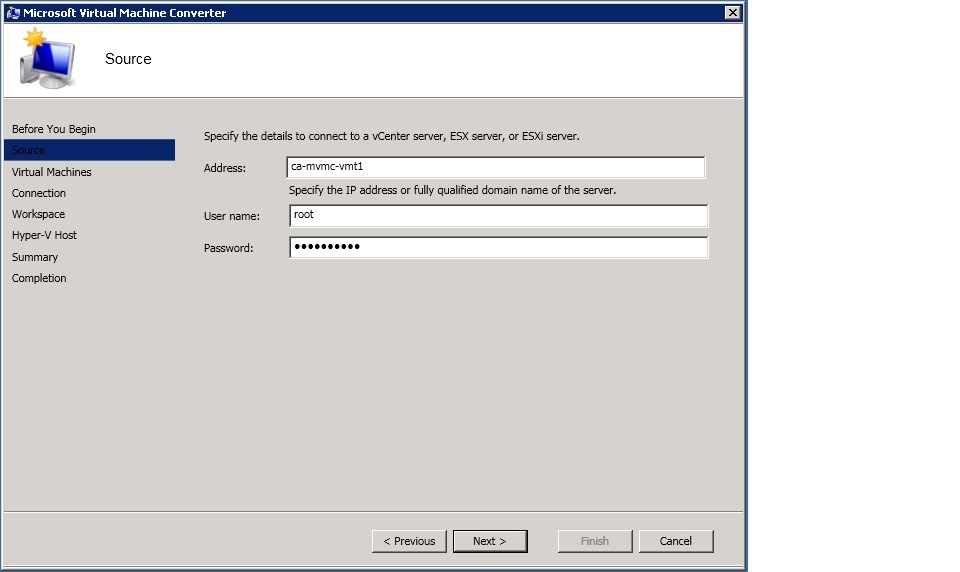
In the Address box, type the server IP address or the name of the VMware source server
In the User name box, type the user name
In the Password box, type the password and click Next
On the Virtual Machines page, select a virtual machine on the source VMware server to convert
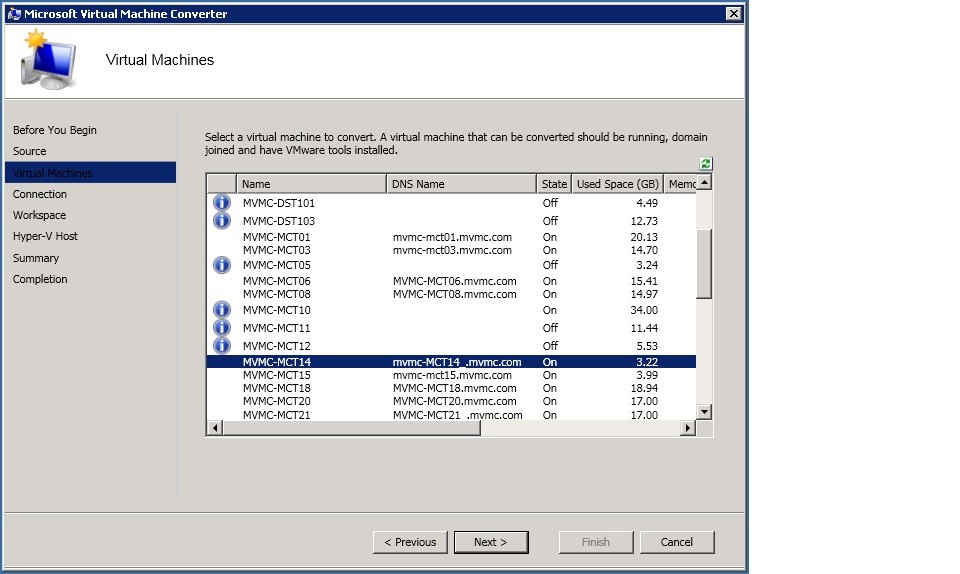
Note: MVMC assumes that the virtual machine is in a running state. Virtual machines that are not running (offline virtual machines) cannot be converted by MVMC
Note: The virtual machine must have VMware tools installed and be connected to an Active Directory domain
Note: The boot disk attached to the source virtual machine will be converted to an IDE-based VHD and all data disks attached to the source virtual machine will be converted to SCSI VHDs
Note: MVMC will create another instance of the virtual machine on Hyper-V based on the source virtual machine configuration. The source virtual machine will remain intact but will be shut down during the conversion process
Click Next
On the Virtual Machine Connection page, enter the credentials of an administrative account that can connect to the virtual machine. The connection is required for uninstalling VMware tools on the source virtual machine. The virtual machine must be joined to an Active Directory domain.
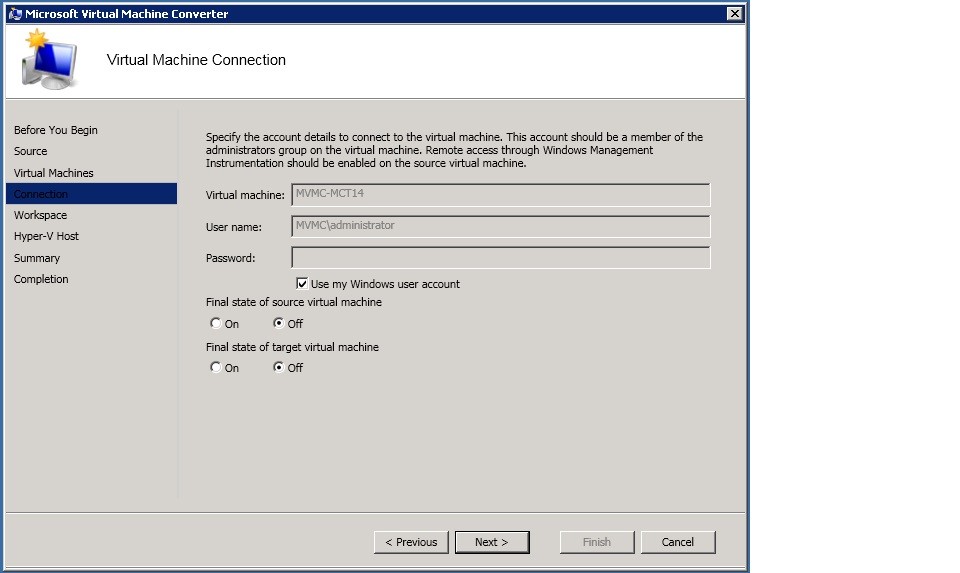
In the Virtual machine box, type the name of the virtual machine
In the User name box, type the domain and user name
In the Password box, type the password
In the Final state of source virtual machine option, select whether the source virtual machine should be turned On or Off when the restoration is complete
In the Final state of target virtual machine option, select whether the target virtual machine should be turned On or Off when the conversion is complete
Note: MVMCalways takes a snapshot of the original source virtual machine before the tools are uninstalled and will restore the virtual machine to its original state once the disks attached to the virtual machine are successfully copied to the machine where the conversion takes place
Note: Remote access through Windows Management Instrumentation (WMI) must be enabled on the source virtual machine
Click Next
On the Workspace page, click Browse to select a workspace folder path from where the UI can be run. Be sure to select a location that has enough disk space for the converted VHD files
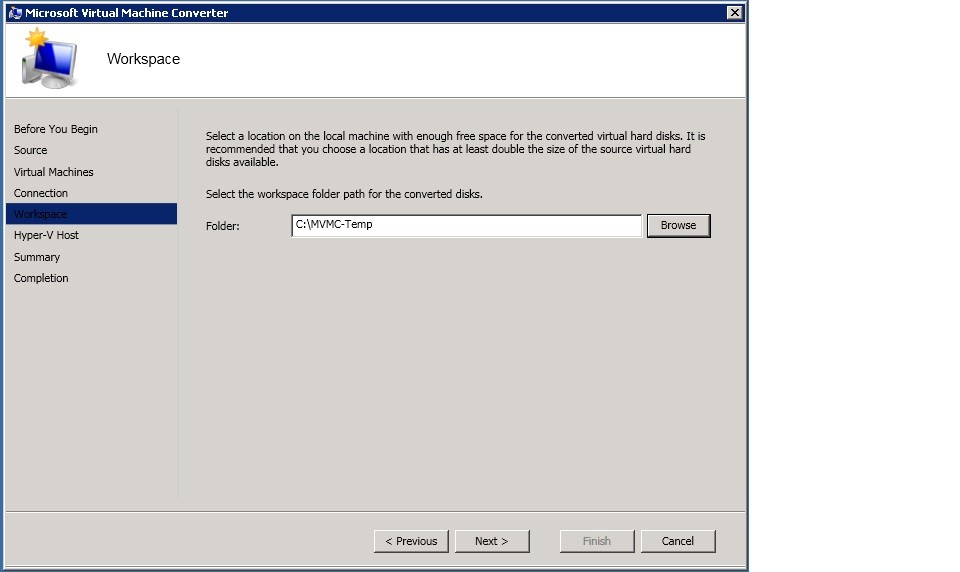
Click Next
On the Hyper-V Host page, enter the details to connect to the destination Hyper-V server where the virtual machine will be created following conversion and specify the UNC path for placement of the VHD files
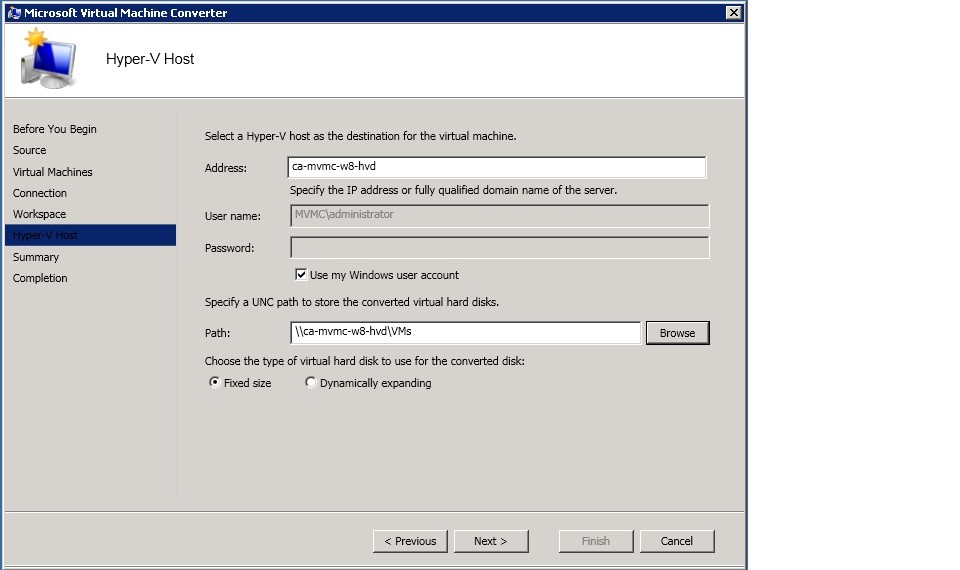
In the Address box, type the server IP address or the name of the Hyper-V source server
In the User name box, type the domain and user name
In the Password box, type the password
In the Path box, click Browse to select the UNC path to where the VHD file will be copied on the destination Hyper-V server
Select whether the VHD file should be Fixed size or Dynamically expanding
Note: MVMC expands the dynamic VHD file to its full size. To reduce a VHD file by removing blank space on the disk, see Edit Virtual Hard Disk Wizard at https://technet.microsoft.com/en-us/library/cc755149.aspx
Click Next
On the Summary page, review the details and click Finish to complete the conversion. If warnings are displayed, review them before proceeding with the conversion
Note: Once the conversion has completed successfully, MVMC starts the virtual machine and leaves it as it is. If you do not want the virtual machine to be started, go to the Hyper-V manager in the destination server and shut down the virtual machine.
On the Completion page, seen when the virtual machine conversion has completed successfully, click Close
Further details regarding troubleshooting and converting VMs via the command-line are also available.
Be sure to test in lab the conversion of virtual machines using the Microsoft Virtual Machine Converter (MVMC) solution for yourself by downloading Windows Server 2012, Hyper-v Server 2012 and the Microsoft Virtual Machine Converter.