Step-by-Step: Building a FREE System Center 2012 Configuration Manager SP1 Lab
As mentioned in an earlier blog post, System Center 2012 SP1, Windows Intune and the BYOD Revolution, there are benefits to allowing users to supply their own smartphones and taking advantage of the BYOD trend. Proper planning and management is encouraged to ensure BYOD stays as a benefit as opposed to become a threat. While co-presenting alongside Mitch at a recent #CANITPRO camp, a request from attendees was put forward that they were eager to test System Center 2012 Configuration Manager SP1 but did not have the ability or lab to do so. While plans are currently underway for Microsoft to host upcoming System Center 2012 #CANITPRO camps later this year, there is a way to get a jumpstart on testing without impacting any of your existing systems and running the full pilot in the cloud for free.
Recently I have come across a great blog post by fellow Microsoft Technical Evangelist, Keith Mayer, detailing how leveraging Microsoft's Windows Azure FREE 90-Day Trial Offer to build your System Center 2012 lab environment for FREE in the cloud for up to 90-days. Once the 90 day free period completed, you can convert your lab to a full paid subscription. This lab environment will cost approximately $0.40 USD per hour of compute usage plus associated storage and networking costs of typically less than $10 USD per month for a lab such as this. Cost estimates are based on published Pay-As-You-Go pricing for Windows Azure current as of this article’s published date.
If there is a requirement or request to test advanced Configuration Manager 2012 SP1 scenarios that require more resources than provided in the prescribed lab, you do have the ability to scale-up or scale-out by provisioning larger VMs or additional VMs for distributed site system roles. To determine the specific costs associated with higher resource levels, visit Microsoft's Windows Azure Pricing Calculator for Virtual Machines.
Lab Scenario
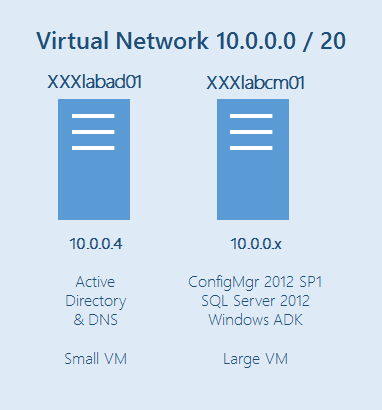
This Step-by-Step Guide allows you to provision a stand-alone Configuration Manager 2012 SP1 primary site server that is joined to an Active Directory domain.
This lab scenario will also serve as the basis for future Step-by-Step Guides where we’ll be expanding the configuration to encompass additional site system roles and capabilities.
This Configuration Manager 2012 lab is a stand-alone primary site can support up to 100,000 clients. If you are testing a lab configuration that will need to scale beyond 100,000 clients when deployed in production, see Site and Site System Role Scalability for details on the supported scalability limits when choosing an alternate lab topology.
Prerequisites
The following is required to complete this step-by-step guide:
- A Windows Azure subscription with the Virtual Machines Preview enabled.
COMPLETE: Sign up for a FREE 90-Day Trial of Windows Azure
NOTE: When activating your FREE Trial for Windows Azure, you will be prompted for credit card information. This information is used only to validate your identity and your credit card will not be charged, unless you explicitly convert your FREE Trial account to a paid subscription at a later point in time.
- Prior completion of the following Step-by-Step Guides to prepare your cloud-based lab environment:
COMPLETE: Getting Started with Servers in the Cloud
COMPLETE: Step-by-Step: Building a Windows Server 2012 Active Directory Forest in the Cloud
- In addition to the prerequisites above, this step-by-step guide also assumes that the reader is already somewhat familiar with installing and using System Center 2012 Configuration Manager in an on-premise deployment.
COMPLETE: For a primer on Configuration Manager 2012, see Fundamentals of Configuration Manager in the Microsoft TechNet Library.
Getting Started
In this Step-by-Step Guide, you will complete the following exercises to configure a System Center 2012 Configuration Manager SP1 stand-alone primary site server as a cloud-based lab on the Windows Azure platform:
- Deploy a New Windows Server 2012 VM on Windows Azure
- Prepare VM with Prerequisites for System Center 2012
- Install System Center 2012 Standalone Primary Site
- Export / Import VMs
Estimated Time to Complete: 90 minutes
Exercise 1: Deploy a New Windows Server 2012 VM in Windows Azure
In this exercise, you will provision a new Windows Azure VM to run a Windows Server 2012 on the Windows Azure Virtual Network provisioned in the prior Step-by-Step Guides listed above in the Prerequisites section of this article.
- Sign in at the Windows Azure Management Portal with the logon credentials used when you signed up for your Free 90-Day Windows Azure Trial.
- Select Virtual Machines located on the side navigation panel on the Windows Azure Management Portal page.
- Click the +NEW button located on the bottom navigation bar and select Compute | Virtual Machines | From Gallery.
- In the Virtual Machine Operating System Selection list, select Windows Server 2012 and click the
 button.
- On the Virtual Machine Configuration page, complete the fields as follows:
- Virtual Machine Name: XXXlabcm01
- New Password and Confirm Password fields: Choose and confirm a new local Administrator password.
- Size: Large (4 cores, 7GB Memory)
Click the button to continue.
Note: It is suggested to use secure passwords for Administrator users and service accounts, as Windows Azure virtual machines could be accessible from the Internet knowing just their DNS. You can also read this document on the Microsoft Security website that will help you select a secure password: https://www.microsoft.com/security/online-privacy/passwords-create.aspx.
- On the Virtual Machine Mode page, complete the fields as follows:
- Standalone Virtual Machine: Selected
- DNS Name: XXXlabcm.cloudapp.net
- Storage Account: Select the Storage Account defined in the Getting Started steps from the Prerequisites section above.
- Region/Affinity Group/Virtual Network: Select XXXlabnet01 – the Virtual Network defined in prior Step-by-Step Guides in the “Early Experts” Cloud Quest.
- Virtual Network Subnets: Select Subnet-1 (10.0.0.0/23)
Click the button to continue.
- On the Virtual Machine Options page, click the
 button to begin provisioning the new virtual machine.
As the new virtual machine is being provisioned, you will see the Status column on the Virtual Machines page of the Windows Azure Management Portal cycle through several values including Stopped, Starting (Provisioning), and Running (Provisioning) . When provisioning for this new Virtual Machine is completed, the Status column will display a value of Running and you may continue with the next exercise in this guide.
- After the new virtual machine has finished provisioning, click on the name ( XXXlabcm01 ) of the new Virtual Machine displayed on the Virtual Machines page of the Windows Azure Management Portal to open the virtual machine dashboard page for XXXlabcm01.
- On the virtual machine dashboard page for XXXlabcm01, click the Attach button located on the bottom navigation toolbar and select Attach Empty Disk. Complete the following fields on the Attach an empty disk to the virtual machine form:
- Name: XXXlabcm01-data01
- Size: 50 GB
- Host Cache Preference: None
Click the button to create and attach the a new virtual hard disk to virtual machine XXXlabcm01.


You have completed the initial provisioning of a new virtual machine running Windows Server 2012 on the Windows Azure cloud platform.
Exercise 2: Prepare VM with Prerequisites for System Center 2012
In this exercise, you will prepare this virtual machine with the prerequisites needed to successfully install System Center 2012 Configuration Manager SP1 later in this Step-by-Step Guide.
- Login to the Virtual Machine as a Local Administrator.
- On the virtual machine details page for XXXlabcm01, click the Connect button located on the bottom navigation toolbar and click the Open button to launch a Remote Desktop Connection to the console of this virtual machine.
- Logon at the console of your virtual machine with the local Administrator credentials defined in Exercise 1 above.
- Wait for the Server Manager tool to launch before continuing with the next step.
- On the virtual machine details page for XXXlabcm01, click the Connect button located on the bottom navigation toolbar and click the Open button to launch a Remote Desktop Connection to the console of this virtual machine.
- In the Server Manager window, format the disk attached in Exercise 1 above by launching the Computer Management tool from the Tools menu located on the top navigation bar.
- In the Computer Management window, click on Disk Management in the left navigation pane.
- When prompted with the Initialize Disk dialog box, click the OK button to continue.
- Right-click on the unallocated disk space on Disk 2 and select New Simple Volume… from the pop-up menu.
- In the New Simple Volume Wizard, click the Next button on each page to accept all default values.
- Click the Finish button on the last page of the wizard to create a new F: volume.
- When the new volume has finished the formatting process, close the Computer Management window.
- In the Computer Management window, click on Disk Management in the left navigation pane.
- Using the Server Manager tool, join the Virtual Machine to the contoso.com Active Directory domain.
- In the Server Manager tool, click Local Server in the left navigation pane to navigate to the Local Server page.
- On the Local Server page, click the WORKGROUP link to launch the System Properties dialog box.
- On the Computer Name tab of the System Properties dialog box, click the Change… button to launch the Computer Name/Domain Changes dialog box.
- In the Computer Name/Domain Changes dialog box, click the Domain: radio button and type contoso.com in the text field. Click the OK button.
- In the Windows Security dialog box, type the Domain Administrator login credentials ( such as Administrator@contoso.com )that you used when configuring this domain in the prior Step-by-Step Guides listed in the Prerequisites section of this article. Click the OK button to authenticate to the domain.
- Once the domain join has been successfully completed, you will see a message box stating “Welcome to the contoso.com domain.” Click the OK button twice, then click the Close button to close the System Properties dialog box.
- When prompted, click the Restart Now button to restart the virtual machine.
Monitor the restart progress of the virtual machine on the Virtual Machines page of the Windows Azure Management Portal. When the restart has completed, the virtual machine status will display Running. You may then continue with the next step in this exercise.
- In the Server Manager tool, click Local Server in the left navigation pane to navigate to the Local Server page.
- Login to the Virtual Machine as a Domain Administrator.
- Select Virtual Machines located on the side navigation panel on the Windows Azure Management Portal page.
- On the Virtual Machines page, click on the name of VM XXXlabcm01 to navigate to the Virtual Machine Dashboard page for this Virtual Machine.
- Click the Connect button on the bottom page navigation toolbar to open a Remote Desktop session to this virtual machine.
- Login with the same Domain Administrator user credentials ( Administrator@contoso.com ) used when deploying the contoso.com Active Directory domain in the prior Step-by-Step Guides listed above in the Prerequisites section of this article.
After the Remote Desktop console session has initialized and the Server Manager tool has launched, continue with the next step in this exercise.
- Select Virtual Machines located on the side navigation panel on the Windows Azure Management Portal page.
- Using the Server Manager tool, disable Internet Explorer Enhanced Security.
- In the Server Manager tool, click on Local Server in the left navigation pane and select IE Enhanced Security Configuration.
- Turn off enhanced security for Administrators and click the OK button.
Note: Modifying Internet Explorer Enhanced Security configurations is not good practice and is only for the purpose of this particular Step-by-Step Guide. The correct approach should be to download files locally and then copy them to a shared folder or directly to the VM.
- In the Server Manager tool, click on Local Server in the left navigation pane and select IE Enhanced Security Configuration.
- Using the Server Manager tool, install the required Windows Server 2012 Roles and Features.
- In the Server Manager tool, click Manage on the top left menu bar and then select Add Roles and Features from the drop-down menu to launch the Add Roles and Features Wizard.
- In the Add Roles and Features Wizard dialog box, click the Next button four times to advance to the Select Features page.
- On the Select Features page, check the checkboxes for the following features and sub-features, leaving all other options at the default checkbox state:
- .NET Framework 3.5 with both HTTP Activation and Non-HTTP Activation selected.
- .NET Framework 4.5 with both HTTP Activation and TCP Activation selected.
- Background Intelligent Transfer Service ( BITS )
- Remote Differential Compression
Whenever prompted during the feature selection process above, click the Add Features button to add all features that are required for a select feature or sub-feature option.
Click the Next button to continue.
- On the IIS Web Server Role Services page, check the checkboxes for the following options, leaving all other options at their default checkbox state:
- Windows Authentication, located under the IIS with Security section.
- ASP.NET 3.5, located under the Application Development section.
- IIS 6 WMI Compatibility, located under the Management Tools | IIS 6 Management Compatibility section.
- Click the Next button and then click the Install button to begin the feature installation.
- When the feature installation has completed, click the Close button to close the Add Roles and Features Wizard.
- Using Internet Explorer from within the virtual machine remote desktop session, download the required software installation bits.
- Create an E:\installfiles folder. Download each of the software installation packages below into this folder.
- Download SQL Server 2012 from https://technet.microsoft.com/en-US/evalcenter/hh225126.aspx?wt.mc_id=TEC_93_1_5
- Download the Windows Assessment and Deployment Kit ( ADK ) for Windows 8 from https://www.microsoft.com/en-us/download/details.aspx?id=30652
- Download the Windows Server 2012 ISO from https://technet.microsoft.com/en-CA/evalcenter/hh670538.aspx
- Download the Windows 8 Enterprise ISO from https://technet.microsoft.com/en-US/evalcenter/hh699156.aspx
- Download System Center 2012 with SP1from https://technet.microsoft.com/en-CA/evalcenter/hh505660.aspx
NOTE: Be sure to download all of the installation bits above, as they will also be leveraged in your cloud-based lab environment for future Step-by-Step Guides that build upon this base configuration.
- Create an E:\installfiles folder. Download each of the software installation packages below into this folder.
- Prepare Active Directory for System Center 2012 Configuration Manager SP1.
Double-click on E:\installfiles\SC2012_SP1_RTM_SCCM_SCEP.exe to extract the downloaded installation bits for Configuration Manager 2012 SP1.
When prompted, extract the downloaded installation bits to E:\installfiles\SC2012_SP1_RTM_SCCM_SCEP as a destination folder location.
Extend the Active Directory Schema with the Configuration Manager 2012 SP1 schema extensions by running the following command from a Command Prompt window:
E:\installfiles\SC2012_SP1_RTM_SCCM_SCEP\SMSSETUP\BIN\X64\extadsch.exeAfter running this command, review the log output located in C:\extadsch.log to confirm that the schema extension operations were successfully completed.
Using the Active Directory Users and Computers tool from the domain controller virtual machine remote desktop console ( XXXlabad01 ) , setup the required Active Directory permissions and objects.
- In the Active Directory Users and Computers tool, select View | Advanced Features from the menu bar.
- In the left navigation pane of the Active Directory Users and Computers tool, right-click on the System container and select Properties from the pop-up menu.
On the Security tab, add the Active Directory computer account for the Configuration Manager site server ( XXXlabcm01 ) to the Groups or user names list and assign Full Control permissions to it.
Click OK when completed.
- In the left navigation pane of the Active Directory Users and Computers tool, right-click on the Users container and select New | User from the pop-up menu.
Create the following domain user accounts for SQL Server and Configuration Manager site system roles:
- SQLService domain user account: uncheck User must change password at next logon optionand check Password never expires option.
- CMAdmin domain user account: uncheck User must change password at next logon option and check Password never expires option. Add this domain user account to the Domain Admins global group.
- In the Active Directory Users and Computers tool, select View | Advanced Features from the menu bar.
After completing the Active Directory preparation tasks above, close the remote desktop connection to virtual machine XXXlabad01 and re-establish a remote desk connection to XXXlabcm01.
Login as a Domain Administrator ( Administrator@contoso.com ) on virtual machine XXXlabcm01.
- At the remote desktop console of virtual machine XXXlabcm01, install SQL Server 2012 database engine and reporting services instances.
Double-click the downloaded SQL Server 2012 ISO file located in the E:\installfiles folder to mount this ISO as a new F: drive letter.
Double-click the F:\setup.exe installation executable to launch the SQL Server 2012 Installation Center.
In the SQL Server 2012 Installation Center window, click the Installation link located in the left navigation pane.
In the SQL Server 2012 Installation Center window, click New SQL Server stand-alone installation or add features to an existing installation in the right content pane. This will launch the SQL Server 2012 Setup program.
In the SQL Server 2012 Setup program, use the OK and Next buttons as appropriate to navigate through the installation wizard and set the following installation property values when prompted:
- Feature Selection: select Database Engine and Reporting Services - Native- Instance Configuration: Default instance
- Instance Root Directory: E:\Program Files\Microsoft SQL Server- Server Configuration: set SQL Server Database Engine service account to use CONTOSO\SQLService domain user account name.
- Database Engine Configuration: Click Add Current User button
As you are navigating through the Setup Wizard, accept all other default values. When ready, click the Install button to install SQL Server 2012.
When the SQL Server 2012 installation is completed, close the Installation Center window if it is still open.
Right-click on the mounted F: drive in a File Explorer window and select Eject from the pop-up menu to unmount the SQL Server 2012 ISO image file.
- Install the Windows Assessment and Deployment Kit ( ADK ) for Windows 8.
- Run E:\installfiles\adksetup.exe to install the Windows Assessment and Deployment Kit.
- When prompted during the setup process, select the following components to install:
- User State Migration Tools ( USMT )
- Windows Deployment Tools
- Windows PE
- Run E:\installfiles\adksetup.exe to install the Windows Assessment and Deployment Kit.
- Exclude the D: volume as a location for Configuration Manager 2012 SP1 files.
The D: volume on a Windows Azure virtual machine is intended for temporary files. When installing Configuration Manager 2012 SP1, certain Site System components are placed, by default, on the NTFS volume with the highest amount of available disk space. To exclude the D: volume so that the Configuration Manager 2012 SP1 setup process will not consider it as a location for these components, create the following file as an empty text file at the root of the D: volume:
- Create file D:\NO_SMS_ON_DRIVE.SMS
The XXXlabcm01 virtual machine is now prepared for installing System Center 2012 Configuration Manager with Service Pack 1.
Exercise 3 – Install System Center 2012 Configuration Manager SP1
In this exercise, you will install System Center 2012 Configuration Manager SP1 on virtual machine XXXlabcm01 and configure it as a stand-alone primary site server.
- Launch the System Center 2012 Configuration Manager SP1 installation by running the following command:
E:\installfiles\SC2012_SP1_RTM_SCCM_SCEP\SMSSETUP\BIN\X64\setup.exe
- Navigate through the installation wizard by clicking the OK and Next buttons as appropriate. When prompted for the following information, use the values supplied below:
- Download required files: Selected
- Download location: E:\installfiles
- Site code: P01
- Site name: Primary Site 01
- Installation folder: E:\Program Files\Microsoft Configuration Manager
- Configure the communication method on each site system role: Selected
- Join the Customer Experience Improvement Program: Selected
- After supplying the values listed in Step 2 above, wait for the installation to complete.
- When the installation has completed, launch the Configuration Manager Console from the Windows Start Screen.
The installation of XXXlabcm01 as a Configuration Manager stand-alone primary site server is now complete.
Exercise 4: Export / Import Lab Virtual Machines
Our System Center 2012 Configuration Manager SP1 cloud-based lab is now functional, but if you’re like me, you may not be using this lab VM 24x7 around-the-clock. As long as a virtual machine is provisioned, it will continue to accumulate compute hours against your Free 90-Day Windows Azure Trial account regardless of virtual machine state – even in a shutdown state!
To save our compute hours for productive lab and study time, we can leverage the Windows Azure PowerShell module to automate export and import tasks to de-provision our virtual machines when not in use and re-provision our virtual machines when needed again.
In this exercise, we’ll step through using Windows PowerShell to automate:
- De-provisioning lab virtual machines when not in use
- Re-provisioning lab virtual machines when needed again.
Once you’ve configured the PowerShell snippets below, you’ll be able to spin up your cloud-based lab environment when needed in just a few minutes!
Note: Prior to beginning this exercise, please ensure that you’ve downloaded, installed and configured the Windows Azure PowerShell module as outlined in the Getting Started article listed in the Prerequisite section of this step-by-step guide. For a step-by-step walkthrough of configuring PowerShell support for Azure, see Setting Up Management by Brian Lewis, one of my peer IT Pro Technical Evangelists.
De-provision the lab. Use the Stop-AzureVM and Export-AzureVM cmdlets in the PowerShell snippet below to shutdown and export lab VMs when they are not being used.
NOTE: Prior to running this snippet, be sure to edit the first line to reflect the name of your VM and confirm that the $ExportPath folder location exists.$myVM = “XXXlabcm01”
$myCloudSvc = "XXXlabcm"
Stop-AzureVM -ServiceName $myCloudSvc -Name $myVM
$ExportPath = "C:\ExportVMs\ExportAzureVM-$myVM.xml"
Export-AzureVM -ServiceName $myCloudSvc -name $myVM -Path $ExportPath
After you've verified that all Export files were created in the folder location specified by $ExportPath, you can then de-provision your VM with the following PowerShell snippet:
Remove-AzureVM -ServiceName $myCloudSvc -name $myVM
Re-provision the lab. Use the Import-AzureVM and Start-AzureVM cmdlets in the PowerShell snippet below to import and start lab VMs when needed again.
$myVNet = "XXXlabnet01"
$myVM = "XXXlabcm01"
$myCloudSvc = "XXXlabcm"
$ExportPath = "C:\ExportVMs\ExportAzureVM-$myVM.xml"
Import-AzureVM -Path $ExportPath | New-AzureVM -ServiceName $myCloudSvc -VNetName $myVNet
Start-AzureVM -ServiceName $myCloudSvc -name $myVM