iSCSI Storage in Windows Server 2012
Storage is one of the most important aspects of our IT infrastructure. In this day and age of virtualization it is even more important because our entire server infrastructure may be stored on a limited set of devices.
Of course that is a lot easier said than done, especially for smaller companies with limited IT budgets. Even the simplest SAN devices can be expensive, and the temptation to save our virtual machines on direct attached storage often wins over the ability to live-migrate virtual
machines between hosts.
In April, 2011 Microsoft released the iSCSI Software Target 3.3 as a free (and supported) download, and suddenly iSCSI SANs were available to the masses. At the time Pierre and I wrote a series of articles in this space as guest bloggers (The Microsoft iSCSI Software Target is now free, All for SAN and SAN for All!, Creating a SAN using Microsoft iSCSI Software Target 3.3, Creating HA VMs for Hyper-V with Failover Clustering using FREE Microsoft iSCSI Target 3.3).
While Hyper-V has made virtualization available to the masses, I feel the iSCSI Software Target has been one of the tools that has best enabled me to teach true datacentre virtualization to the masses, because after all without Live Migration and Failover Clustering virtualization is really limited to the capacity of a single box.
In Windows Server 2012 Microsoft has taken us one step further: The ISCSI Software Target is actually included in the box. Enabling and creating a target is as simple as following the steps in this article.
Environment
As with most of my articles, the screen captures will be from servers in my production environment. As with any technology, if you are going to play with this one I strongly suggest you do it in a lab environment before bringing it into your production network.
Target Server:
I have created a virtual machine called SWMITarget on one of my virtualization hosts. The resource requirements are pretty simple… as it is not performing any other function, it seldom needs more than 512 MB of RAM; using dynamic memory I give it that as a minimum, but allow it up to 2048 (2GB) for a maximum… in case it really needs it. I should mention that in a production environment I would never recommend virtualizing your SAN… try to pick up an inexpensive server with a bunch of good drives in it.
While I do not recommend this in most companies, For this environment I am using the same network as my production environment. In a production environment I would recommend a separate network for the SAN environment for two reasons: security and bandwidth. As my network is a closed loop with 10GigE switches neither is an issue.
The storage for the target is separated into two: a 40GB system disk attached to an IDE Controller for the Windows Partition, and a 150GB disk attached to a SCSI controller for the LUN (Logical Unit Number). In reality I will have a Storage Pool of three 150GB disks for my production environment. To learn about Storage Pools read my recent article Storage Pools: Dive right in!
Host Servers:
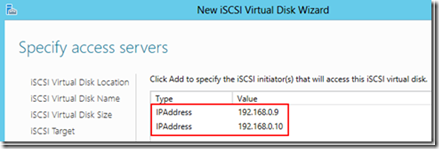
Because the iSCSI security model will only expose its LUNs to a server (Initiator) that is pre-specified, you should know the IP Addresses of the servers that will be connecting to the shared storage before building the iSCSI Target. I will be connecting two hosts to this target, and have checked their addresses: 192.168.0.9 and 192.168.0.10. This could also be done by DNS Name or IQN (iSCSI Qualified Name), but IP is the easiest.
Preparing the Target Server:
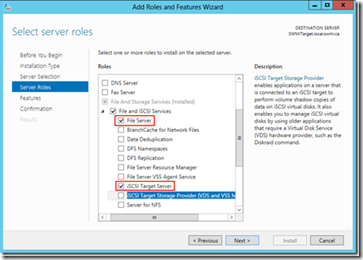 Although the iSCSI Software Target is included in the box, it is not installed by default. It is a Role that has to be enabled:
- From the Server Manager click Manage, and select Add Roles and Features. This will launch the Add Roles and Features Wizard.
- On the Before you begin page read the instructions and click Next>
- On the Select installation type screen ensure that the Role-based or feature-based installation radio is selected and click Next>
- On the Select destination server screen ensure that the Select a server from the server pool radio is selected, and under Server Pool select the server onto which you want to install the role, then click Next>
- On the Select server roles screen under Roles expand File and iSCSI Services, select File Server and iSCSI Target Software, then click Next>
- On the Select features screen click Next>
- On the Confirm installation selections page review the options and click Install. Optionally, you could also select the Restart the destination server automatically if required box, but if you are only installing these roles then a reboot should not be necessary.
Now that the role is installed, you should now see the iSCSI option under the File and Storage Services tab.
Creating the iSCSI LUN
Before you actually create the iSCSI Target you first have to create the iSCSI virtual disk, and from within the New iSCSI Virtual Disk Wizard you will create the target.
NOTE: If you will be using this target for a Failover Cluster you may want to create a second virtual disk that is 1GB and add it to the same iSCSI Target. This disk will be used as the disk witness (or Quorum Disk).
From the Server Manager console navigate to the File and Storage Services tab.
In File and Storage Services click on iSCSI in the navigation pane.
In the details pane under iSCSI VIRTUAL DISKS click To create an iSCSI virtual disk, start the New iSCSI Virtual Disk Wizard.
In the New iSCSI Virtual Disk Wizard ensure that your server is selected under Server, and the disk where you want to store
the Target disk is selected under Select by volume. Click Next>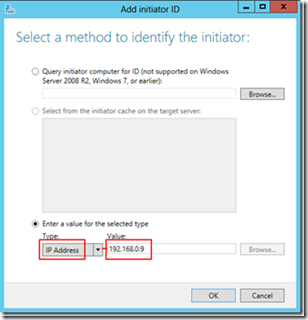 In the Specify iSCSI virtual disk name screen type a name for the disk and click Next>
In the Specify iSCSI virtual disk size screen enter the size for the target disk and click Next>
In the Assign iSCSI target screen ensure the New iSCSI target radio is selected and click Next>
In the Specify target name screen type a name for your target. Remember that this target name will be integrated into the IQN which is replete with dashes… I strongly recommend avoiding them here!
In the Specify access servers screen click Add.. . to open the Add initiator ID window.
- Ensure the Enter a value for the selected type radio is selected.
- In the Type: dropdown select IP Address
- In the Value box type the IP Address of the first host that you want to connect, then click OK.
NOTE: You will have to run this process separately for each server that you plan to add.
In the Specify access servers screen click Add.. . to open the Add initiator ID window.
- Ensure the Enter a value for the selected type radio is selected.
- In the Type: dropdown select IP Address
- In the Value box type the IP Address of the first host that you want to connect, then click OK.
Before going forward make sure that all of the hosts that you want to access this target are listed in the Specify access servers list, then click Next>
In the Enable Authentication screen click Next> . While CHAP and reverse CHAP are options, I will not go into them here. Because iSCSI is an open protocol, CHAP (Control Handshake Authentication Protocol) is the only authentication method available for iSCSI SANs, and it has not changed or advanced in over a dozen years. As such it is not considered very secure.
In the Confirm selections screen ensure that your selections are correct, and click Create.
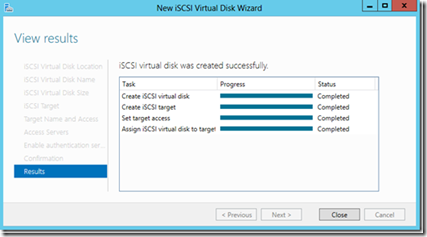
Once the wizard is complete you should see a results screen like this. You can close it… your target is done!
Accessing the Target:
The iSCSI loop consists of two distinct parts – the Target, which is the device being accessed, and the Initiator, which is the server (or client) accessing it. Every Microsoft OS that you might use in a business has the iSCSI Initiator software included… it is simply a matter of enabling it, and \once it is enabled it will start automatically every time your system reboots.
NOTE: The following steps must be performed on each server that will be connecting to the iSCSI Target.
To enable the iSCSI Initiator, simply search for iSCSI Initiator and run it. You will get a dialog box that says:
The Microsoft iSCSI service is not running. The service is required to be started for iSCSI to function correctly. To start the service now and have the service start automatically each time the computer restarts, click the Yes button.
Click the Yes button. The iSCSI Initiator Properties box will come up. To connect to your target:
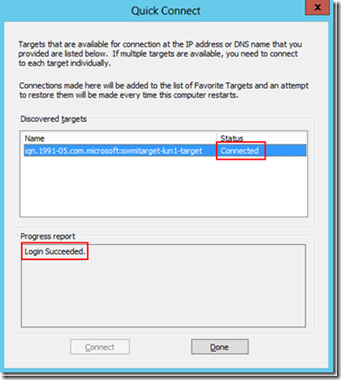
In the Target box (in the Targets tab) enter the IP address of your Target Server, and click Quick Connect…
If your initiator connects successfully to the target it should take only a second or two for the Quick Connect window to appear with the successful acknowledgement (see screen capture). If it takes longer than more likely than not something went wrong. Make sure that the IP address of the Target is right, and if it is then go back into the Target and confirm that you correctly entered the IP address of the Initiators.
Click Done
In the iSCSI Initiator Properties box navigate to the Volumes and Devices tab and click Auto Configure. You should get entries for your LUNs that look like this:
There will be one entry for each disk that you connected to the iSCSI Target.
Click OK.
NOTE: The following steps must be performed on only one server that will be connecting to the iSCSI Target.
- Open the Disk Management console (right-click in the bottom left corner of the screen and click Disk Management).
- There should be disks that are offline and unallocated – if you created two then there will be two, and so forth. Right-click on the disks and bring them both on-line.
- Right-click on one of the disks and select Initialize Disk. All of the uninitialized disks should appear. Ensure they are all selected and click OK.
- Right-click on each disk and create a simple volume, and format them.
If you were to return to the iSCSI Initiator Properties now, select the Volumes and Devices tab and click Auto Configure again, you would get entries that look like this:
However this step is unnecessary.
You’re Done!
Okay, you aren’t quite done, but you have created your iSCSI Target, and connected your hosts to it. In my next article I will show you how to enable and configure Failover Clustering, how to make your existing virtual machines highly available, and how to create new Highly Available Virtual Machines.
