Windows Server 2012 IT Camp – Lab #2
In November I posted the first of several post that covered building a lab at home. Then I followed up with Windows Server 2012 IT Camp – Lab #1 .
This is third one in this series and it will cover the following:
- Details of the import virtual machines process in Hyper-v
- Virtual Machines Dynamic memory
The import virtual machines process in Hyper-v
Importing a virtual machine from one physical host to another can expose file incompatibilities and other unforeseen complications. Administrators often think of a virtual machine as a single, stand-alone entity that they can move around to address their operational needs. In reality, a virtual machine consists of several parts:
- Virtual hard disks, stored as files in the physical storage.
- Virtual machine snapshots, stored as a special type of virtual hard disk file.
- The saved state of the different, host-specific devices.
- The memory file, or snapshot, for the virtual machine.
- The virtual machine configuration file, which organizes the preceding components and arranges them into a working virtual machine.
Each virtual machine and each snapshot that is associated with it use unique identifiers. Additionally, virtual machines store and use some host-specific information, such as the path that identifies the location for virtual hard disk files. When Hyper-V starts a virtual machine, it undergoes a series of validation checks before being started. Problems such as hardware differences that might exist when a virtual machine is imported to another host can cause these validation checks to fail. That, in turn, prevents the virtual machine from starting.
Windows Server 2012 includes an Import wizard that helps you quickly and reliably import virtual machines from one server to another.
The Import Wizard for virtualization:
- Detects and fixes problems.
- Hyper-V in Windows Server 2012 introduces a new Import Wizard that is designed to detect and fix more than 40 different types of incompatibilities. You don’t have to worry ahead of time about the configuration that’s associated with physical hardware, such as memory, virtual switches, and virtual processors. The Import Wizard guides you through the steps to resolve incompatibilities when you import the virtual machine to the new host.
- Doesn’t require the virtual machine to be exported.
- You no longer need to export a virtual machine to be able to import it. You can simply copy a virtual machine and its associated files to the new host and then use the Import Wizard to specify the location of the files. This “registers” the virtual machine with Hyper-V and makes it available for use.
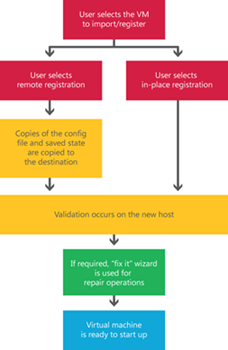
The flowchart shows the Import Wizard process.
When you import a virtual machine, the wizard does the following:
- Creates a copy of the virtual machine configuration file. This is created as a precaution in case an unexpected restart occurs on the host, such as from a power outage.
- Validates hardware. Information in the virtual machine configuration file is compared to hardware on the new host.
- Compiles a list of errors. This list identifies what needs to be reconfigured and determines which pages appear next in the wizard.
- Displays the relevant pages, one category at a time. The wizard identifies incompatibilities to help you reconfigure the virtual machine so it’s compatible with the new host.
- Removes the copy of the configuration file. After the wizard does this, the virtual machine is ready to start.
The new Import Wizard is a simpler, better way to import or copy virtual machines. The wizard detects and fixes potential problems, such as hardware or file differences that might exist when a virtual machine is imported to another host.
As an added safety feature, the wizard creates a temporary copy of a virtual machine configuration file in case an unexpected restart occurs on the host, such as from a power outage. The Windows PowerShell cmdlets for importing virtual machines let you automate the process.
Virtual Machines Dynamic memory and automatic start-up actions
In Windows Server 2012, Fast-growing organizations whose workloads are rapidly expanding often need to add more virtual machines to their host processors. These organizations want to optimize the number of virtual machines that they can place on a host server to minimize the number of expensive host servers that they need. With the Hyper-V Dynamic Memory improvements in Windows Server 2012 , IT administrators can now allocate virtual machine memory resources more efficiently and dramatically increase virtual machine consolidation ratios.
Dynamic Memory improvements in Windows Server 2012 include support for higher virtual machine consolidation with minimum memory and Hyper-V smart paging.
Minimum memory lets Hyper-V reclaim the unused memory from virtual machines. This can result in increased virtual machine consolidation numbers, especially in VDI environments.
Although minimum memory increases virtual machine consolidation numbers, it also brings a challenge. If a virtual machine has a smaller amount of memory than its startup memory and it’s restarted, Hyper-V needs additional memory to restart the machine. Due to host memory pressure or the states of the virtual machines, Hyper-V may not always have additional memory available. This can cause sporadic virtual machine restart failures in customer environments. In Windows Server 2012, Hyper-V smart paging is used to bridge the memory gap between minimum and startup memory and allow virtual machines to restart reliably.
Hyper-V smart paging allows virtual machines to start reliably when the minimum memory setting has indirectly led to an insufficient amount of available physical memory during restart.
Hyper-V smart paging
As in the earlier version of Dynamic Memory, you can configure minimum memory for your virtual machines and Hyper-V continues to help ensure that this amount is assigned to running virtual machines. To provide a reliable restart experience for the virtual machines configured with less minimum memory than startup memory, Hyper-V Windows Server 2012 uses Hyper-V smart paging.
Hyper-V smart paging is a memory management technique that uses disk resources as additional, temporary memory when more memory is required to restart a virtual machine. This approach has advantages and drawbacks. It provides a reliable way to keep the virtual machines running when no physical memory is available. However, it can degrade virtual machine performance because disk access speeds are much slower than memory access speeds.
To minimize the performance impact of Hyper-V smart paging, Hyper-V uses it only when all of the following occur:
- The virtual machine is being restarted.
- No physical memory is available.
- No memory can be reclaimed from other virtual machines running on the host.
Hyper-V smart paging isn’t used when:
- A virtual machine is being started from an off state (instead of a restart).
- Oversubscribing memory for a running virtual machine would result.
- A virtual machine is failing over in Hyper-V clusters.
Internal guest paging
Hyper-V continues to rely on internal guest paging when host memory is oversubscribed because it’s more effective than Hyper-V smart paging. With internal guest paging, the paging operation inside virtual machines is performed by Windows Memory Manager. Windows Memory Manager has more information than the Hyper-V host about memory usage within the virtual machine, which means it can provide Hyper-V with better information to use when choosing the memory to be paged. Because of this, internal guest paging incurs less overhead to the system when compared to Hyper-V smart paging.
Memory ballooning
To further reduce the impact of Hyper-V smart paging, after a virtual machine completes the startup process, Hyper-V removes memory from the virtual machine, coordinating with Dynamic Memory components inside the guest (a process sometimes referred to as “ballooning”), so that the virtual machine stops using Hyper-V smart paging. With this technique, the use of Hyper-V smart paging is temporary and is not expected to be longer than 10 minutes.
Runtime configuration
Windows Server 2012 Hyper-V enables you to make the following configuration changes to Dynamic Memory when the virtual machine is running:
- Increase the maximum memory.
- Decrease the minimum memory.
Home lab setup Part 3
After Lab #1 We have our 2 physical machines and 2 virtual Domain controllers (one on each physical hosts)
VMhost10a and VMhost10b. We have them configured as follows:
- VMhost10a – physical
- IP Address: 192.168.11.5
- Subnet Mask: 225.225.225.0
- Gateway: none
- DNS1: 192.168.11.100
- DNS2: 192.168.11.110
- VMHost10B – physical, 192.168.11.10
- IP Address: 192.168.11.10
- Subnet Mask: 225.225.225.0
- Gateway: none
- DNS1: 192.168.11.100
- DNS2: 192.168.11.110
ITCAMP-DC1 and ITCAMP-DC2. We have them configured as follows:
- ITCAMP-DC1 – Virtual
- IP Address: 192.168.11.100
- Subnet Mask: 225.225.225.0
- Gateway: none
- DNS1: 192.168.11.100
- DNS2: 192.168.11.110
ITCAMP-DC2 – Virtual
- IP Address: 192.168.11.110
- Subnet Mask: 225.225.225.0
- Gateway: none
- DNS1: 192.168.11.110
- DNS2: 192.168.11.100
In this lab we will get our hands on a couple more machines that we will build and use in our scenarios.
Build our ITCAMP-SMB server
Using the VHD downloaded here (https://technet.microsoft.com/en-ca/evalcenter/hh670538.aspx) after extracting it to a temporary location, I copied it to the location I want my ITCAMP-SMB machine to be located and renamed it to ITCAMP-SMB. Once that’s done I created a new Virtual machine on VMHost10A with the following settings:
- Name: ITCAMP-SMB
- Startup Memory: 1024MB
- Network Connection : Use the same Virtual Network as the one configured for ITCAMP-DC1 and ITCAMP-DC2. In our case it’s “CorpNet”
- Use an Existing Disk: Use the disk and location we copied at the beginning of this exercise.
- everything else is default
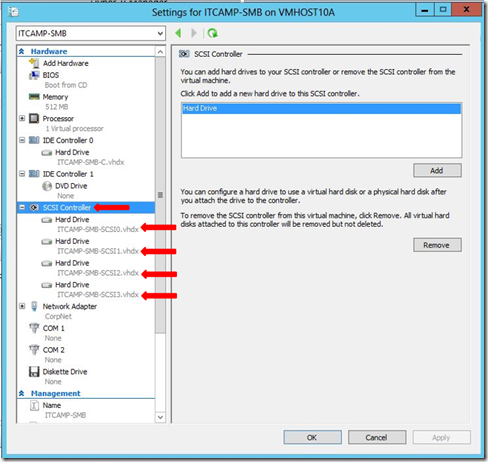
Once the machine is created, open the settings for ITCAMP-SMB and under the “SCSI Controller” add 4 disks as shown in the exhibit below:
Once it’s started, there are a few things to do for setup before we can continue with the labs.
- Rename to ITCAMP-SMB
- Join it to the ITCAMP domain.
- Set the IP address to :
- IP Address: 192.168.11.150
- Subnet Mask: 225.225.225.0
- Gateway: none
- DNS1: 192.168.11.110
- DNS2: 192.168.11.100
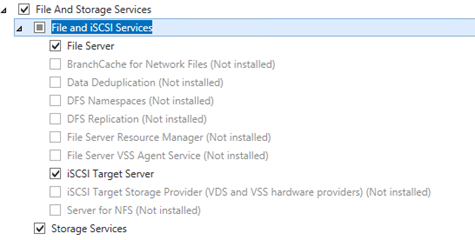
- Ensure that the following roles (and supporting features) are installed
Build ITCAMP-SCVMM
That one is a little easier. Since System Center 2012 Service Pack 1 is not out yet, you still have to download a pre-baked machine to be used as a System Center 2012 Virtual Machine manager. you can get the SCVMM machine here (https://aka.ms/SCVMM2012SP1)
Once you’ve downloaded and expanded it on VMHost10B just follow the directions included with the virtual machine.
Here is what we have at the end of the build process:
Lab #2
Lab #2 will consist in the following:
- Configure dynamic memory for ITCAMP-SMB
- Configure to auto start w/ 60 sec delay
- Add File and iSCSI Services – File Server Role to VMhost10A,
- On VMHOST10A, create share to F:\VMMLibrary
Here is the 7 minutes video on this lab.
If you have other scenarios you would like me to explore and post please leave me a comment.
As always, the easiest way to learn is to download the evaluation and start getting your hands dirty.
you can find the evaluation download here. ( https://aka.ms/ws2012eval)
Cheers!
Pierre Roman, MCITP , ITIL | IT Pro AdvisorTwitter | Facebook | LinkedIn


