Embedding live maps into SharePoint lists (Mappy mash-ups)
In my last article we looked at a quick way of including mapping information by creating a dynamic link to a live maps web page. This time we are going to be much more fancy and will look at embedding an interactive map right inside a list view.
Much of the work of this example was first done here but this article is now a little out of date. This example uses the most recent Live Maps SDK and is localised for the UK (although it will work for any location). Full details of the SDK are available here.
Building a list to work with
Firstly we need to create a list to work with. From your SharePoint site go to Create à Lists and choose the list type of Contacts. From this list you can either enter some test contacts ensuring that you enter a PostCode / Zip for each entry or you can import some of your contacts from Outlook (from the list view screen select Actions à Connect to Outlook).
Creating the page
In this example we are going to modify the default view of the list item. Open up your site in SharePoint designer and then expand the List folder and then expand the name of the list you have just created. Finally open the file DispForm.ASPX
Currently you will see the List Form Web Part. We don’t want this part for this example so we need to hide it. To hide the web part, highlight it and then in the code view change the <isVisible> tag to false.
Add a Data View Web Part
Below the hidden web part we want to add a Data View Web Part. To do this, click into some space below and then:
(1) From the menu : Data View | Insert Data View
(2) In the top right Data Source pane select your list and click “Show Data”
(3) Click on the ID field
(4) Click “Insert selected fields as...” and choose “Single Item View”
Next we want to only show the Item that the user has selected, we are going to add a filter to show only the item that matches the ID variable in the query string. To do this:
(1) Click on the data view, right click to show the Data view tasks
(2) Select "Filter"
(3) Add a new clause
(4) Field name = ID, comparison is 'Equals'
(5) Value = Create a new parameter
Name = ID
Type = Query String
Variable = ID
Default = 1
Add the Map
In your Data View Web Part, click into the left hand cell containing the text "ID" and add a Row below (right click “Insert Row Below).
Click into the empty row and switch to the code view. Insert the following HTML:
<div id="Map" style="position:relative; width:400px; height:400px; left: 0px; top: 0px;"><br /></div>
This is where our map will be contained. Next we need to include the Virtual Earth SDK. Scroll down to the end of your HTML. You will see a number of <asp:content> tags, add the following inside the first tag:
<script charset="UTF-8" type="text/javascript" src="https://dev.virtualearth.net/mapcontrol/mapcontrol.ashx?v=6.2&mkt=en-GB"></script>
Important note on localisation: The above link is localised for the UK (which means we can search on UK Postcodes). The localisation is the ‘mkt=en=GB’ portion of the query string. Please see here for the code for other countries.
Update the Stylesheet
The current Data View web part has a number of templates that are used to display the table. We don’t need them for this simple example and so we are going to replace the lot with a simple sheet.
Highlight the Data View web part and then switch to code view. Locate the start of the DVT_1 template by finding the following line.
<xsl:template name="dvt_1">
Now scroll down (lots of lines) to the end of all the templates by finding the following lines
</xsl:template>
</xsl:stylesheet></XSL>
Highlight all of the HTML and replace with this:
|
<xsl:template name="dvt_1"> <xsl:variable name="dvt_StyleName">RepForm3</xsl:variable> <script type="text/javascript"> _spBodyOnLoadFunctionNames.push('GetMap');
function GetMap() { map = new VEMap('Map'); map.LoadMap(); map.Find(null, '<xsl:value-of select="/dsQueryResponse/Rows/Row/\@WorkZip" />', null, null,null,null,true,true,true,true,AddPin); }
function AddPin() { var center = map.GetCenter(); var pin = map.AddPushpin(center); pin.SetTitle('<xsl:value-of select="/dsQueryResponse/Rows/Row/\@Company" />'); pin.SetDescription('<xsl:value-of select="/dsQueryResponse/Rows/Row/\@WorkAddress" />, <xsl:value-of select="/dsQueryResponse/Rows/Row/\@WorkCity" />'); }
</script> <table border="0" width="100%"><tr> <td width="75%" class="ms-vb"> <strong><xsl:value-of select="/dsQueryResponse/Rows/Row/\@Company" /></strong></td></tr> <tr><td width="75%" class="ms-vb" ><xsl:value-of select="/dsQueryResponse/Rows/Row/\@WorkAddress" />, <xsl:value-of select="/dsQueryResponse/Rows/Row/\@WorkCity" />, <xsl:value-of select="/dsQueryResponse/Rows/Row/\@WorkState" />, <xsl:value-of select="/dsQueryResponse/Rows/Row/\@WorkZip" /></td></tr><tr><td width="75%" class="ms-vb"><xsl:value-of select="/dsQueryResponse/Rows/Row/\@WorkPhone" />
</td></tr><tr><td width="25%" class="ms-vb"> </td><td width="75%" class="ms-vb"> </td></tr><tr><td width="25%" class="ms-vb" colspan="2" style="width: 100%"><div id="Map" style="position:relative; width:400px; height:400px; left: 0px; top: 0px;"><br /></div></td></tr></table>
</xsl:template> </xsl:stylesheet></XSL> |
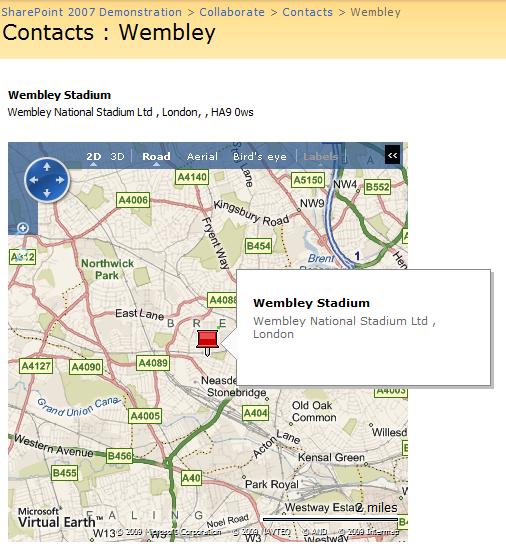
Thats it! Take a look in SharePoint and you should have a fully interactive map based on the PostCode/Zip field of your list item.
How does it Work?
At the bottom of our page we have linked into the SDK for virtual earth so we can use the mapping functions. We created a couple of JavaScript functions the first GetMap loads the map by using the value of the postcode field (and places it inside the <div> tags for our Map object). The second function AddPin places a pushpin at the postcode location and will add some details for the description from further SharePoint fields.