Adding a dynamic link to mapping information from a SharePoint List Item Field
Here is a neat trick to provide a link to a map (and weather and travel information) using a postcode field in a list item. We aren’t doing any fancy embedding here, just creating a dynamic link to the information. This technique would be perfect for any list that contains lots of addresses, in this example I am using the UK but it should work for anywhere in the world.
Setup
Firstly create a Custom SharePoint list called “Locations” that includes a field “Postcode” and add few entries into the list.
Next, open your site in SharePoint designer. Expand the Locations list and open the DisplayItem.ASPX page.
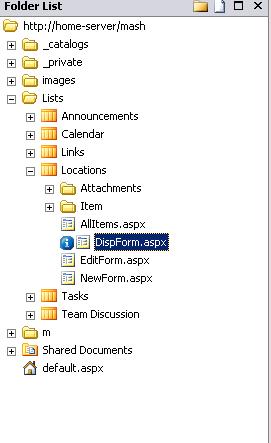
In this example we are going to change the default page that displays the list item (DispForm.ASPX).
Create the page
The DispForm.ASPX page currently contains a List Form Web Part, this item is pretty much locked down (i.e. we can’t interact with it too well). Instead we want to use the Data View Web Part which will still display the information but allows us many more options.
Important note regarding all default List view pages:DO NOT remove any web parts that are contained in these pages, if you do they will not function correctly. Instead hide any parts that you don’t want to use. |
Switch your view in SharePoint designer to “split” so that you can see both the design and code panes. Next, highlight the List View Web Part. In the code section find the following line:
<IsVisible>true</IsVisible>
And change it to:
<IsVisible>false</IsVisible>
Note, that the tag is case sensitive. This hides the component when the page is viewed (and ensures that SharePoint is happy).
Add a Data View Web Part
Directly below the List Form that we have hidden we are going to add a Data View Web Part that will display the list item.
To Add the DVWP, follow these steps:
1. From the top menu go Data View | Insert Data View
2. Click on the new Data View on your page
3. On the top right pane, go to “Data Source Library”
4. Click on the “Locations” List and select “Show Data”
5. Using Control and Click select the fields you wish to display
6. Hit the “Insert selected fields as...” and choose “Single Item View”
We now have a Data View Web Part that will display the first item in our Locations list. Next we want to ensure that the list item displayed is the Item that was selected by the user. We will do this the same way that the standard SharePoint pages do this, by using the ID parameter.
Filter the view
Hover over the Data View web part so that the On Object User interface button appears [>]. Click on the button so that the Common Data View tasks menu appears.
Follow these steps to add in the filter to show the correct list item:
1. Click on “Filter”
2. Click on the bar “Click here to add a new clause...”
3. Field name = ID
4. On the value drop down select “Create a new parameter”
5. Name = ID
6. Source = Query String
7. Query String Variable = ID
8. Default value = 1
9. OK
What did we just do? When SharePoint displays all the items in a list (using thAllItems.ASPX page) each item is identified by its ID field. When a user clicks on an item the ID field is passed in the query string to the page to display the item (DispForm.ASPX). We are filtering the Data View to show only the item that corresponds to the ID.
Add the link
Here comes the sneaky part. Adding a link to our address is very easy thanks to the good people at Live Maps. They provide a service that will receive a postcode in the query string and display the corresponding map – very cool indeed.
Firstly we want to add another row into our table where our link will appear. Click on the last row of your table that displays a field (for example “Postcode”) this should be the last row before the footer of the table. Next Right click, select Insert and then insert Row below.
Import note: It’s very important that you create the new row exactly as detailed above. The value of the Postcode is only in scope within the body of the table. If you add the row anywhere else it will be blank and the link will not work. |
You should now have a blank row below your last field. Enter the word “Map” into this row.
Follow these steps to create the Hyperlink:
1. Highlight the word “Map” , right click and select Hyperlink
2. In the Address line paste the following:
https://www.multimap.com/maps/?hloc=GB|&zoom=16
3. Hit the Parameters button.
4. Select the “hloc” parameter and hit Modify
5. In the value drop down, select your Postcode Field
The name and value will now have changed to read @postcode , make the following changes:
6. Change the name back to “hloc”
7. Edit the value to read “GB|{postcode}”
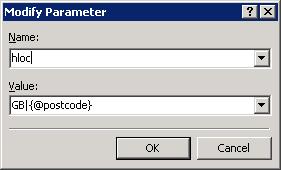
8. OK, OK
What did we just do? The Multimap website allows us to pass a postcode value as a query string variable “hloc”. We have passed the value of our postcode field as a parameter into the hyperlink.
Final thoughts and improvements
Although this has been UK example you should be able to make this work for any location and you can change the value of the Zoom parameter depending on the scale of the map you would like.
You may wish for the map to pop up in a new window, to do this you need to add a target value to the hyperlink. Locate the link HTML, it will look like this:
<a href="https://www.multimap.com/maps/?hloc=GB|{@postcode}&zoom=16" >Map</a>
Change it to:
<a href="https://www.multimap.com/maps/?hloc=GB|{@postcode}&zoom=16" target="_blank">Map</a>
If you are looking to embedd mapping within a page, take a look at this blog. I hope you enjoyed this, some more SharePoint designer articles coming soon as well as some tips and tricks around search federation.