Creating a Quiz Web application using SharePoint designer - Part 4
Welcome to part 4 where we will complete the creation of our ShowQuestion.aspx page. In this part we will add a custom list form to capture the input from the user. We are going to populate our Answers list with values taken from the user, the Questions list (as well as Query string and system variables!). We are also going customise the 'Submit' botton of our form.
Adding in our Answers custom list form
We now have our Question displaying nicely on our ShowQuestion.aspx page and we are ready to ask the user to choose their answer. We are going to use our second Web Part Zone which we named “Answers”.
This time we aren’t displaying information, rather we are asking the user for input. To achieve this we are going to use another Part, a custom list form.
The user will add a value into the Answers table (into the ChosenAnswer field) and we will also pass some of the values from the Question table into the Answers table so that we can determine if the answer is correct or not. We will also pass the query string value Session into each answer so that all the answers will form a set so we can display a final mark for the whole exam.
Firstly, let’s add in our custom list form:
· Highlight the “Answers” Web Part Zone
· From the menu select Insert | SharePoint Controls | Custom list form
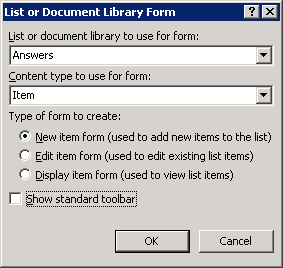
The list to use will be “Answers”, content type is “Item”. Make sure the form is set to “New Item Form” and de-select “Show Standard toolbar”
· Click “Ok”
A big and ugly form appears in our second Web Part Zone. The only field the user can change (and actually the only one we will let them see) is the AnswerGiven filed. All the others are used in the background to make the application work. Here is an explanation of how we will use them:
Field Name |
Type |
We will store the User ID in here ($UserID system variable) |
|
The user will choose either A,B, C, or D from a dropdown box |
|
We pass the correct answer from the Question DVWP into here |
|
We pass Exam title from the Title query string parameter |
|
We pass Question number from the Question query string parameter |
|
We pass Session ID from the session query string parameter |
|
When the item is saved this calculated field will become a ‘1’ if the answer given matches correct answer , otherwise it is set to zero |
So, the plan is to load the form with values that actually come from no less than four different sources: The user input, Query string values, server values and also values from another web part (the Questions DVWP). For the time being we will leave all these fields visible so we can see what is going on.
Pre-loading form fields from Query string variables
As I mentioned we are going to load three of our form fields from query string variables, title, question and session.
The first thing we need to do is define the parameters so the form can use them. To do this:
1. Click on the OOUI button  of the Custom list form web part and click on “Parameters”
2. Hit “New Parameter”
3. Name=Quiz
4. Source=Query String
5. Query string value = Title
6. Default value =*Quiz* (you don’t need to add a default value but it is useful to see it in the form)
Next the question number
1. Hit “New Parameter”
2. Name=Question
3. Source=Query String
4. Query string value = Question
5. Default value =*Question*
Then the “Of” parameter which stores the total number of questions in the Quiz. We will not be passing this value into any of the form fields but we will be using it at the end of this section.
1. Hit “New Parameter”
2. Name=Of
3. Source=Query String
4. Query string value = Of
5. Default value =*Of*
And finally the session ID
1. Hit “New Parameter”
2. Name=Session
3. Source=Query String
4. Query string value = Session
5. Default value =*Session*
We will now be able to reference these parameters in our custom list form. Here is how to load the value of a parameter into a field.
In the form find the QuestionNumber field and click on the input box. You will see a OOUI button appear, follow these steps:
1. Click on the OOUI for the input box
2. You will see the following dialog box appear
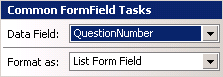
At the moment the field type is formatted as a “List Form Field” which means it cannot be manipulated. Click on the drop down selector and change to “Text Box”
This simple action is the key to opening up a lot of things you can do with forms and data views – it allows us to ASP.NET so we can create values and apply validation amongst other things.
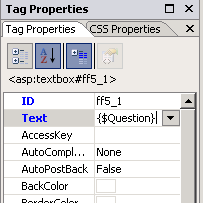
1. Click again on the input box associated with the Question Number
2. On the bottom left hand task pane (Tag Properties) find the Text Value
3. Enter the following value into the Text property {$Question}
What did we just do? Firstly we created some parameters (Question, Quiz and Session) by grabbing them from the query string. We then changed one of the fields in our form so that it was a TextBox. This allows us to pass parameter values into the field. By enclosing the text in” { }” the designer knows it’s a value and a “$” means it’s a parameter.
If you like at this point you can save your page and take a look at it in the browser. You should see the value of the Question parameter in the query string be passing into your form.
We now need to do the same with the session and Quiz parameters.
Change the format on the input boxes on the SessionID and Exam fields to be TextBox. Then, for the Text value of session add {$Session} and for the Text value of Exam add {$Quiz}.
All three query string values should now be added into your form (you can check in your browser to see them all setting there ready to go).
Pre-loading form fields from values in another web part
We now have the values from the Query string placed into our form and now we are going to load some of the fields by passing a value from the Questions data view web part.
We need to send the data we want from the Questions web part to the Answers web part. Here is how:
1. Select the OOUI of the top, Questions, web part.
2. Select “Web Part Connections...”
3. Action: Send row of data To
4. Connect to a Web part of this page
5. Target: Answers
6. Action: Get Parameters from
We have specified that we are going to send some of the fields from the Questions part in to the Answers part. We have also said that when they are sent into the Answers part, they will be available as parameters.
Scroll down the list until you see the <Create a new parameter> section.
Here is how to create our two new parameters:
1. Click on the <none> section next to the <Create a new parameter>
2. This opens the Parameters box, call the first parameter “CorrectAnswer” and click OK
Now we need to link the fields in the Questions list to our new parameters. Here is how.
1. Click on the <none> column next to the “CorrectAnswer” column that you created
2. From the dropdown select the field CorrectAnswer
Click, Next, Next then finish and we are ready to load these values into our custom list form.
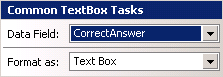
First we need to change the format of CorrectAnswer input box from a form field to Text Box. To do this click on the input box and click the OOUI button, from the format drop down, select Text Box, like this:

Secondly we need to place the parameter values into the next box fields. This is done the same way as we loaded the query string values.
Click in the CorrectAnswer text box and change the Text value (in the properties task pane on the left hand side) to {$CorrectAnswer}
What did we just do? We connected the Questions web part to the Answers web part so that we could send some of the fields across as parameters. We then loaded the values of a the passed parameter into a textbox by using {$parameter-name} as the format.
Take a look at the form in your browser and you will see all our new variables populated into our list form.
Loading a system variable (current user name) into a custom form
Finally, we have one more field that we are going to load into the form. This will be the system variable for the current user name. You will recall how we get this variable from earlier in the article, this time we are going to chop our the domain and then store it in our Title field.
This field is useful if you want to store or sort the Quiz results or answers by a particular user.
Firstly we need to add a couple of lines of code at the top of the XSL style sheet. Find the start of the style sheet for the Answers web part . You should see all the <xsl:param name=...> definitions for the parameters we have created.
Add the following lines:
<xsl:param name="UserId"></xsl:param>
<xsl:param name="UserName" select="substring-after($UserId,'\')"></xsl:param>
The first line makes the UserID system variable available. The second line created a new parameter UserName which has the domain removed.
We are now ready to load this value into the Title input field. Convert the field format from a list field type to a Text Box then load {$UserName} into the Text properly of the field.
Take one final look at your form in the browser – all our fields are now loaded into the form correctly. We are nearly there! Obviously we will hide the fields a little later but for the moment let’s think what we need to happen for this page to function as a real quiz application.
So far we have displayed the first question correctly, we now want to get the answer from the user and let them submit it. When the answer is submitted we need a few things to happen automatically:
· A new Answer list item has to be created with to store the User’s response
· The IsCorrect field to be set to a ‘1’ if the answer is correct
· We then need to display the next question OR if we have just completed the last question in the Quiz then show the final results
All of the above is actually very easy indeed thanks to SharePoint designer. In fact as our custom list form is already linked to the Answers list a new list item will automatically be created and the IsCorrect field will be populated using the formula you entered when you created the list – so the first two bullets are already completed!
In order to get full control over what happens when we submit the form we are going to build our own “Submit” button. Here is how:
1. On your current form, delete the existing “OK” and “Cancel” buttons at the top and bottom of the form
2. In the top right task pane, choose the “Toolbox” Tab
3. Scroll down to the “Form Controls” section
4. Drag a “Input (Submit)” button in to your form
We now have a new Submit button in our form, next we need to associate some actions to the form “Submit” button. Namely we want to submit the data and then redirect the page to show the next Question (or results page). Here is how:
1. Right click on the button and select “Form actions”
2. Highlight “commit” and then click “Add”
3. Highlight “Navigate to a page” and then click “Add”
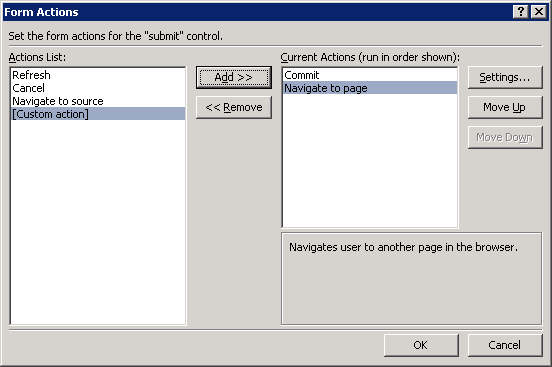
4. With “Navigate to page” highlighted, hit “Settings”
5. Hit the “Browse” button and select our ShowQuestion.aspx page
At this point our button will submit the data to the form and then redirect us back to the ShowQuestion form. That is all good but we need to display the next question rathen than returning to the current one. To do so, we need to pass on all the parameters (The quiz title, the Session and the amount of questions in the quiz) and we also need to show the next question in the Quiz by incrementing the Questions parameter.
You may have noticed a “Parameters” button available to use as part of the settings on the "Navigate to a page" action – unfortunately this is one example where try as it might, SharePoint designer can’t help us.
If you take a look the code behind the button you will see the following:
<input name="Submit1" type="submit" value="submit" onclick="javascript: {ddwrt:GenFireServerEvent('__commit;__redirect={ShowQuestion.aspx}')}"
The button is using Javascript and the redirect is a part of the string. If we let SharePoint designer try and insert our parameters they will be passed as literal values (i.e. Question will not show as ‘1’ it will show as @Question) and our query string will break.
In order to overcome this we need to get down into the code and build our string for a custom redirect.
Building a custom string to pass multiple parameters into form re-direct
We are going to build a string containing all our parameters that can be used in the JavaScript.
First locate the XSL style sheet section for the Answers section. It should look something like this:
<xsl:stylesheet
...
<xsl:param name="dvt_apos">'</xsl:param>
<xsl:param name="ListItemId">0</xsl:param>
<xsl:param name="ListID">{BF902FA5-F0D4-4A51-BA62-C08AB807F4DA}</xsl:param>
<xsl:param name="Quiz">*Quiz*</xsl:param>
<xsl:param name="Question">*Question*</xsl:param>
...
<xsl:variable name="dvt_1_automode">0</xsl:variable>
At the bottom of this section add the following lines:
<xsl:variable name="URL1"><xsl:value-of select="$Quiz"></xsl:value-of></xsl:variable>
<xsl:variable name="URL2"><xsl:value-of select="$Of"></xsl:value-of></xsl:variable>
<xsl:variable name="URL3"><xsl:value-of select="$Session"></xsl:value-of></xsl:variable>
This passes the values of our query string values into XSL variables so they can be passed into the Java script. You may have noticed that we haven’t dealt with the $Question parameter – this is because we are going to do something a little extra with this value.
We want to take the $Question query string parameter and increment the value so that when we direct our page the next question in the sequence will be displayed (remember that the Question Data View Web part is set to filter all but the current Question value).
Fortunately XSL has maths functions available so we just need to create one last XSL variable and add one to it. We need to place this variable inside the body of the form so that it is in scope. Follow these steps:
Locate the XSL template for the main body of the table, it will begin with:
<xsl:template name="dvt_1.body">
<xsl:param name="Rows"/>
...
Add the following line which increments that value of the $Question query string parameter and places the value in the XSL variable called NextQNumber
<xsl:variable name ="NextQNumber" select="$Question +1"></xsl:variable>
That is all our variables created, we can add them all together into a string so they can be used to make our submit form button re-direct to our ShowQuestions.apsx page which multiple parameters.
Build our button
To do this click on the submit button so that it’s code is highlighted. Currently it’s associated code will be:
<td width="99%" class="ms-toolbar" nowrap=""><IMG src="https://blogs.technet.com/_layouts/images/blank.gif" width="1" height="18"/><input name="Submit1" type="submit" value="submit" onclick="javascript: {ddwrt:GenFireServerEvent('__commit;__redirect={ShowQuestion.aspx}')}" /></td>
It is the __redirect= section that I have highlighted that we are interested in, we want to insert our string here so that we can pass our parameters.
Change the whole string to be as follows (I have highlighted the new section).
input name="Submit1" type="submit" value="submit" onclick="javascript: {ddwrt:GenFireServerEvent(concat('__commit;__redirect={ShowQuestion.aspx?Title=',$URL1,'&Question='
,$NextQNumber,'&Of=',$URL2,'&Session=',$URL3,'}'))}"/>
What have we done here? It looks complex (and admittedly it is a little fiddly) but actually all we have done is pass the query strings into XSL variables and use the concat function to build a string that the Javascript function is happy with.
Try testing this in your browser – you will see that when you submit the answer to a question then the next question in the quiz is automatically shown(and we have preserved all our query string variables).
By the way, take a look (in your browser) at the contents of the Answers list. You will see a new list item for each answer that has been submitted. We will tidy up this view later.
What happens when we get to the last Question?
With the code so far we can select a Quiz from our default.aspx page and then answer each question in turn.
However, currently when we run out of questions our quiz will just keep running. We want the form to re-direct to show the results when the final answer is submitted by the user. Luckily there is a nice easy way of doing this.
We will use conditional formatting to compare the current question number (stored in the query string $Question) to the number of questions in the quiz (stored in the query sting $Of ).
Here is how to do it:
1. Right click on the “Submit” button and select “Conditional formatting”
2. The Conditional formatting task pane will appear at the top right
3. Click “Create” and “Hide Content”
4. Click the “Advanced” Button
5. Enter the following expression “$Question = $Of” (without the quotes)
6. Click Ok, Ok.
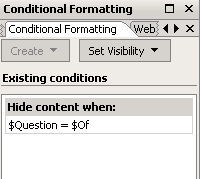
So when our $Of value is the same as our $Question value Ii.e. we are on the last question) the button will disappear!
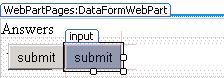
In order to get the user to see the results of the Quiz (i.e. the score and pass / fail) we want to jump to our ShowResults.aspx page when they have submitted the final answer. To do this we will add another submit button that will only appear when it is the final question in the Quiz. As far as the user is concerned it looks like the same button.
Here is how:
1. Click in the space to the right of your existing “Submit” Button
2. Located the Toolbox task pane from the tabs in the top right
3. Drag a “Input (Submit)” button to sit next to your existing button, like this
4. Create a blank results page by File | New | ASPX Page and save it as “ShowResults.Aspx”
5. Switch back to your ShowQuestion.aspx page and right click on your second button
6. Select Form actions
7. Select “Commit” and Click Add
8. Select “Navigate to a page” and click Add
9. Hit “Settings”
10. Browse to your new ShowResults.aspx page
11. Ok, Ok, Ok.
We are nearly done, we just need to add a couple of parameters to our second button. This is much more straightforward this time as the variables have already been created and we only need to pass the Quiz and Session values across this time as we no longer care about the question number.
Click on your second button so that the code is highlighted and change the following string from
<input name="Submit2" type="submit" value="submit" onclick="javascript: {ddwrt:GenFireServerEvent('__commit;__redirect={ShowResults.aspx}')}" /></td>
To this
<input name="Submit2" type="submit" value="submit" onclick="javascript: {ddwrt:GenFireServerEvent(concat('__commit
;__redirect={ShowResults.aspx?Title=',$URL1,'&Session=',$URL3,'}'))}" />
The above change passes the Quiz Title and the Session parameters to our ShowResults.ASPX page. Finally we only want this button to show on the last question in the Quiz (and when the other button is hidden). To do this we need to add another conditional formatting clause. I’m sure you can guess how this will look:
1. Right click on your second button and select “Conditional formatting”
2. In the top right task pane, select “Create” and “Hide content”
3. Enter “$Question != $Of”
4. Ok, Ok.
(The above clause says hide the second button if the Question isn’t the last question in the Quiz)
Congratulations – all the hard work is now done! Have a play around in the browser to make sure everything works correctly. You should be able to choose a Quiz, complete all the questions and then be re-directly to the current blank ShowResults.aspx page.
A note about formatting
Although (hopefully!) you page works beautifully it’s not currently the best looking web page in the world.
One step you will almost certainly want for your to have your new page inherit the design of your master page. To do this, from the top menu simply go Format | Master Page | Attach Master page
There – looking better already! Save everything (and I would recommend saving a backup of all your pages too) and then play around with making the page look exactly how you would like it.