Creating a Quiz Web application using SharePoint designer - Part 2
Welcome to Part two of this article. In part one we created the three lists that our application will use. In this part we we are going to build a page which shows a list of the available Quizzes and allows the user to click on one of them and begin the quiz.
We will use the Data View Web Part (DVWP) and
work with paramters and system variables. Will will also be building a customised hyperlink to pass query string varibles to another web page depending on the user selection.
Modifying Defult.aspx (the page to list our available Quizzes)
We will use our default.aspx page as the page to display our available Quizzes. Open the defult.aspx page in SharePoint designer. I would recommend you switch the view to 'Split' - that way you can see the code and the design which makes for a great way of seeing the code as it is being created.
Inserting our Data View
Our default page will contain a single Data View Web Part that lists all the available Quizzes and provide a hyperlink for each to begin the Quiz. Effectively we are just listing all the list items contained in the Quiz list.
Follow these steps to insert the Data View Web part:
1. Select the area on the page where you want to insert the view (there may a “click here to insert a Web Part” showing on the screen already)
2. On the top menu go Data View | Insert Data View
3. In the top right task pane, select the Data Source Library tab
4. Select the Quiz list and select Show Data
You can now see a list of all the available data fields that you created (and some system created) in the Quiz list.
5. Using Control & Click select: Title, Description, Pass Mark and NumberOfQuestions
6. Click “Insert selected Feilds as...” button ( just above the list of fields ” and choose “Multiple item view”
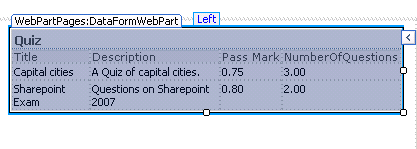
This gives us a DVWP showing all our available Quizzes.
What is an OOUI?
You will notice if you click on a table area or entry you get a  button – this has the friendly title of a On Object User Interface (OOUI) but is actually an incredibly useful helper in everything you want to do in SharePoint.
For example, to change the Pass Mark cells to show as formatted percentage values, click on the first value and then click the button. If you then select “Number formatting options” you can select “Percentage %”.
The Data View Web Part has its own mega-OOUI at the top right of the table which allows you to control all its functions (we will get right into this later).
Grabbing System Variables
In this application we are going to require the name of the currently logged in user and also the current system time and date. Both these variables are system variables and can be easily accessed in SharePoint. Most of the work is already done for us as they are actually almost available. Switch to the code view and find the <ParameterBindings> section near the top of the page.
You should see something like this:
<ParameterBinding Name="UserID" Location="CAMLVariable" DefaultValue="CurrentUserName"/>
<ParameterBinding Name="Today" Location="CAMLVariable" DefaultValue="CurrentDate"/>
UserID and CurrentTime are already there for us to use. We just need to add a couple of extra lines so that we can use them in our form.
Click on the DVWP so that the whole part is highlighted, in the code view all of the associated code should also be highlighted. Towards the top of the highlighted code you will a line containing the following:
<xsl:param name = “dvp_apos”>'</xsl:param>
Directly below this add the following two lines
<param name = "UserID">
<param name = "Today">
Note: We are using XSLT here which is case-sensitive! (There is much more on XSLT to come later).
This makes the current user information (for example ‘DOMAIN\Username) available to use and also the current date and time both passed as parameters into the form. These are pretty useful for lots of application work.
Creating a Unique session ID
The Answers list will contain every answer given for every exam for each time it is taken. When a new Quiz is started by clicking its title off the default.aspx page we want to create a unique identifier for the set of answers. This session ID will allow us to group together the answers.
I tried a few options and decided on adding the current date and time together with the Username to form a string. Although this isn’t a true GUID it should work well as an identifier for our needs.
We already have the UserID and Today parameters available to us so all we need to do is to create another parameter to store our Session Parameter.
Add the following line directly below the other two lines you just added:
<xsl:param name="Session" select="concat($Today,substring-after($UserID,'\'))"></xsl:param>
Let’s break down the line below:
Section |
Explaination |
xsl:param name="Session” |
In our XSL style sheet, create a new Variable called session. This can be referenced by calling $Session |
Concat( |
Concatenate (join) two strings to form a single string. |
$Today |
The current time and date parameter stored as $Today |
substring-after($UserID,'\') |
The substring-after function chops the $UserID variable at the ‘\’ which removes the domain name from the $UserID string. |
Our session variable will end up looking something like this ‘2009-04-06T05:13:05ZUserName’
Creating a custom Hyperlink with parameters
We have now created our Session parameter and we are ready to create our hyperlink that will initiate the quiz.
Before we create the link let’s quickly create the new ASPX page that we are going to link to:
- From the main menu select File | New and choose ASPX page.
- Then File | Save As and save the page as “ShowQuestion.aspx”
- Close the page
We are going to create our hyperlink linked to the title of each quiz in the list, and we are going to pass the following variables via a query string into the ShowQuestion.aspx page:
Paramter |
Description |
Title |
Exam Title |
Question |
The number of the question to display |
Of |
The total number of questions in the quiz |
Session |
Unique session ID for the attempt at the quiz |
Here are the steps to create our hand-built hyperlink with parameters:
1. Click on the title of the Quiz in your Data view Web Part table
2. Click of OOUI button
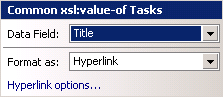
3. Change the Format as: to Hyperlink
4. Select Hyperlink options
1. For the Address: Browse to our newly created ShowQuestion.aspx page
2. Hit the Parameters button
3. Hit the Add Button
The Add Parameter box will pop up asking for a name and value. To add our “Title” parameter give the name as “Title” and then scroll down the list of values and find the Title field like this:
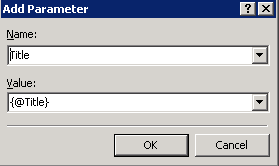
Important note: Check that SharePoint designer hasn’t added a @ at the start of the name of your parameter – if it has just delete it so that the name is “Title”.
To add our “Question” parameter, click add again. This time give the title as “Question” and type the value as “1” (without the quotes).
Then Add our “Of” parameter (which is the total number of questions) by giving the title as “Of” and the selecting the value from the drop down list as “NumbeOfQuestions”)
Our final parameter is the Session ID we created earlier, although this isn’t available from the drop down list we can still reference it. Hit add one more time and give the title as “Session”. For the value enter {$Session}
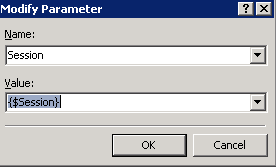
SharePoint Designer knows that anything enclosed in {} is a system field. A “$” means a parameter and “@” maps to a node variable. We will be getting lots of practice in using {$variables} on our next ASPX page!
You should now have all your parameters added and the screen will look like this:
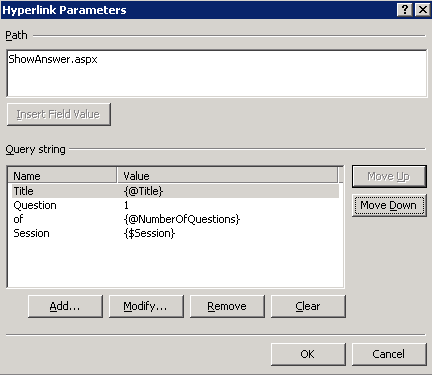
What did we just do? We have added a number of paramters to our hyperlink which will be added at the end of the link as a query string. The Title variable was assigned to a node value, identified as {@Title}. The Question number was set to equal '1' as we always want to start with the first question. The Of value was set to
the node value of the NumberOfQuestion. Finally the Session value was assigned the value of a paramter, idenfitied by {$parameter-name}.
If you save your default.aspx and then view it in your website when you hover of the title of an exam you should now be able to see your link. If you click the link you will be taken to our blank ShowQuestion.aspx page and you can see all four variables have been passed across in the query string.
In part three of this article we will build the ShowQuestion.ASPX page which will show each Question and get an answer from the user (and mark the question).