Office 365 Admin Primer for IT Pros
I’ve had the pleasure of taking part in a number of technology panels recently on the impact of “The Cloud” on the career of the IT Pro. The topic of “The Cloud” threatening the career of IT Pros is a common discussion topic at these events, and a common point that I use to refute these fears is the upcoming launch of Office 365. What is Office 365 you ask? I did a blog post on this a while back to give you some basics which can be found at the link above, and I also did a number of TechNet Events where I did a session on Office 365, the slide deck on that can be found here. I’m currently putting together a screencast of the Office 365 session I delivered at the TechNet event series, so be sure to check back soon for that.
If you’re an IT Pro and you’ve got an understanding of what Office 365 offers, its important to remind you that Exchange 2010, SharePoint 2010 and Lync don’t automatically configure their feature sets to your company’s needs, nor do they automagically adjust based on the changes in your company over time, so don’t go contemplating that career change just yet. If you’re one of the many millions of customers running one or more of these enterprise applications from Microsoft (Exchange, SharePoint, or Lync), Office 365 provides the IT Pro a number of different ways to setup, architect, configure and administer these services in the cloud. Multiple ways to do my job? In the cloud? Really? Do tell!! I like to call it admin your way…
GUI
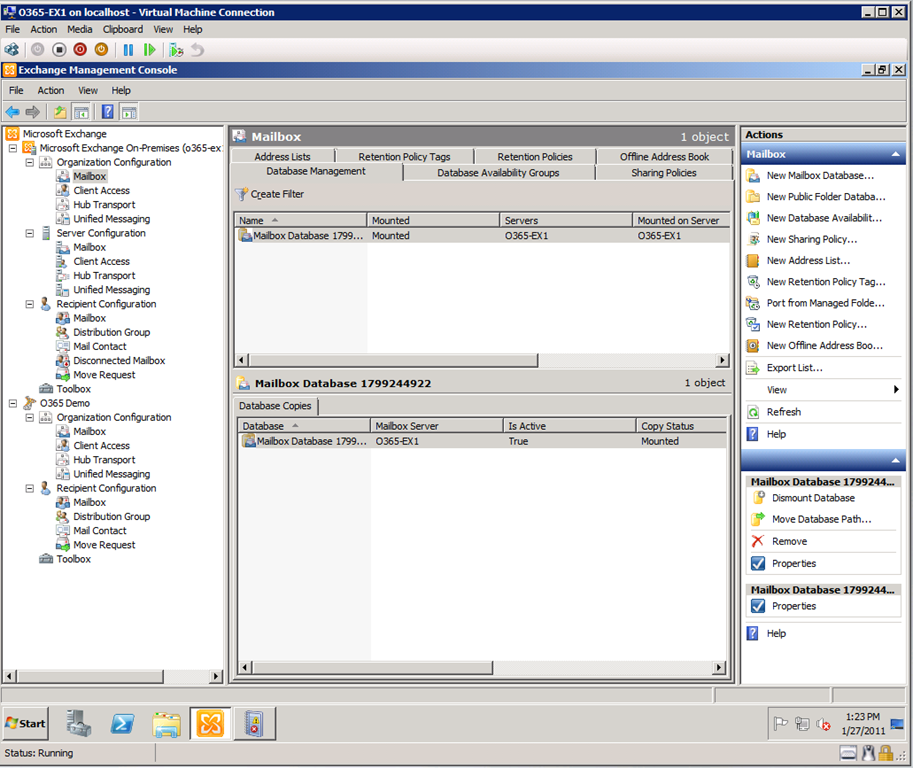
Well, first off, if you’re a regular IT Pro/Architect like myself you appreciate and have become accustomed to the admin tools that come with these products for interfacing with and architecting/configuring/administering the application you’re familiar with. Moving an application to the cloud like Exchange does not change your ability to use the Exchange Management Console (EMC) to do your job because Exchange 2010 allows the two to work together simultaneously and seamlessly. Exchange 2010 is the first-of-its-kind application that I’m aware of that from the same management console the admin can administer both an on-premise instance and a cloud-based instance as a single entity. Essentially what you get is an on-premise Exchange org and an Exchange Online org as part of an Office 365 tenant that is managed and administered as a single org. See the screen capture below:
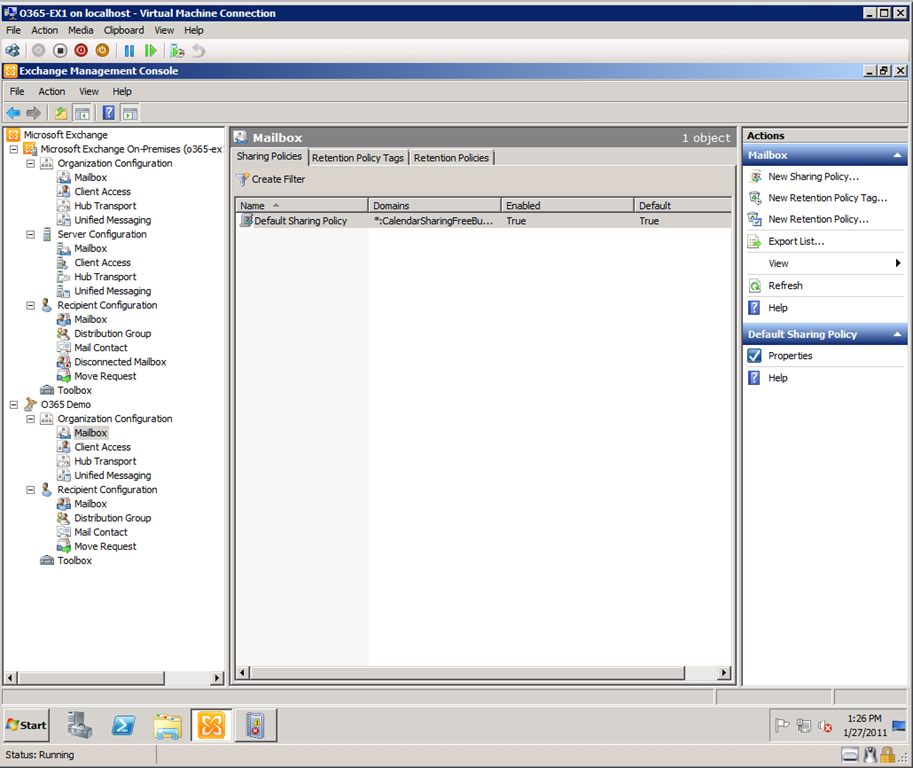
You will notice down the left-hand pane in the navigation tree that you can see both the on-premise Exchange org and further down the tree you can see the Office 365 Demo Exchange tenant. Just like you are running the Exchange environment totally on-premises, you can click through the various sections of the Exchange Management Console for the Office 365 Exchange tenant and setup/configure Exchange like you would as if it was on premise. There are some differences between what you will see in the Exchange Management Console between the on-premise Exchange environment and the Office 365 Exchange environment, namely where the Office 365 environment is already doing that part for you. For example, you may have already noticed in the screenshot above that there is no “Server Configuration” sub tree under the Office 365 demo. The reason for that? Office 365 manages the servers for you, so there are no options for the admin to configure there. What other differences are there? Well, it depends on where you are in the Exchange Management Console. For example, you’ll notice in the picture above that there are seven tabs available in the on-premise Exchange 2010 environment when I click on the Mailbox options of the Organization Configuration with several Actions available in the Action pane. When I click on the same Mailbox options of the Organization Configuration in the Office 365 tenant, I only have three tabs available with only a few Actions available. See the picture below:
Pretty cool that I can use the same Exchange Management Console with Office 365. IT Pro’s are starting to relax a bit, but I’m not nearly done yet.
PowerShell
What other admin options are available in Office 365? Well, I’m happy to report that in addition to the regular admin GUI, you can also use Remote PowerShell to do your administration in Office 365. Now I admit that I prefer to use the Exchange Management Console GUI when possible to do my usual administration and configuration of Exchange, but I’m also wary enough to have used PowerShell to perform some of the more complex tasks of Exchange administration as well as using PowerShell to automate many of the routine tasks that I have to perform over and over again.
So how does this work – connecting your local machine to a remote Office 365 environment and executing PowerShell commands against it? Well it all starts with installing Windows PowerShell and Windows Remote Management (WinRM) on your computer. Once these have been installed, you connect the Windows PowerShell of your local computer to the Office 365 tenant where you can do your administration. There’s a good step-by-step walkthrough of these steps here that can guide you through these to get going.
OK, so I’ve got this set up, what can I do to the Office 365 environment? Well, here’s an excerpt of commands that can be done against the Office 365 Exchange environment:

For a full listing of PowerShell Cmdlets currently available to Exchange Online Administrators, feel free to check out the help article located here. More importantly, it’s great to know for those of you command-line and PowerShell guru’s that you don’t have to go back to the GUI or use a Web console to perform administrative tasks in Office 365. Did you say web console?
Web
Last but not least, your ability to administer Office 365 can also be done via the Office 365 Web Console. So I guess it’s not a surprise to anyone that an administrator has the ability to do administration of a cloud-based service like Office 365 using a web-based console. What might be surprising is what I covered in the last two sections, and that is the web-based console isn’t the only way to do it! Let’s cover some of the admin options available using the Web Console.
While the first two sections of this post I’ve focused primarily on Exchange Administration, for the Web Administration portion I’ll focus on actually getting your Active Directory Accounts into the cloud and point out how the Office 365 Admin Console helps get this done. First off, a picture of what the Office 365 web console looks like:

You should be able to see quickly that this admin console is much more than a tool to perform administration, but it is also a great admin resource to point you to the many resources available on Office 365 and can walk you through these many tasks. You can see right from the home page above there are a number of admin shortcuts that immediately show the novice admin how to perform some of the more rudimentary and common tasks in Office 365. At the top of the left hand pane there’s also links to step-by-step setup of the Office 365 environment as a whole. When I click on the Overview Link of the Setup section, it brings me to a page that outlines numerous articles on how to set up Single Sign-on, Active Directory Synchronization and much more:

This is indeed a very useful Web console as it is designed to put relevant admin information directly in the admin console so you don’t have to leave the tool to get the information you’re looking for to perform the task.
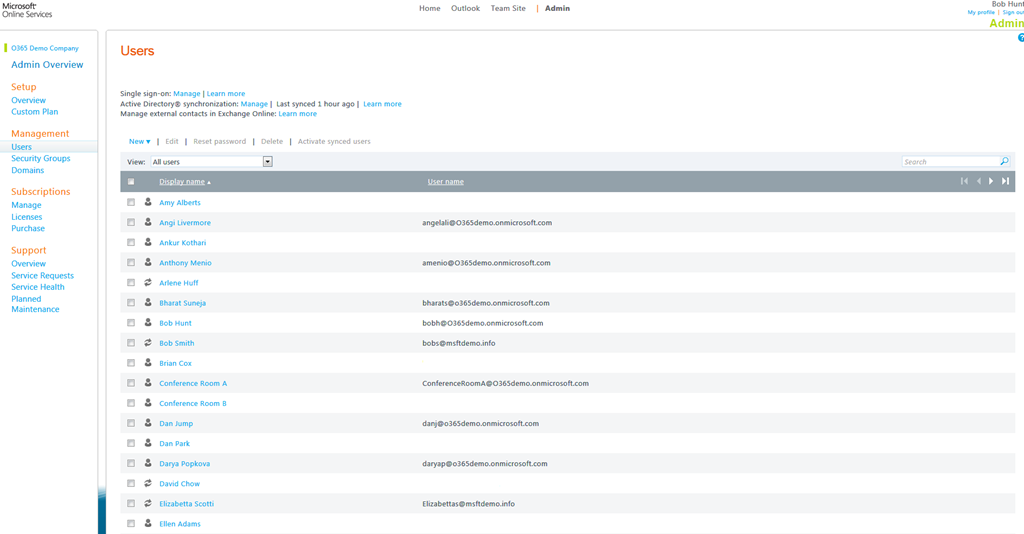
Back on the home page of the Admin section, Administration of each of the Office 365 services (Exchange, SharePoint, and Lync) are available, but maybe more importantly is Active Directory User Administration. You’ll notice on the left-hand pane of the admin console that Management of Users, Security Groups and Domains are prominently displayed on the home page. When you click on Users under the Management section, you’ll see the User Management page where a number of common tasks can be performed like Password Resets and so on, but interestingly you’ll see two different types of users listed, both Live ID users and users synced from the Active Directory. Users with a Live ID account have a “pawn” or figurehead head and bust picture next to the account name where the users synchronized with the Active Directory can be identified by the two arrows pointing in a circle next to the users name. See the picture below:
Very cool, on-premise Active Directory that I can use for Single Sign-on with Office 365. On premise Active Directory? Who’s gonna run that and set that up? Huh, well I guess the IT Pro’s job isn’t in danger of going to the cloud after all…