Troubleshooting UAG installation and update problems
An unpleasant situation is when you’re trying to install a product or an update, and get some error message and a failed installation. If this is on a brand new installation, it could be frustrating, because you didn’t even get a chance to cause any problem, right?
One challenge with a failed install is that it doesn’t always tell you what’s the cause of the problem. In such a case, you might have no choice but to read through the installer log and look for clues. Beyond the challenge in sifting through thousands of lines of data, often times, the error you see is a bland and seemingly-meaningless 1603. Error 1603 is a generic MSI error, which indeed rarely means anything by itself. Before we delve into that, let’s review a few guidelines that should eliminate most problems.
1. No DCs, please. If you are trying to install UAG on a Domain Controller, that’s not going to work.
2. Admins only, please. If the computer is a domain member, make sure you have logged on to the computer as a user who is a domain administrator. Do not use the local administrator.
3. If the user you are using to install has been customized, and is not really a domain admin, that could cause a problem. Use only full domain admins for this.
4. If the computer has already been installed with a previous version of SQL, UAG or TMG, it’s almost guaranteed to fail the installation. Even if everything was properly uninstalled, there are often remnants which would trip the installer. With proper cleanup, you might be able to get through this, but we strongly recommend installing UAG on a computer that’s a brand-new installation, with nothing else installed except Windows updates and drivers.
5. Avoid installing the product from a network share, or non-reliable source. Copy the files to the local hard drive, or use a removable media.
6. If you are expanding or mounting an ISO image, make sure that when you extract or mount it, the file name doesn’t get damaged. Some extraction utilities will convert file names to the old DOS 8.3 format, and that will certainly disrupt things
7. If you downloaded your installer from the web as an ISO image, make sure it’s the correct file. The current version of UAG (With SP1 integrated) comes as an ISO file named X17-16677.ISO. Its CRC value is 0x38FF8D2D and SHA1 value is 339B81FB28DAD8210B47178AF61220D4CA9105C3. If unsure, you can check the CRC and SHA1 of the file you have with a tool such as Marxio-FCV (https://www.marxio-tools.net/download/Marxio-FCV.exe) and compare it to the values I quoted here.
8. Make sure no other setup process is running during the installation. For example, if you’re RDPing into the server, another user might be logged-in and running something else.
9. If your domain has Group Policies enabled, make sure you exclude the server from any and all policies, and then reboot it to make sure it’s been cleaned of everything. Not all GPOs are bad, but most GPOs are there for security, and the settings they include are there to ‘harden’ the machine…which often conflicts with the things the installation has to do.
10. If you are using an OS that’s based on a custom corporate installation image, as opposed to a vanilla DVD install, that’s a potential problem. For example, the custom image might have some services disabled or customized, or other settings which could conflict. We recommend using a system that’s as clean as possible.
11. Specifically, if there are any Windows services that have been changed from the default (STOPPED, or set to DISABLED), reverse those changes for the purpose of the installation.
12. If you have performed any other hardening on the server, either manually or automatically, examine your steps, to make sure they won’t cause a problem. Something that may seem benign, like disabling the IPv6 stack on the Network Cards, could be a problem for UAG.
If what you’re trying to do is upgrade or update UAG to a later version, and having problems, there are other things to look into.
1. If you have installed a private fix for UAG or TMG on the server, or you are running a trial or pre-release version of any of the products, this is very likely to fail the update process. You should remove any private fixes, if possible. Pre-release or trial versions cannot be upgraded to a full one, so you’ll have to backup your configuration, rebuild the server, and import the configuration.
2. Installing an update over the network is highly discouraged. Copy the file locally, or install from a removable media.
3. If you have downloaded the update from the internet, we recommend downloading it again, and comparing the two. I cannot list all the CRC values of all the drops, but you can calculate it for the two downloads and compare. If there’s any variation, then your internet connection may be unstable. In that case, download the package a few more times, until you have at least two identical copies.
4. If your server is currently in production, and users are connecting to it, try blocking their access temporarily and then rebooting the server before doing the installation. This could be done on your external router or switch (but avoid pulling out the cable, because that would put the external NIC in a “disconnected” state, which could cause other problems). The reason for this is that If the server is very busy, the UAG, TMG and IIS services may be less responsive than expected, tripping the installation
5. If you have customized your server by putting custom files in one or more CustomUpdate folder, this could cause a problem as well, as the installer first backs up the configuration from these folders. In fact, if you’ve ever had errors or problems during the backup process (which is done as part of the Activation process), that’s a sure thing to kill the upgrade/update process as well.
6. The installer of an update may require the source install of previously installed updates. Normally, these will be stored on the server automatically, but if you cleaned up the MSI folders intentionally, it’s going to be a problem. In such a case, it might be possible to provide the server with the files it needs manually, but that’s complicated and beyond the scope of this guide. Consult with Microsoft support, and consider that you might have no choice than rebuilding the server if the installer configuration has been damaged enough.
7. If the installation process takes a very long time (because the server is slow, busy or because your configuration is very complex), there are some timeouts in the installer that might lead to a failure. In such a case, try speeding up the server. As suggested in step 4, disconnecting it from the network could help, or any other standard speed-up tricks (cleaning the hard drive, stopping AV scanners etc).
If you’ve checked all the above, and it still fails, then your next step is to examine the UAG installation logs, which will be stored in the %ProgramData%\Microsoft\UAG\Logs folder on the server. If you are installing an update, then it might not store any logs, so in that case, run it with the extra verbose options. For example:
Then, open the resulting log, and look for the string “value 3”. Don’t be tempted to look for the classic keywords “fail” or “error”…you’re bound to find plenty of those, and most will be irrelevant or false positives, and so won’t tell you much. It almost all cases, the problem would show up shortly before Value 3. For example:
Here we see value 3 at the bottom, and a few lines above it a call to InstallUtil.exe. Shortly afterward, it says “setup failed while registering Forefront TMG managed performance monitoring”. In this case, the installer creates additional logs as part of running the InstallUtil (under c:\windows\temp, as you can see from line 2). Reading through these logs was necessary, and it turned out that the performance monitor on the computer was damaged, and the installer could not install the counters for TMG on the system. In other situations, you might need to read through the TMG installation logs too. For example, if you’re installing UAG itself, it installs TMG and that might be the cause of the problem. Another variation of this is installing UAG SP1, which automatically installs TMG SP1. If there’s a problem with the installation of TMG SP1, TMGs logs might reveal the reason. You can find the logs at %windir%\Temp
Unattended MSI installs
Sometimes, the MSI install runs without the user’s intervention. For example, when the install is triggers by another installer (such as how TMG is installed by UAG) or by the Windows OS (such as when uninstalling an Update to UAG). For these situations, MSI has a special registry flag that sets it to extra-verbose logging for all installs. To configure it:
- On the UAG, Open RegEdit and navigate to HKEY_LOCAL_MACHINE\Software\Policies\Microsoft\Windows\Installer
- Create a new key of type REG_SZ and name it Logging
- Set the value of the key to voicewarmupx
- Clear the temp folder (START>>RUN>>%temp%)
- Perform the action that involved the install or uninstall that is causing a problem
- The extra-verbose log should be created in the Temp folder (log file name beginning with MSI).
Install source missing?
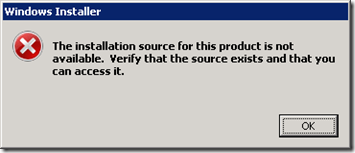
When you install something on a Windows server, the MSI engine stores the installation path, which is used in case the product needs to be uninstalled or changed. When installing something, it’s important to perform the install from a local source (local drive) and leave the original installer in place, but often times, people delete the source to save space, or perform the install from a network share which may become unavailable. In such a situation, the MSI install may fail for any change to the product (reinstall, uninstall or installation of an update), with an error such as this:
Sometimes, it would show a dialog allowing you to point it to the correct location of the installer, but not always. In such a case, it’s possible to edit the stored install path from the registry, as described here. For TMG and UAG, the source is here:
UAG: HKEY classes root\installer\products\E85EC0B9221C4BC4081C15D414260CC7\SourceList\
TMG: HKEY classes root\installer\products\664ACBEAC98430E46B768CD9DCE5FF42\SourceList\
It should also list the actual file that was used and that the installer is looking for. For example:
Configuration wiped?
This is pretty rare, but occasionally, you might find that after completing the installation, your configuration is suddenly cleared. This sounds unnerving, but it’s actually not a big problem. If you installed an update and find yourself with a seemingly blank server, all you have to do is restore the configuration from a backup. UAG actually backs up the configuration before it starts the update, so you should have it even if you didn’t mean to. The only problem is that the upgrade to UAG will have a new Schema version, so the old backup cannot be simply restored.
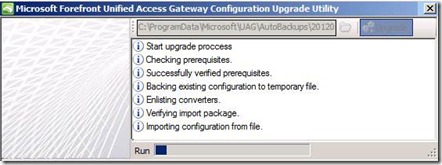
In such a case, UAG comes with a utility that can upgrade an old backup to the current Schema. To perform this, follow these steps:
1. Launch the utility C:\Program Files\Microsoft Forefront Unified Access Gateway\common\bin\UAGSchemeUpgradeUtil.exe
2. Browse and select the last backup
3. Upgrade the backup
4. Use the Import function in the UAG console to restore your backup
5. Activate the configuration


